| Previous Page |
PCLinuxOS Magazine |
PCLinuxOS |
Article List |
Disclaimer |
Next Page |
Two New PDF Scripts (With GUI) To Put In Your Toolbox |
|
by Paul Arnote (parnote)
Why, you might ask? Well, primarily because every time I use one of the command line tools, I’m scrambling around like a chicken trying to get his/her fair share of scratch grains, as I try to remember the command line options for each tool to get what I’m after. After a while, it becomes tiring, which makes reaching for a GUI tool all that more tempting. That main GUI tool I usually reach for is Master PDF Editor. The best way to think of Master PDF Editor is as a word processor whose default output is PDF files. Plus, it also allows you to edit most PDF files to replace images or text, and then output those changes back to a PDF file. Don’t get me wrong … it’s a mighty powerful program that excels at its job. But sometimes, it’s overkill, and sometimes too slow. It’s not slow in the sense that the program runs slow. But let’s set the scenario. Let’s say I need to access the images in a PDF file. As in, all of them. I can load the PDF into Master PDF Editor, and save each image in the file, one at a time. That can easily take over 30 minutes to do. In the end, I have the images I need, but I’m left with a feeling that there has to be a faster, less labor-intensive way to grab those images. Thankfully, there is. In the April 2026 issue of The PCLinuxOS Magazine, we reprinted a tip from kalwisti in the Tip Top Tips column. Kalwisti posted a “teaser” of his tips in the forum, and linked to a PDF document he created for the full tip. So, to reprint it in the April 2026 issue, we needed to be able to access the text and images in the PDF (his format wasn’t compatible with the process we use to lay out the magazine). So, I loaded the PDF into Master PDF Editor, and proceeded to click on and save each individual image … 16 times. That took about 15–20 minutes to do. And that’s when I started thinking “there has to be a faster, easier way” to grab those images. That’s when I remembered the command line PDF tools I have amassed (they are all installed from the PCLinuxOS repository). When I looked at the tools and their command line options, I realized that they were ripe for creating a custom script. Of course, I made sure that the custom script has GUI elements, provided courtesy of Zenity. I’m sure I could have written an email to kalwisti, and just as certain he would have sent them to me in very short order. But, why bother kalwisti if I didn’t have to? That set me off on a journey to create the bash script. Once I had a preliminary working version of my script, I also made a second one to grab all the text elements from a PDF file, as well.
The first script I came up with extracts all of the images from a PDF file. I call it PIE, short for PDF Image Extractor. As with many of the custom bash scripts I write, this one can be run either as a standalone script from the command line, or it can be used as a Thunar Custom Action (just in case you didn’t know, I’m a HUGE Xfce fan). You can also type the script in by hand, or you can download the scripts from the magazine server. When you do, save the file(s) to the directory where you store all of your scripts. Then, remove the “.txt” file extension, and make the script executable. You can download PIE from here, if you wish. The entire script is 2.0 KiB in file size, so it should also download in the literal blink of an eye. Hopefully, the directory where you store your scripts is also in your $PATH statement. That way, you only need to enter the script name, followed by any command line parameters. If the directory where you store your scripts is NOT in your $PATH statement, you will need to use the full path to the script, the script name, and any command line parameters it takes. As you can see, having your scripts stored in a directory that is also in your $PATH statement can make life a LOT simpler. Before we begin dissecting the script, let’s take a look at the entire script.
As with all bash scripts, the first line is the “shebang” that gets everything started. Lines 3 through 15 are merely comment lines, outlining (briefly) what the script does, its release terms (GPL v2.0), and some brief usage notes. 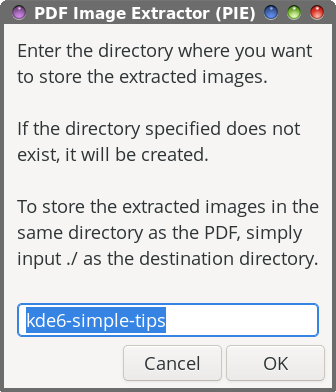 In line 17, the entire filename of the input file is changed to all lowercase, and then we set a “global” variable (DFLT) (line 18) to hold the base filename of the PDF we’re extracting images from (which defaults to the same filename as the PDF, but with the PDF file extension removed, and the entire filename changed to lowercase). Line 20 sets up the first Zenity dialog box. Within that box, we give the end user some brief instructions on what to do, set the width and height of the Zenity dialog box, and set a default subdirectory to store the extracted images in (--entry-text=$DFLT). Of course, the user can override that suggestion just by typing in a different directory name. Unless you know a PDF file doesn’t contain a lot of images, storing them in the same directory as the PDF shouldn’t be too much of a problem. But if a PDF has a lot of images in it (during testing, I extracted the images from the March 2026 issue of The PCLinuxOS Magazine … all 262 of them; Meemaw extracted images from another PDF magazine, and ended up with over 1,400 images), you’ll stay much more organized by extracting the images to a subdirectory of the directory that contains the PDF file you want to extract images from. Hey … we might as well try to stay neat and tidy here! Of course, you don’t have to accept the default value (that’s already filled in for you). You’re free to use any directory name you wish. Just keep in mind that whatever you decide to call the directory, it will be set up as a subdirectory of the directory that contains the PDF you’re trying to extract images from. 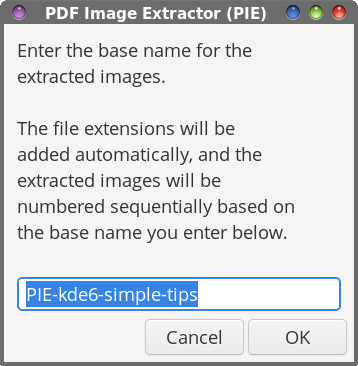 Lines 21 through 23 allow the script to exit “gracefully” if the user hits the “Cancel” button in the dialog box. Lines 25 through 29 check to see if the desired directory to put the images in already exists, and if it doesn’t, it creates the directory. In line 31, we invoke our second Zenity dialog box, asking the end user to specify a “base” name for the extracted image files. The text entry value “defaults” to PIE-<default-base-name>. That means, all of your images will start with PIE-<base-name>, with sequential numbers appended to the end of the filename. By using this image naming convention, we’re able to keep all of the images grouped together. And, just as with the directory dialog box, you’re free to enter whatever base name you want. Accepting the “default” value just makes things easier, in my opinion. 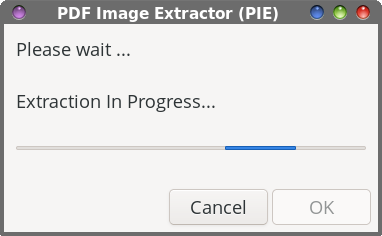 Just as before, lines 32 through 34 allow the script to exit “gracefully” if the user should click on the “Cancel” button in the Zenity dialog box. The “heavy lifting” for the extraction of the images from the PDF file happens in line 36. The pdfimages command is the command line tool that’s responsible for extracting the images. The -all parameter tells pdfimages to extract all of the image formats it recognizes. With the ./$DIR”/”$BASE parameter, we’re telling pdfimages what directory/subdirectory to save the images to. We then pipe that command to a Zenity progress dialog box with a pulsating progress bar, so we know that the script is still working. In line 38, we issue the cd command, just to be sure we keep the script in our current working directory. Lines 40 through 44 set the formatting for displaying the location where the extracted images are saved to in what I call the “confirmation” dialog box that signals that the task has been completed. In line 46, we count how many files have been extracted from the PDF, so we can display it in the confirmation dialog box. 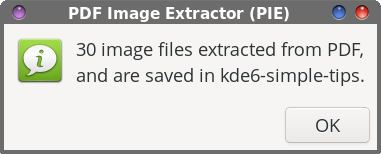 Line 47 sets up a Zenity “Information” dialog box that is displayed when the task is complete. It tells you how many image files were extracted, and where they were stored. The exit 0 command in line 49 allows the script to exit gracefully.
The script, as I mentioned earlier, can be run as a standalone script from the command line, or as a Thunar Custom Action. I have no doubt that other file managers can also add the script to their context menus, such as Dolphin and Caja, but that is beyond the scope of this article (and beyond my current skill set, since I only ever run Xfce). To run it as a standalone script from the command line, the script only takes one command line argument. That is the name of the PDF file you want to extract images from. When running the script from a terminal session, it will help keep you properly oriented by using the cd command to move to the directory that contains the PDF you want to extract images from, and then running it from there. Then, it’s just a matter of following the prompts from the Zenity dialog boxes to input the necessary data it needs to complete its task. 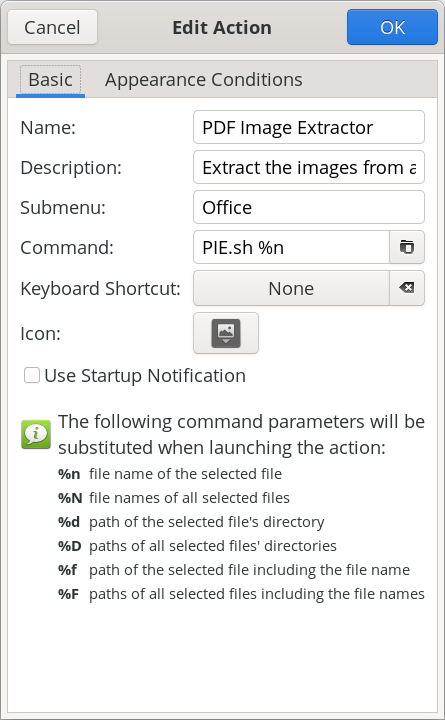 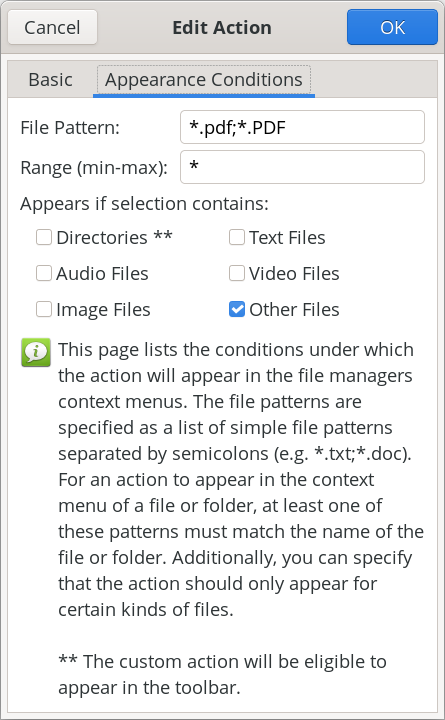 To set up the script as a Thunar Custom Action, make your custom action dialogs resemble those shown above. In the image on the left (showing the “Basic” tab), fill in the “Name” field (PDF Image Extractor), the “Description” field (Extract the images from a PDF file), the “Submenu” field (if you use one … I have mine located in an “Office” submenu), and the “Command” field (PIE.sh %n). In the “Appearance Conditions” tab, set the “File Pattern” (*.pdf;*.PDF), leave the “Range” field set to its default value of “*”, and place a check in the box next to “Other Files.” Once you have those all filled in, save it by clicking on the “OK” button. Keep in mind that the directory containing my scripts (/home/parnote/bin) IS in my $PATH statement, meaning I can call the script directly, without having to provide a path to the script. Again, if you store your scripts in a directory that IS NOT in your $PATH statement, you will need to provide the full path to the script in the “Command” field.  Above are some of the extracted images from kalwisti’s PDF, as they appear in Thunar. Notice that some of these images are “blank.” This is normal, and has more to do with how images are stored inside a PDF file. Now mind you, I’m no “expert” on the internal file structure of PDF files, but the first image is what we would recognize as “the” image, while the “blank” image holds the alpha channel data so that the PDF file can display transparent PNG files. You can keep the blank files around, or delete them. It’s up to you. The pdfimages tool recognizes several graphic file formats. Some of them are easy enough to discern … JPEG, PNG, TIFF, JPEG2000 (JP2), JBIG2, CCITT. They are listed if you type “pdfimages --help” at a command line prompt. Support for “other” graphic formats isn’t as easy to discern, since they are not listed specifically. For example, here at The PCLinuxOS Magazine, we’ve been using WEBP graphics for a couple of years now. Even though WEBP graphics aren’t listed in pdfimages repertoire, it can “handle” them. What I’ve been seeing during my “testing” of the PIE script is that pdfimages extracts the “the” image as a JPG file, and then extracts a PNG of the same image to serve as the alpha channel for transparency. Many of the images we use in the production of the magazine have no transparency, but pdfimages has no idea of whether they do or not. So, even if an image has no transparency, pdfimages still extracts “the” image as a JPG file, and a PNG of the same image to serve as the alpha channel image to provide transparency. I can tell you that AVIF images are “unofficially” supported with pdfimages. None of my “usual” PDF creation tools are capable of using AVIF files, and certainly not Scribus, the tool I use to create many PDFs and the tool we’ve used monthly to create The PCLinuxOS Magazine for many years. So, to “test” AVIF files compatibility, I converted an image to the AVIF format (using ImageMagick), and then printed it to a PDF file from within GIMP. When I extracted the image from the PDF file, pdfimages wrote the image out to my drive as a perfectly valid PNG file. Meanwhile, you’re going to be quite pleased with how fast PIE works. On my computer, I “timed” the script by running it from the command line, and running the “time” command, followed by the PIE script. On kalwisti’s PDF, it extracts 30 images (there are really only 16, but remember the production of additional images for the reasons we just discussed) in just 8.558 seconds. Included in that overall time is 3.291 seconds waiting on me to press the “Enter” key (I just accepted all the defaults), and 0.139 seconds for the system. Is PIE perfect? Nope. During testing, Meemaw and I found a few PDFs where the images didn’t extract well. But, PIE was able to extract the images from the vast majority of PDF files we threw at it. It’s hard to know exactly what the production team of those PDF files did differently when they produced the PDF file. It’s also hard to know what the production manager or project managers are thinking. Without knowing *exactly* what they did or what they were thinking, most of the “conclusions” we can reach are totally speculation. Did they use a non-standard or unsupported image format? Did they include a custom color palette? Unless we were present when the PDF was created, there’s no real way to know exactly what was done, or why. However, I’m pretty sure you’ll discover, just as Meemaw and I did during our testing of the script, that PIE is capable of handling the vast majority of PDF files you might throw at it, and successfully extracting the images from them.
The second script I created was born from my work on PIE. Oftentimes, it’s not enough to just extract the images from a PDF file. There certainly are times when you will also need to extract the text from a PDF file. Enter PET, short for PDF Extract Text. PET will extract all of the text elements from a PDF file, and save them to a plain text file. Follow the same instructions for obtaining PET as I gave for PIE. You can download the script from here. The PET script is 1.8 KiB in file size, so it should download in a literal blink of an eye. So, before we get into dissecting the script, let’s take a look at it.
The first 16 lines of the PET script are virtually identical to the first 16 lines of the PIE script, with references to “images” changed to “text.” So, I see no need to wade through those lines again. Line 17 changes the input file filename to all lowercase, to ensure that the basename command in line 18 works properly. The basename command strips the PDF file extension off of the input file to create our default values in our Zenity dialog boxes. 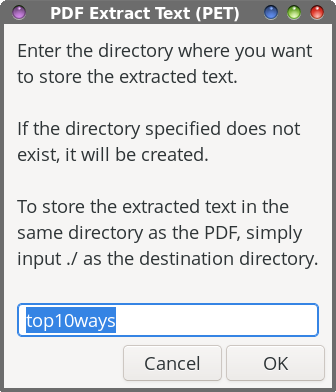 In line 20, we set up the first Zenity dialog box. Within that box, we give the end user some brief instructions on what to do, set the width and height of the Zenity dialog box, and set a default subdirectory to store the extracted images in (--entry-text=$DFLT). Of course, the user can override that suggestion just by typing in a different directory name. Lines 21 through 23 provide a clean way to end the script, if the end user presses the “Cancel” button in the Zenity dialog. Lines 24 through 28 check to see if the specified directory exists. If it does not, the specified directory is created. 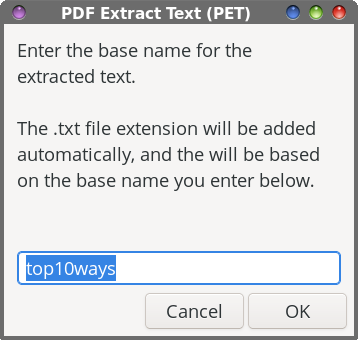 With line 30, the second Zenity dialog box is created to allow the user to input the base name for the text extraction. You can accept the default value, or provide another one of your choosing. Lines 31 through 33 provide that clean, neat way to end the script if the end user chooses the “Cancel” button in the Zenity dialog box. The “heavy lifting” is done in line 35, where the command line tool pdftotext extracts the text elements from the PDF. That is piped to a Zenity progress dialog box, with a pulsating progress bar. To be honest, I doubt you’ll ever see this. The text extraction is so fast that I’ve only seen it once or twice, and even then, only for a second or less. Still, I felt it necessary to include it, just in case you ever come across a really large PDF file that takes a bit longer to extract the text elements. This way, you know that the script is running and doing its task, instead of just staring at nothing, unsure if anything is happening. 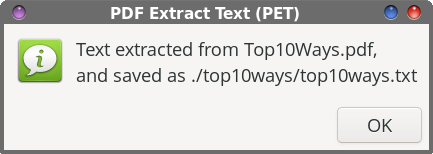 In line 37, we issue the cd command, just to be sure that the script recognizes the correct working directory. Lines 39 through 43 set up and format the text that is displayed in the confirmation dialog box when the task is complete. Then, line 45 displays the Zenity dialog box that lets you know the task has been completed, one I like to call the confirmation dialog box. It informs the end user that the text elements have been extracted from the PDF, and where the resulting “.txt” file has been stored. And finally, line 47 allows us to cleanly exit the script when the task is completed.
Like its brethren, PIE, PET takes just one command line option, and that is the filename of the PDF file you want to extract the text elements from. And, just as I did with PIE, PET can be run either as a standalone script from the command line, or as a Thunar Custom Action. If you’re running it from a terminal session, it would be best to cd to the directory that contains the PDF you’re wanting to extract the text elements from. It will help to keep things a LOT tidier, and will take away the onerous use of full path statements as the command line parameter. 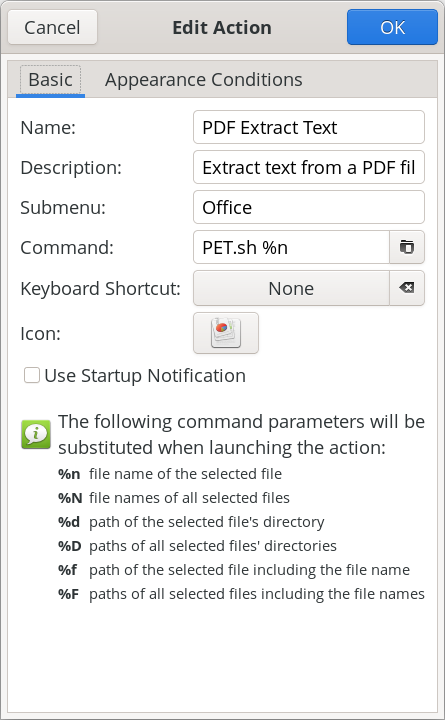  To set up the script as a Thunar Custom Action, make your custom action dialogs resemble those shown above. In the image on the left (showing the “Basic” tab), fill in the “Name” field (PDF Extract Text), the “Description” field (Extract the text from a PDF file), the “Submenu” field (if you use one … I have mine located in an “Office” submenu, with my other custom PDF tools), and the “Command” field (PET.sh %n). In the “Appearance Conditions” tab, set the “File Pattern” (*.pdf;*.PDF), leave the “Range” field set to its default value of “*”, and place a check in the box next to “Other Files.” Once you have those all filled in, save it by clicking on the “OK” button. Keep in mind that the directory containing my scripts (/home/parnote/bin) IS in my $PATH statement, meaning I can call the script directly, without having to provide a path to the script. Again, if you store your scripts in a directory that IS NOT in your $PATH statement, you will need to provide the full path to the script in the “Command” field. 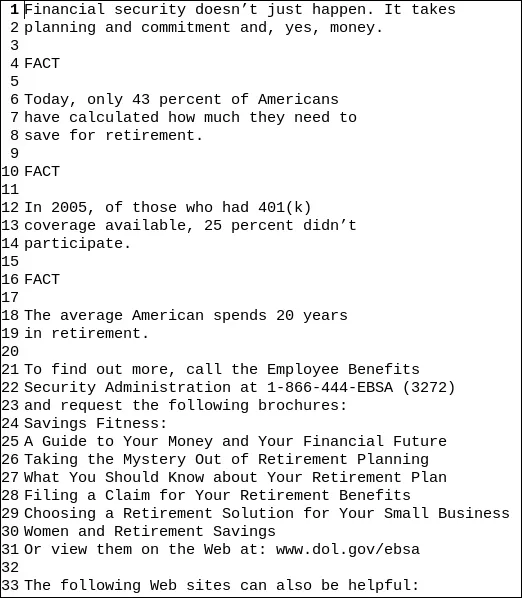 The image above shows sample text that was extracted from a PDF file that Meemaw shared with me when we were testing these scripts (the text file is opened up in Mousepad with line numbering turned on). As you can see, it really is just plain text. To “reuse” the text (provided you have the rights to reuse the text … don’t fail to consider the ramifications and consequences of copyright infringement!), it’s going to require some formatting work in whichever tool you’re using to reproduce it. But, at least you have the text, so the reformatting should just be something you have to do when you lay it out. Did I mention that PET is F-A-S-T?! It’s even faster than PIE at performing its task.
So, there you have two powerful tools to add to your toolbox that, when used, has the potential to save you a LOT of time. These tools are fast at what they do, and follow the time-honored Linux practice of “do one thing, and do it well.” I can think of several use-case scenarios where these scripts will be useful. Plus, they’ll save you considerable amounts of time. Let’s say you need to make revisions to a document you created three years ago. You want/need to update that document. While you cannot find the original, you do manage to locate a PDF of the document. With these tools, you can extract the images and text from that PDF, and then redo it … with your changes, of course. I’ve already found a use for these scripts, in taking PDF files and extracting the images and text from them. In fact, I can think of several instances where I wish I had this in my arsenal of tools. Every once in a while, we (those of us here at the magazine) have a need to access images in a PDF file. Previously, we’d have to display it in a PDF Viewer, and take a screenshot of the image … and hope for the best. These tools would have made it so, so, so much easier. |