Through The Lens
Patrick G Horneker
Digitizing Old Photographs
Photography itself has been around for more than 150 years. Digital cameras were just under development in the late 1990s. During the same time, the image scanner was the peripheral to have if you wanted to digitize a photograph for use in a document, web page, or to store on your hard drive.
Fast forward to today. You can still buy an image scanner, but scanners by themselves are difficult to come by in the retail stores. However, all-in-one devices and digital cameras reduced the need to purchase a separate scanner.
Why am I telling you this? Because the digital camera is not the only way to create digital photographs. If you have a large collection of photographs, an image scanner, be it by itself or as part of an all-in-one device, is a necessity to get that collection onto your hard drive. This has been true since the first scanners came out for Macs and PCs of the early 1990s.
For PCLinuxOS and other Linux distributions (as well as FreeBSD, Solaris, and other UNIX dialects), there is SANE (for Scanner Access Now Easy) for scanner access and support.
Packages you need to have installed
In PCLinuxOS, SANE is a series of RPM packages that need to be installed. If you have the MiniMe flavor of PCLinuxOS, you will need to go into Synaptic and install saned and all of its dependencies, including sane-backends. These packages provide the basic SANE installation you need to get your scanner working under PCLinuxOS.
If you have a Hewlett-Packard all-in-one device, you will also need to install the hplip, hplip-gui, hplip-hpijs and all of its dependencies, which should include the aformentioned saned and sane-backends packages.
Get saned working first
SANE is to Linux what TWAIN is to Windows. SANE is a software layer that is an interface between your scanner and your PCLinuxOS machine. It is responsible for initial setup of scanners (such as uploading of firmware), scanner detection, and acquisition of image data.
Before you can scan anything into your PCLinuxOS machine, you need to make sure your scanner is supported. If you have a Hewlett-Packard All-in-One Device, check with the HPLIP website to see if your all-in-one device is supported with the version of HPLIP installed. This information cannot be found at the SANE Project website.
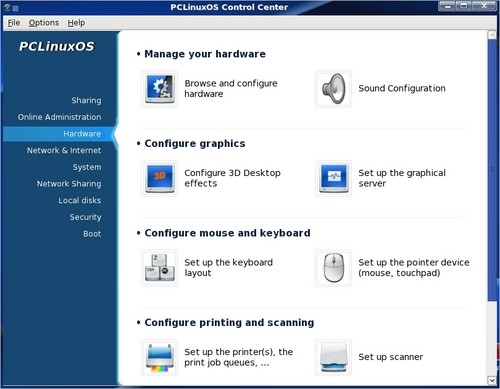
All applications that involve scanning of images require saned to be properly functioning. The easiest way to configure your scanner is to open the PCLinuxOS Control Center, click on the Hardware tab, then select Set up Scanner.
If you have a Hewlett-Packard all-in one device, you do not need to click on Set up Scanner. Instead, make sure a print queue has been setup for the device. HPLIP software automatically sets up the SANE backend at the time the print queue has been setup. This is a function of the HPLIP installation utility.
Notes for Parallel Port Scanners
SANE can only automatically detect SCSI and USB scanners. It cannot automatically detect parallel port scanners. This is due to the design of the SANE library. Fortunately, PCLinuxOS has a way to configure even these scanners, provided that they are supported in the first place.
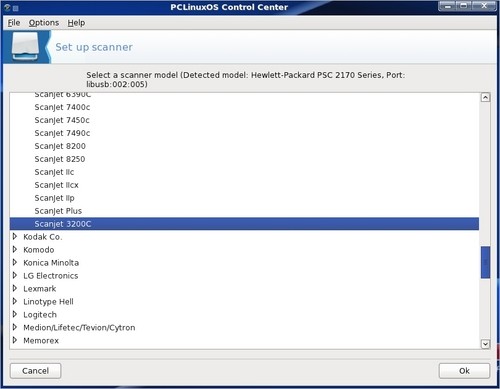
In this example, I have selected the Hewlett-Packard Scanjet 3200C. This was a scanner that I owned before I got my all-in-one devices.
The highlighted scanner is a parallel port scanner that is known to work with SANE using the sane-umax_pp backend. The 3200C is a rebranded UMAX Astro 1220P scanner, hence the UMAX parallel port backend.
Though I currently have a Hewlett-Packard PSC-2175 with the HPLIP driver providing the SANE backend, I have presented you with the dialog box here to show you that some parallel port scanners can be configured under PCLinuxOS.
SANE was originally designed to work with SCSI-based scanners as the (now ancient) SCSI interface was the only interface for scanner access available to Linux and UNIX users. In order for parallel port devices to work with Linux, drivers called ppdev (at the root level) and parport (at the user level) were loaded first, then SCSI emulation was activated so the scanners could be accessed.
Fortunately for us, USB devices are easily accessed through SANE, thanks in part due to first the SCSI emulation that is part of the USB subsystem, and later due to the udev and HAL subsystems, that are now a part of many Linux distributions, including PCLinuxOS.
Thanks to the user friendly utilities provided with PCLinuxOS Control Center, the user does not need to be concerned about the configuration details.
Command Line Utilities
SANE comes with a couple of useful command line utilities. sane-find-scanner is useful when you are having trouble detecting your scanner. As the name suggests, this utility attempts to detect scanners connected to your PCLinuxOS machine. Note: This utility does not detect parallel port scanners, only those connected to SCSI and USB. Simply open a terminal window and type in sane-find-scanner. The following output should appear.
[patrick@davinci ~]$ sane-find-scanner

 # sane-find-scanner will now attempt to detect your scanner. If the
 # result is different from what you expected, first make sure your
 # scanner is powered up and properly connected to your computer.

 # No SCSI scanners found. If you expected something different, make sure that
 # you have loaded a kernel SCSI driver for your SCSI adapter.

found USB scanner (vendor=0x03f0 [Hewlett-Packard], product=0x2b11 [PSC 2170 Series]) at libusb:002:005
 # Your USB scanner was (probably) detected. It may or may not be supported by
 # SANE. Try scanimage -L and read the backend's manpage.

 # Not checking for parallel port scanners.

 # Most Scanners connected to the parallel port or other proprietary ports
 # can't be detected by this program.

 # You may want to run this program as root to find all devices. Once you
 # found the scanner devices, be sure to adjust access permissions as
 # necessary.
[patrick@davinci ~]$
In this case, SANE has found my PSC-2175 all-in-one device as highlighted in the output. All this utility does is detect devices with scanning capabilities. The output mentions the other useful utility, scanimage, which is a command line utility that does the actual scanning.
Typing scanimage -L lists available backends you can use with your scanner.
Notes on the following software packages
The following software packages may or may not come with your PCLinuxOS distribution. While PCLinuxOS has its own App Store, which does make life easier for the system maintainer, many of the featured packages here are not yet included for downloading. You will need to use Synaptic to install the featured packages, if they are not already installed on your PCLinuxOS system.
The XSANE Package
Used by itself or with the GIMP, this utility was developed as part of the SANE package to provide a graphical interface to the SANE backends.
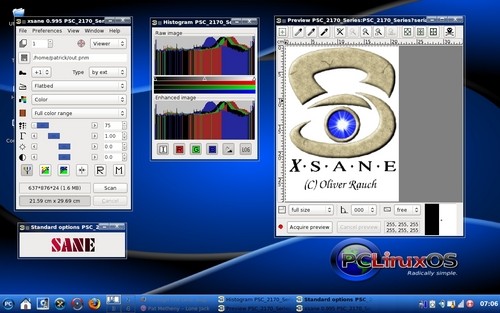
In this example, I launched xsane by itself, then rearranged the opened windows so you can see all the controls of the program. This is how xsane looks when you first launch the program. This example is for the Hewlett-Packard PSC-2175.
If you have more than one scanner, or a scanner and/or a supported webcam, you will get a menu to choose a device to use before this comes up.
General controls supplied with this program provide control over the image resolution, brightness, contrast, and gamma value, as well as for inverting colors, and resetting default values.
You can also select whether to scan the image as a color image, a greyscale image (for black and white work), or line art (useful for lithographic work).
The window on the center displays a histogram for the image.
The window on the right is where the actual scanning work takes place. Here you see what is being scanned, and you can select parts of the image to save. Click on Acquire Preview to get an initial scan of the image you are digitizing.
The lower right hand corner of this window (called the Preview window) contains a magnified view of the image you are scanning. You use this as a tool for precision when selecting parts of the image to use in the final scan.
To create the final scan, click on Scan in the left window (the main window). The output of the scan depends on how you started xsane, and what type of output you have selected. When running as a GIMP plugin, a new GIMP document is opened for editing. By default, the built-in image viewer opens up to display the image, where you can then have the option of saving the image. If you do not supply a filename, xsane will automatically save it as out.pnm in your home directory.
xsane has support for image printing, faxing, copying and e-mailing as well as creating multi-page PDF documents. Not bad for a simple scanning tool.
xsane can be installed from Synaptic under the Graphics category.
Kooka, the KDE scanning package
Yes, xsane runs fine on KDE, but kooka was designed to be used with KDE. There are a few differences between kooka and xsane.
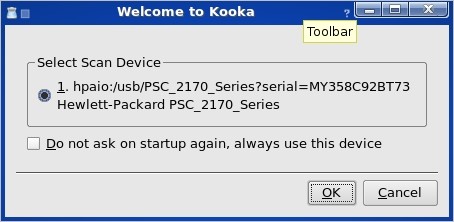
For starters, this dialog always appears when launching Kooka. xsane does this only if there is more than one scanning device connected to your PCLinuxOS system. Of course, you can bypass this window if you check "Do not ask on startup again, always use this device".
The designers of Kooka integrated all functionality found in xsane into one application window instead of using four windows. They did not include the image histogram. However, they did include one click access buttons to optical character recognition, printing, image sizing, rotation and image selection.
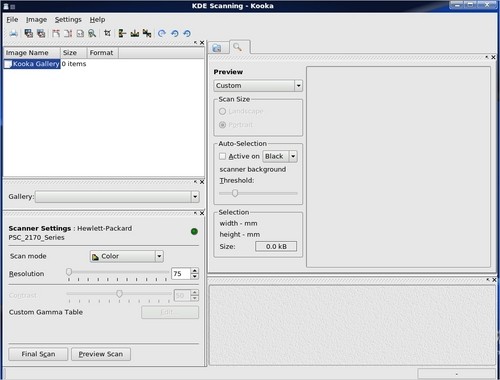
The screenshot here is what you get after launching Kooka and selecting your device. In addition to the previously aforementioned features, Kooka includes its own image gallery.
This gallery is internal to Kooka, and if you have your own organized photo collection on your hard drive, you can save images scanned with Kooka to your collection. Unfortunately, it is a tedious task. You must select each entry you wish to save, then select File -> Save Image... to save each image to your hard drive.
You can also import images to the built-in gallery.
To scan images, you need to perform a preview scan. This is one thing that was made easier with Kooka than with xsane. The Preview Scan and Final Scan buttons are next to each other in the application window.
After the preview scan, the image comes up in the preview window (shown below). Unlike xsane, there is no automatic control over the brightness and contrast of the image. You can, however, control the contrast and resolution of the final image.
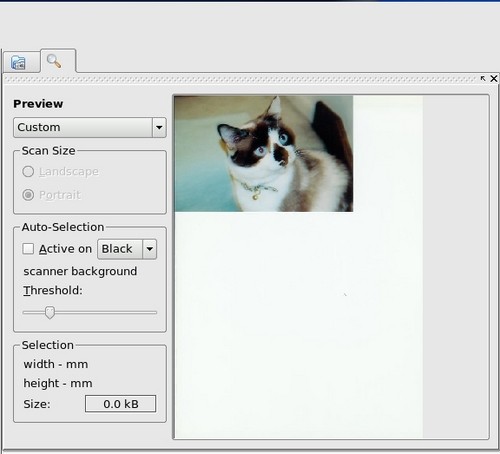
It is here where you select the image you want to be included in the final scan. The best way to select the image is to manually select the area to be included. This means press the left mouse button at the lower right hand corner of the picture, then drag the mouse to the upper left hand corner of the image.
You can also autoselect the image by checking the Active on... box and adjusting the threshold. This may or may not get you the image you want.
Notice that the preview size is labelled Custom. Kooka comes with some presets for common paper and image sizes, selectable from that drop down menu. While this may seem to be an easy way to select the scan area, it is not always the best way.
When you are done, click on Final Scan to scan only the selected area. This scan will appear in the Kooka Gallery where you can print, save to your hard drive, or open it in another program.
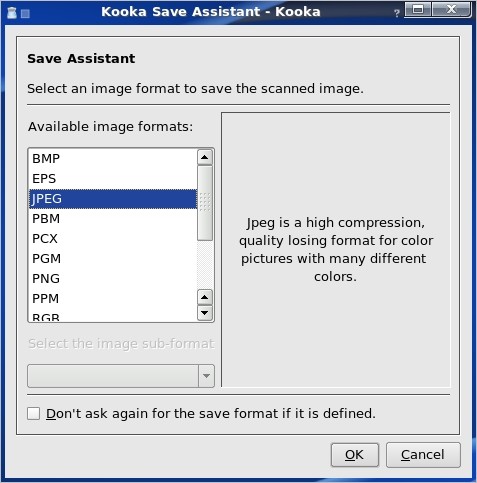
After the scanner reads in your photograph, you will be presented with the Save Assistant. This dialog box allows you to choose the image format where you want the final image to be saved as.
Kooka has support for the common JPEG, TIFF, and PNG formats. Kooka also supports the lossless Targa format, originally developed at AT&T for its specialized video boards developed back in the early 1990s. The Targa format is superior when it comes to image quality. However, the tradeoff is that the file size is quite large when compared to a uncompressed JPEG or TIFF file.
I recommend either the Targa or the TIFF formats if you really cannot compromise the quality of the image for space savings. For everyday photographic work, I would recommend the JPEG format.
Kooka can be installed from Synaptic under the Graphical Desktop/KDE category.
While you can save images from the application, there is a faster way to retrieve the images from the Kooka gallery. The images are stored in your home directory, and are located at:
~/.kde/share/apps/ScanImages
and are named kscan_xxxx.jpeg where xxxx is the scan number set by an internal counter for keeping track of how many scans were performed in a Kooka session. If you choose to copy these files to another directory on your hard disk, I recommend copying the files to an empty directory, then renaming the files to something more appropriate before integrating them to your photograph collection.
Vuescan
Vuescan is a commercial product that is a replacement for SANE and its graphical interface, xsane . It has support for many more scanners than the SANE package, but it is well worth the expense if you have a scanner that is not supported by SANE.
There are two versions of this product available: The Standard Edition ($39.99 USD) provides scanning services only, and the Professional Edition ($79.99 USD) provides raw scanning (similar to raw image processing in digital cameras), ICC color profiles, color calibration, and other useful services to photographers.
What About Film Scanners?
The scanning software and the SANE package work with scanners designed for photographs and documents. But what about scanners that scan negatives and slides? This is a more difficult task. Some image scanners come with film adapters to scan in negatives and slides. But what about the dedicated units that do only negatives and slides?
Nikon has several models that work with Linux. The LS30 and LS2000 are SCSI-based models that work flawlessly. The LS4000 and LS8000 work good, but are parallel port models. The LS40 works flawlessly as a USB scanner. However, the support for LS50 and Coolscan models is minimal and untested as of this writing.
The Ion Audio Slides2PC, which is a commercially available product, is a paperweight. It uses a proprietary software designed to work exclusively with Windows. No Mac OS-X version of the driver was ever developed, let alone a driver for Linux.