Openbox: Use Pipe Menus For More Functionality
by Paul Arnote
We’ve already covered how to customize your Openbox right click menu in the August issue of The PCLinuxOS Magazine. However, you can further increase the functionality of your Openbox menu by using what’s known as “pipe menus.” Pipe menus are menus that activate an external script, and the information is dynamically displayed in your Openbox menu.
Pipe menus work fairly simply. First, you write a script (a bash script, a python script, etc.) that performs the “work.” You then modify your ~/.config/openbox/menu.xml file to display the dynamic menu. As daunting as it may sound, it’s actually easier than you may think.
To get started, you need to find a script to control your Openbox pipe menu – or write your own. If you choose to use one that someone else has already created, then your task will be quite a bit simpler. Fortunately, there are several “collections” of Openbox pipe menu scripts scattered around the web. One place you will definitely want to check out serves as, more or less, a central “clearing house” for all pipe menu scripts. That place is the pipes menu page on the Openbox Wiki.
If, however, you want to write your own custom script, the Openbox Wiki also has a page that details what you need to include in your script. Of course, you may want to take a look at the examples in the first link. I know that, for me anyway, it’s so much easier to see an example of how to do it, in conjunction with the “technical directions” on some web page.
Putting Pipe Menus To Work
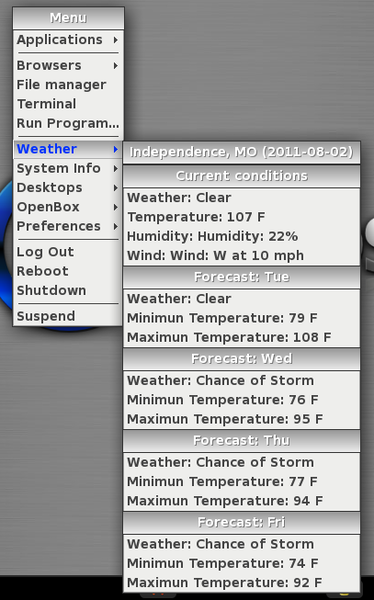
Take a look at this screen shot (below), that displays your local weather forecast:

To get the weather forecast to appear in your Openbox menu, here’s what you need to do. First, go grab the python script. This particular version of the weather forecast script uses weather information from Google. If you prefer to use the weather information from Yahoo, you can grab a different python script. There is yet a third, different weather script, displaying information from weather.com. The setup steps for that script are very similar to the steps that follow for the Google and Yahoo weather information sources.
All of the scripts will give you similar information. The Google source will give you a four day forecast (today’s, plus the next three days), while the Yahoo source will give you only a two day forecast (today’s and tomorrow’s).
I copied the script(s) into Geany, and saved them in ~/.config/weather. Next, go into the directory and mark the file as executable. In PCManFM, if you right click on the file and choose “Properties” from the context menu, select the second tab and place a check mark in the “Make the file executable” option. To avoid confusion, I saved the Google weather script as gweather.py, and the Yahoo weather script as yweather.py.
Next, you need to add a line to your ~/.config/openbox/menu.xml file, so that the menu displays in your Openbox menu. For the Google weather script, I added the following line (all on one line):
<menu id="pipe-weather" label="Google Weather" execute="python ~/.config/weather/gweather.py 64052 en" />
For the Yahoo weather script, I added the following line (again, all on one line):
<menu id="yahoo-weather" label="Yahoo Weather" execute="python ~/.config/weather/yweather.py 64052 Fahrenheit" />
As you can see, the options for both differ a little bit. For the Google weather script, you include the city code for your area (in the U.S., that’s your ZIP code) and the language you want to use to display the information (in my case, “en” for English). For the Yahoo weather script, you include the city code for your area, along with the measurement units you want to use for displaying the temperature (Fahrenheit for the U.S., and Celsius for most everywhere else).
After editing your ~/.config/openbox/menu.xml file, right click your mouse on an empty spot on your desktop, and select the Openbox > Reload Openbox menu item to load your new menu into the Openbox menu. On subsequent reboots, this step will not be necessary.
One caveat about the Yahoo weather script, however, is in order. The script is set up to cache the data from Yahoo, so that repeated access to the script doesn’t keep retrieving data from Yahoo. The time length for the cache is set to six hours, meaning that despite how many times you access the Yahoo weather script during that time frame, you will be viewing the cached data. Near the top of the script (line 27), look for the entry named “CACHE_HOURS.” Change the “6” to “1,” and now the cached data will expire after one hour. This means that repeated attempts to access the Yahoo weather data will be refreshed if the data is more than one hour old. Accessing the weather data in less than the one hour time frame will result in the cached data being displayed.
More than just weather reports
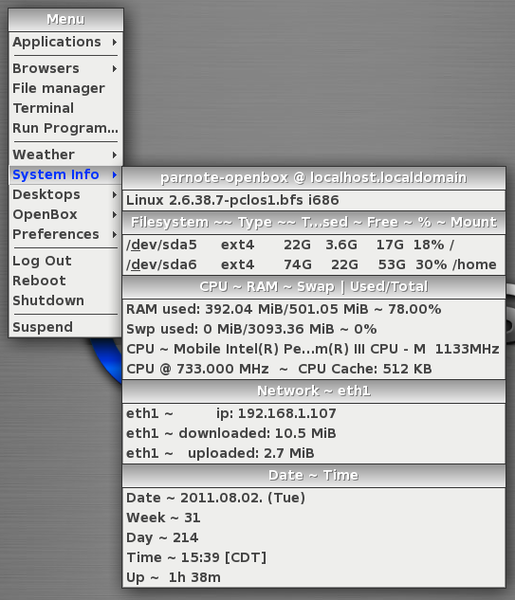
Of course, you can do more than just display weather information on demand via the Openbox menu. Another one that I found useful is called “sysinfo.”

As you can see by the screenshot (above), sysinfo provides lots of information about your computer system. This information includes the current kernel you are using, information about your drive partitions, data about RAM usage, swap file usage and CPU usage, information about your network connection, as well as time and date information.
To use this on your Openbox installation, first go grab the bash script that controls the display of this information. You may need to edit the bash script so that the information displayed reflects your computer and its hardware options. For example, I had to edit the bash script to display the proper hard drives for my system, as well as the network information.
Again, I copied the script into Geany, saved it at ~/.config/sysinfo as sysinfo.sh, and made the file executable. Next, I placed the following line in my ~/.config/openbox/menu.xml file (again, all on one line):
<menu id="sysinfo" label="System Info" execute="~/.config/sysinfo/sysinfo.sh" />
Reload Openbox, via the Openbox > Reload Openbox menu item on your Openbox menu to access your new menu item.
Having some more fun
There are more items you may want to add to your Openbox menu. One pipe menu script adds RSS news feeds to your Openbox menu. Another checks your email, from the Openbox menu. Another displays a calendar and the current time. Yet others control playback of sound files, change wallpapers, and much more. Refer to the Openbox Wiki “clearing house” for a full list of pre-made Openbox pipe menus.
Summary
Basically, anything you can script can be formatted to work with Openbox’s pipe menus. This is where your custom scripting skills can help to truly make your Openbox experience unique.
If you want to read more about Openbox pipe menus, check out the TechRepublic articles that appeared at the end of July and in early August. This article had been planned since before we ever started doing Openbox articles, back when we were in the planning stages for the series of articles on Openbox. The TechRepublic articles help provide even more resources for those interested in learning more about Openbox’s pipe menus.
You can make the use of pipe menus as easy or as complex as you like. But use them you should, since they help provide a more complete, more customized user experience.