| Previous
Page |
PCLinuxOS
Magazine |
PCLinuxOS |
Article List |
Disclaimer |
Next Page |
Making Xsane A Little More Sane
|
|
by Paul Arnote (parnote) Back in October 2009, Meemaw covered some of the basics of using and setting up a scanner under PCLinuxOS, with Xsane. If you are new to Xsane, or if you need to brush up on your scanning basics, I recommend following the link and re-reading Meemaw's article. This month, we'll revisit Xsane and explore some of the more advanced things you can do with it. 
Xsane is a cross-platform application, helping to provide a graphical interface to the SANE backends. Aimed at UNIX and Linux users, Xsane also provides a graphical interface for Win32 users and OS/2 users. Of course, none of this would mean anything without understanding SANE. SANE is a cross-platform backend for standardizing access to raster image acquisition hardware. The SANE API is in the public domain, and is released under the GNU General Public License. Ports to MacOS X, OS/2 and Microsoft Windows are either already done or in progress. From the SANE project site: SANE is a universal scanner interface. The value of such a universal interface is that it allows writing just one driver per image acquisition device rather than one driver for each device and application. So, if you have three applications and four devices, traditionally you'd have had to write 12 different programs. With SANE, this number is reduced to seven: the three applications plus the four drivers. Of course, the savings get even bigger as more and more drivers and/or applications are added. Not only does SANE reduce development time and code duplication, it also raises the level at which applications can work. As such, it will enable applications that were previously unheard of in the UNIX world. While SANE is primarily targeted at a UNIX environment, the standard has been carefully designed to make it possible to implement the API on virtually any hardware or operating system. While SANE is an acronym for "Scanner Access Now Easy" the hope is of course that SANE is indeed sane in the sense that it will allow easy implementation of the API while accommodating all features required by today's scanner hardware and applications. Specifically, SANE should be broad enough to accommodate devices such as scanners, digital still and video cameras, as well as virtual devices like image file filters. If you're familiar with TWAIN, you may wonder why there is a need for SANE. Simply put, TWAIN does not separate the user-interface from the driver of a device. This, unfortunately, makes it difficult, if not impossible, to provide network transparent access to image acquisition devices (which is useful if you have a LAN full of machines, but scanners connected to only one or two machines; it's obviously also useful for remote-controlled cameras and such). It also means that any particular TWAIN driver is pretty much married to a particular GUI API (be it Win32 or the Mac API). In contrast, SANE cleanly separates device controls from their representation in a user-interface. As a result, SANE has no difficulty supporting command-line driven interfaces or network-transparent scanning. For these reasons, it is unlikely that there will ever be a SANE backend that can talk to a TWAIN driver. The converse is no problem though: it is pretty straightforward to access SANE devices through a TWAIN source. In summary, if TWAIN had been just a little better designed, there would have been no reason for SANE to exist, but things being the way they are, TWAIN simply isn't SANE. In the previous article, Meemaw covered how to set up your scanner. Granted, support under SANE is often hit and miss. This is, of course, nothing new to Linux users. Many manufacturers worry only about supporting Windows. Even when a scanner or imaging device is recognized by SANE, there's no guarantee that all of the features of your scanner will be recognized or that they will all work like they were intended to under Windows. You can check here to see if your scanner is supported by SANE. Be sure to look for your specific scanner model. Close doesn't count. Sometimes, on models with close model numbers, you will find one model that works, while the next one does not. To be sure you're getting a scanner that you can use, I would suggest looking through the supported models list to find one that is reported as working, and that has the features you are seeking. Then, go to Ebay and look for a used model of that scanner. You'll also save yourself some money - and hassles. My HP ScanJet 8250 originally sold for $1000 when it was brand new, but you can now get it on Ebay for $55 and free shipping. Meemaw did an outstanding job of covering the basics of Xsane in her previous article. But, there are a lot more capabilities hiding under the hood. Each of the various capabilities of Xsane can be set up under the Preferences > Setup menu. So, let's take a look at some of those features. Image Scanner This is probably what most people will use Xsane for. There aren't many of us around that don't have a bunch of photos stuffed into a box in the closet. How nice would it be to have those images in a digital format that you can use? 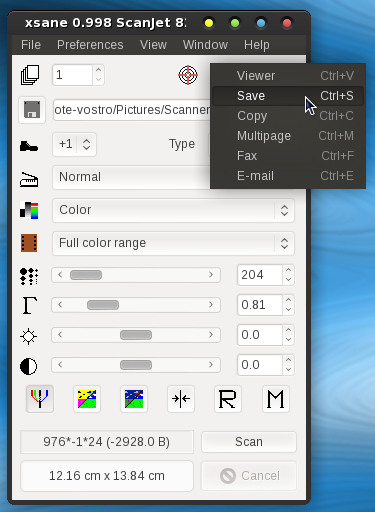
To get started, select either "Viewer" or "Save" as the target (note the target icon to the left of the drop down selections). The difference between "Viewer" and "Save" is that the former will allow you to view the image in the viewer window before saving it, while the latter will simply save the file directly, without you being able to view it before it is saved. If you use the viewer selection, you can save the displayed image by selecting File > Save Image from the Viewer window menus. 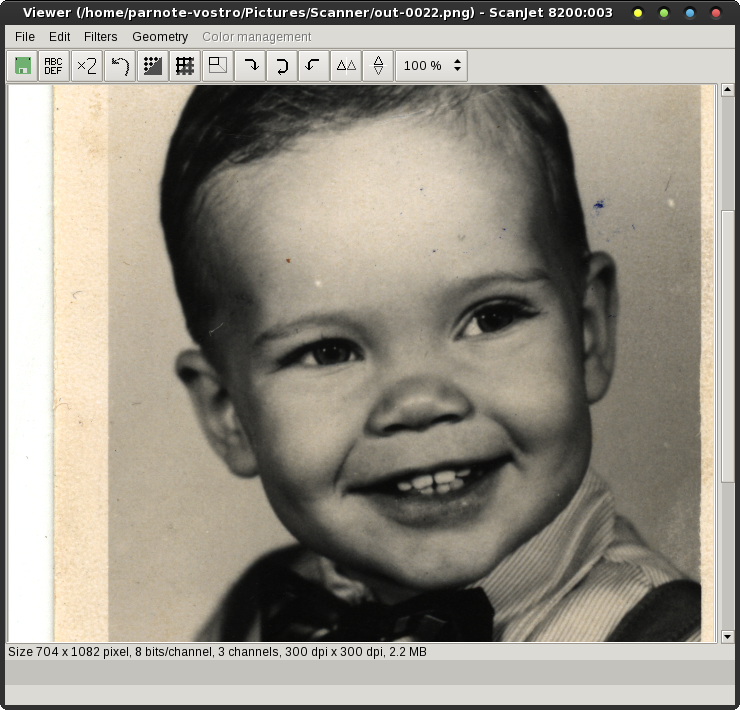
Another nice feature of Xsane is that it will automatically number your images, giving each a unique filename when it saves them. All you have to do is set up the first number in the naming scheme, and Xsane will take care of incrementing the number with each picture you scan, and append that number to the end of your filename. I have Xsane set up to save images to the ~/Pictures/Scanner directory (which I created), and the filename set up as out-0001.png for the first image I scanned. From there on out, Xsane increments the number at the end of the filename, even between reboots and subsequent launchings of Xsane. Make sure you've set up the rest of you options, as Meemaw covered in her October 2009 article. Then, place the image(s) you wish to scan on the glass of the flatbed scanner, and close the lid. Click on the "Acquire Preview" button in the Preview window. 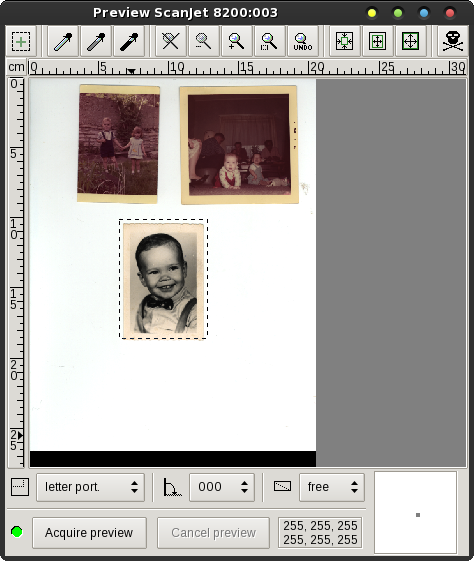
You can place either a single image, or multiple images on the flatbed scanner. Meemaw covered how to use "Auto Raise" in the preview window to select single items when multiple items were placed on the scanner bed. I take a slightly different approach. Click on the first icon at the top of the Preview window, and then simply draw around the image you want to scan by clicking and dragging your mouse, leaving a little extra "wiggle room" around the edges. Don't worry. You can crop the image closer later in your favorite image editor, such as GIMP. When you are satisfied with your selection in the Preview window, select the "Scan" button in the main Xsane window. Now, depending on whether you selected to save the file directly or if you selected to view the image before saving it, your scanned image will be either written to your hard drive or displayed in the Viewer window. You can choose to save it as a JPG, PNG, PDF, PNM or TIFF file. Home Copy Machine Let's say your brother or sister comes over for dinner and you have prepared an old family recipe. Your sibling asks for a copy of the recipe, which you happen to have in your grandmother's handwriting. You could get in the car and run off to the local copy center and make a copy - or you could just head over to your computer and scanner, and make a copy on your own printer in less time than it would take you to make the round trip to the local copy center. Convenient, huh? Before we can use Xsane and our scanner as a copy machine, we first need to set things up in Xsane. Go to the Preferences > Setting menu in Xsane, and choose the third tab. 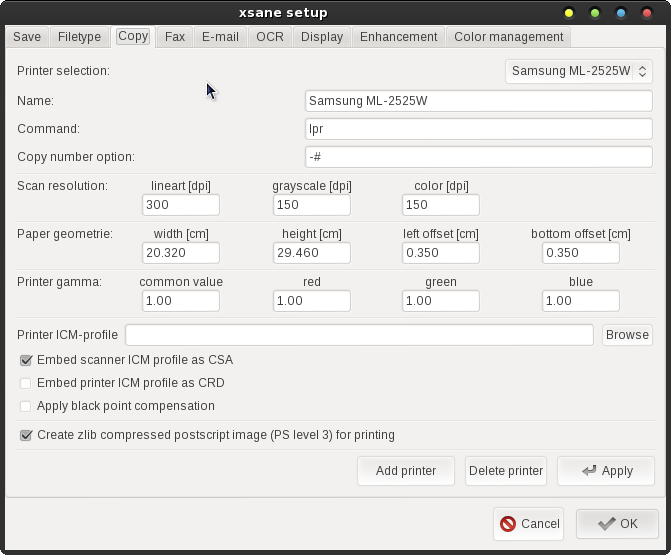
If this is your first time setting up this part of Xsane, you may not have a printer listed. You may need to select the "Add printer" button at the bottom of the window. Next, specify the name of your printer on the Name field exactly as it appears in your list of printers. While your mileage may vary, I have found that I can simply accept all of the rest of the default settings in this window. 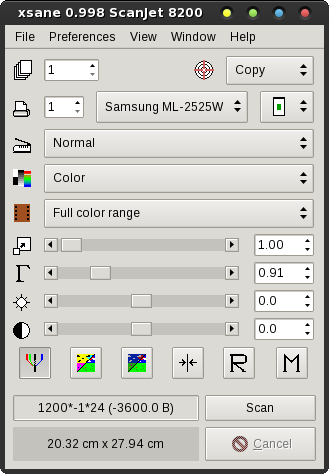
Next, select "Copy" as the target for your scan. In the second row of controls, you can set how many copies you would like to print, the printer you want to print to (just in case you have more than one printer to choose from), and the positioning of the scanned image on the copied page. Now, select the rest of your settings (you may want to change from "Color" to "Lineart" if you're copying documents or handwritten text), and place the original on the glass of your flatbed scanner. In the Preview window, select "Acquire Preview," then crop the scan area as we previously described. In the main Xsane window, select the "Scan" button, and after a brief wait (providing you've done everything properly), your scanned image should start printing on your selected printer. Multipage Document Creation Without a doubt, I have found this feature of Xsane to be the most useful. Most of the time, when scanning documents, we have more than one page to the original document. Sure, you could save each individual page as a separate PDF file. If I wanted them all placed into one PDF, I could use pdfjoin from the command line, and combine all of the pages into one single PDF file. However, selecting "Multipage" as your scan target eliminates all of that post-scanning work. Instead, it will take each page that you scan and place them into one PDF file for you. 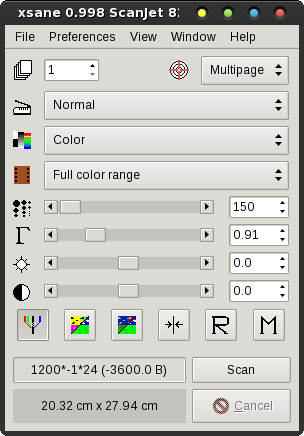
Select "Multipage" as your scan target, and make adjustments to the rest of your settings so they meet your needs. 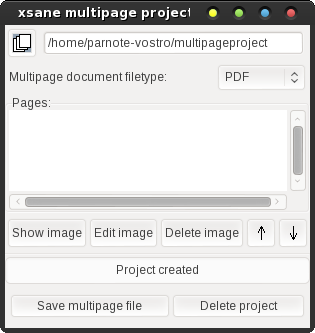
When you select "Multipage" as your scan target, another window will open up. On the top line of that window, you can specify the path and filename you want to use when saving your multipage file. On the second line, you can specify what type of file you want Xsane to create. Your choices are PDF, PS or TIFF. Now, all you have to do is scan each page of your document. As you scan each page, the scans will be listed in the middle of the window, in the "Pages" section. If you accidentally get some of your pages out of order, don't worry. Highlight the page in the list that you want to move, then click on the up or down arrow buttons to move it to its new location. After you've scanned all of your pages, select the "Save multipage file" button at the bottom left. Voila! You have just created a mutlipage file from a series of scans. Home Fax Machine Last month, in the January 2013 issue of The PCLinuxOS Magazine, I covered how to send faxes from PCLinuxOS. While I personally think it would be easier to create a multipage file, and then send that file with your fax modem, Xsane also includes a feature that will allow you to send a fax from your scans, as you scan them. 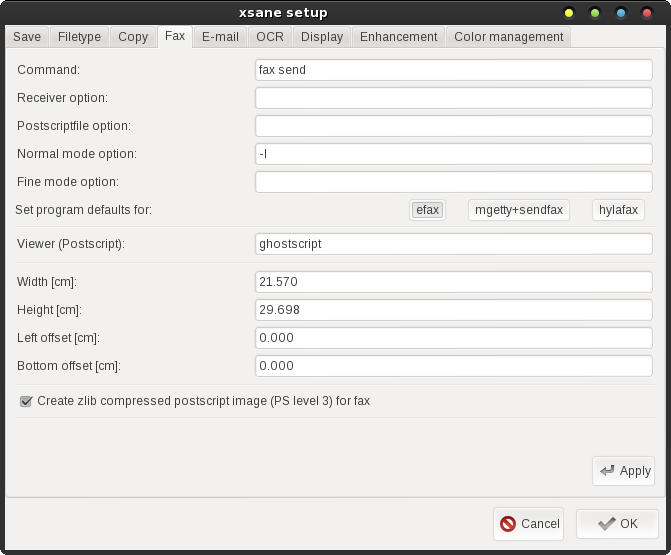 Select "Fax" as the target for your scans, in the main Xsane window.
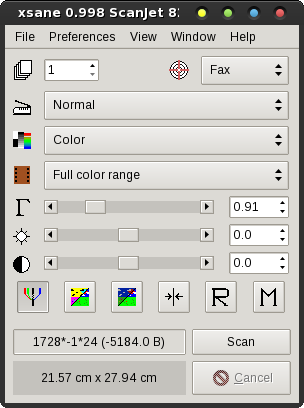
Enter the telephone number of your fax recipient in the second line of the window below. You can change the name of the project, if you choose. The default is "faxproject," and is placed in your /home directory. 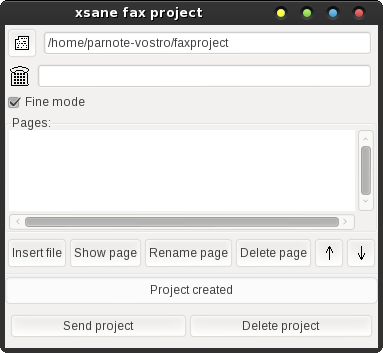
Select "Scan" in the main Xsane window. The scanned page(s) will show up in the "Pages" section of the Xsane Fax Project window. When you are satisfied that you have all the pages you want to send listed, select the "Send project" button at the bottom of the window. At least, that's how it's supposed to work. To be perfectly honest, I never got this feature of Xsane to work - at all. Your mileage may vary, and I'd love to hear from you if you are successful in getting this setup in a manner that allows it to work. I tried the efax-0.9a fax program, which is installed with efax-gtk, the fax program we used in the January 2013 fax article. I also installed mgetty+sendfax, and was still unsuccessful at getting Xsane to send the fax. Oh sure, it "queued" the faxes, but they were never sent. Like I said when I started talking about the Fax capabilities of Xsane, it makes a lot more sense to me to make a multipage PDF, and then send that from Efax-Gtk. If nothing else, this provides a nice alternative to sending faxes from Xsane. Document Emailer If you have a standard POP3 email account, you can email scanned images directly to your email recipients. It kind of shortcuts the whole process of scanning in an image, opening your email client (or web page), composing the message, remembering to attach the image, then sending your email. Why not just do it all, right from Xsane? Before you can send an email, you will need to set up the details of your email account in the Preferences > Setup dialog box. 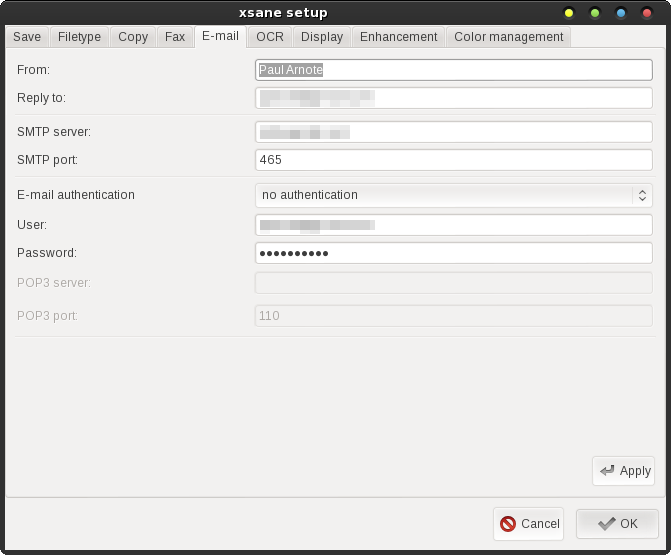
On the first line, insert your name how you want it to appear in the "From" field of the email. On the second line, "Reply to," insert your return address, which is typically the email you are sending email from. You can insert a different email address, if you wish. On the third line, insert the smtp server address, provided from your ISP or mail host. On the fourth line, insert the SMTP port (typically, 25) used by your mail provider. On the fifth line, select ASMTP Login, since most email accounts require authentication these days. The sixth line is your "User" ID, which is typically your email address. The seventh line is where you put the password for your email account. You should now be set to send email with your POP3 email account, straight from Xsane. 
Select "Email" as the target for your scans, in the main Xsane window. This would also be a good time to make sure all of the other settings are what you want (Color, Gray, Dithered, Lineart, scan resolution, etc.). 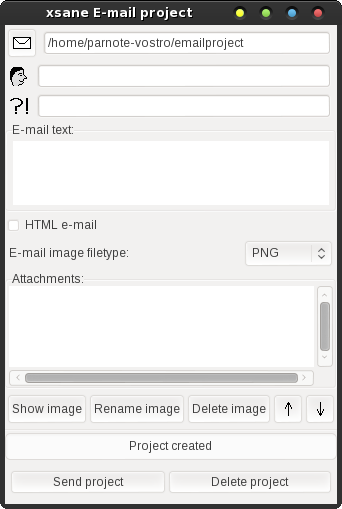
When you select "Email" as your target, another window opens that allows you to specify all the specific details necessary to send your email. On the second line, insert your email recipient's email address. On the third line, insert the subject of your email. In the "E-mail Text" box, type your message to your email recipient. Below that, check the box "HTML e-mail" if you want Xsane to send HTML encoded email. Otherwise, your message will be sent as a plain text email. You can also select the type of file you want your scan to be saved as. Your choices are JPG, PDF, PNG, PostScript, and TIFF. At this point, place your original on the scanner bed, acquire the preview, crop it, then select the "Scan" button in the main Xsane window. The scanned file will appear in the "Attachments" window, in the bottom half of the email window. Once you are satisfied that everything is as you intend, select the "Send project" button at the bottom left of the email window. This is all fine, if you are using a standard POP3 email account. But if you are a Gmail user, you have some work to do to get Xsane to talk to Gmail's SMTP servers. Initially, I honestly thought it might not be possible. But after some digging around, I found a four year old post on Ubuntu forums from a user named flabdablet that solved the problem. Instead of linking you to the actual post, I'm going to list the instructions here, minus the typical Ubuntu sudo stuff that PCLinuxOS doesn't use. I've tested this, and can confirm that the instructions work perfectly.
First, open your favorite text editor, and enter the following: #!/bin/sh /usr/bin/openssl s_client -connect smtp.gmail.com:465 -quiet 2>/dev/null I temporarily saved the file as gmail-smtp.sh in ~/Downloads/Scripts. Right click on the file, go to the "Permissions" tab, and make sure the file is marked as executable. Now, open up another copy of your favorite file manager as the root user, and copy the gmail-smtp.sh file to /usr/bin. Before proceeding, let's test the script to make sure it is working properly. Open a terminal session, and enter /usr/bin/gmail-smtp.sh on the command line. After a short delay, you should see something similar to 220 mx.google.com ESMTP f42sm17489123rvb.6. If you then type helo, you should get something like 250 mx.google.com at your service. Typing quit should get you 221 2.0.0 mx.google.com closing connection f42sm17489123rvb.6, and your shell prompt back. Now we need to make that wrapper available as a local network service, so XSane can use it. Open your favorite text editor again, and type the following in:
# default: on
# description: Gmail SMTP wrapper for clients without SSL support
service gmail-smtp
{
    disable         = no
    bind            = localhost
    port            = 10025
    socket_type     = stream
    protocol        = tcp
    wait            = no
    user            = root
    server          = /usr/bin/gmail-smtp.sh
    type            = unlisted
}
Save that file as gmail-smtp, without any file extension. Again, I temporarily saved the file in my ~/Downloads/Scripts directory. Once again, open another window of your favorite file manager as the root user, and copy the file to the /etc/xinetd.d directory. If you type netstat -ltn at a command prompt, you should see a line something like this: tcp 0 0 127.0.0.1:10025 0.0.0.0:* LISTEN All that remains is to configure XSane. Under the "Email" tab in the setup dialog box, set the SMTP server address to localhost, the port to 10025, fill in your Gmail account details, and select ASMTP Login authorization. If you've done everything properly, you should now be able to send emails from your Gmail account. To test it out, enter your email address as the recipient, type a subject, enter some text for the message, and hit "Scan" in the main Xsane window. The image will appear in the "Attachments" section of the email project window. Once everything is as you want, click on the "Send project" button. Your email to yourself should be on its way. A Few Scanning Tips Get out the Windex (or other glass cleaner), some plain white paper towels (the ink on the printed paper towels can cause streaks) … and CLEAN the glass that makes up your flatbed scanner's imaging surface. It'll save you time later on when you are enhancing and cleaning up your scanned images. You will reveal plenty of imperfections to "fix" in just the original image. There's no need to add more work, simply because you introduced more dirt and imperfections into the scanned image. Plus, no one wants to see your fingerprints and other smudges - which will show up in the scanned image. Choose your scan resolution wisely. Higher resolution scans take more time to complete, and they also make larger files - sometimes HUMONGOUS files. Keep in mind what your intended purpose is for whatever it is you are scanning. Here are some examples. First, let's say that you are scanning in an image to use as desktop wallpaper on your computer. Most computers use a display resolution of 96 dpi (dots per inch) for images. Hence, it makes no sense to scan in an image at 4800 dpi if you're only going to use the image as wallpaper. Similarly, if you are scanning in a document that you are preparing to fax, it makes no sense to scan your document at 600 dpi and in color, since the maximum resolution a fax machine can reproduce is 200 dpi with dithered graytones. In that case, anything more than 300 dpi and dithered gray is overkill and a waste of time and disk storage space. On the other side of that spectrum, if you are planning on making a copy of an image that is larger than the original (say you are taking a 4" x 5" image and wanting to make an 8" x 10" image from it), it is wise to gather and preserve as much of the image detail as possible. You can do this by increasing the scan resolution. Keep in mind that the resulting file will be quite large. Get rid of the blank space around an image. If you are scanning in a wallet sized school picture of your niece or nephew, you certainly don't need all of the rest of that blank space surrounding your image. Without cropping too tightly, select only the image and maybe a little of the surrounding space around the image. Your scans will not only have a smaller image file size, but your scan will also complete much quicker. On a similar note, if you are only interested in just a portion of an image, crop the image in the Preview window to scan only that specific portion of the image you are interested in. Using this method, I was able to create a "close-up" image of my grandfather, who was standing in a large group of kids outside the schoolhouse where he went to school. In the smallish original image, taken in 1911, it was hard to distinguish that it was him. But afterwards, by paying close attention to my scan resolution (high) and scanning only that portion of the image, I was able to make a passable 5" x 7" image of my grandfather, separated out from the crowd of other students. It is, to this day, the only image we have of my grandfather from when he was a child. Summary Without a doubt, Xsane is a very powerful tool to use with desktop scanners. Like I stated earlier, there are a lot of features hiding just below the hood. Once you understand how to manipulate, setup and use those features, Xsane becomes even more powerful. There are more advanced Xsane functions, but what we have covered here should cover the needs of 98% or more users needs. It's a shame that the scanner market, after 20 years, still isn't unified. Some manufacturers, such as Epson, only support the TWAIN standard. The sad thing about TWAIN is that it is rather "Windows-centric." Although TWAIN claims to support Linux, it has never really caught on with Linux users. Even on their forum, the most recent posts about Linux are three and four years old. Meanwhile, other scanner manufacturers, such as Hewlett Packard, support both the TWAIN and SANE standards, giving users the best of both worlds while supporting more than just Windows. Of course, as Linux users, we're used to manufacturers not releasing detailed hardware and interface specifications, since they don't want to reveal "trade secrets." Linux users, as has been the case all along, have been forced to "roll their own" solutions to get image scanners operational under Linux. Maybe when - not if - Linux gains a greater market share among desktop computer users, the scanner manufacturers will start to provide better Linux support for their hardware. There is a new crop of scanners coming onto the scene in recent years that work without the need to be connected to your computer. Rather, these scanners are a standalone, all-inclusive solution. Their imaging capabilities are self contained on their ROM, and they store images on either a USB flash drive or on SDHC/microSDHC memory cards. With this newer crop of scanners, there are no more concerns about drivers, driver compatibility or whether an OS is supported. All you have to do is scan your images, and save them to the memory card. Then, pop the memory card into the card reader on your computer, and you have immediate access to your newly digitized images. |


