| Previous
Page |
PCLinuxOS
Magazine |
PCLinuxOS |
Article List |
Disclaimer |
Next Page |
Converting Between Graphics Formats, Revisited |
|
by Paul Arnote (parnote) Back in November 2022, there was a thread in the PCLinuxOS forum where GOTHBITES was asking how to view a JXL (JPEG XL) file. Back in April 2022, the JXL format was talked about in an article on WEBP graphics. PCLinuxOS users ... heck, most users, regardless of the operating system ... are pretty much up a creek without a paddle when it comes to viewing or using JXL files. I'm doubtful that the JXL format will gain much traction, performing like most of the JPEG Group's other attempted modifications to the original JPG format. And none of them resulted in anything resembling widespread use, except among the committee members and their fanbois. By the second page of the aforementioned forum thread, talk had turned to the "newish" WEBP graphic format (originally announced by Google in September 2010 as an open source format, but the first stable version of its library didn't come out until April 2018, according to Wikipedia) that appears to be coming on strong with widespread adoption, at least on the web. I've even seen "reports" that the Google Chrome web browser will save images in the WEBP format when/if you select "Save Image..." from an image on a web page. However, none of the usual word processors or publishing programs known and used by Linux users (including LibreOffice and Scribus) recognize the WEBP graphics format, but all of the major web browsers and GIMP support the format. As a result, users are encountering WEBP graphic files at an ever increasing rate. In short, the huge benefit to WEBP graphic files is their smaller file size and excellent image quality means web designers can use smaller files, which helps webpages load and display faster. Whenever those users find a WEBP graphic and want to use that graphic in a LibreOffice creation or in a publishing program, that WEBP graphic has to be converted to either a PNG or JPG file (typically) that the importing program recognizes. Now rewind 10 years, to March 2013. Then, I published a custom Zenity-enhanced bash script in my Xfce Power User Tips, Tricks & Tweaks: Working With Graphics article. I still use that bash script, albeit slightly enhanced, attached to a Thunar Custom Action today ... A LOT. That forum thread lit a fire under me to further enhance the script I originally published 10 years ago. So, below is the newly enhanced version of that script. To keep the line numbers in proper order, the script is presented as a graphic. You can download the script from the magazine website. When/if you do so, store the bash file wherever you typically store your bash files (preferably somewhere within your path), strip the ".txt" file extension from the downloaded file, and make the file executable. 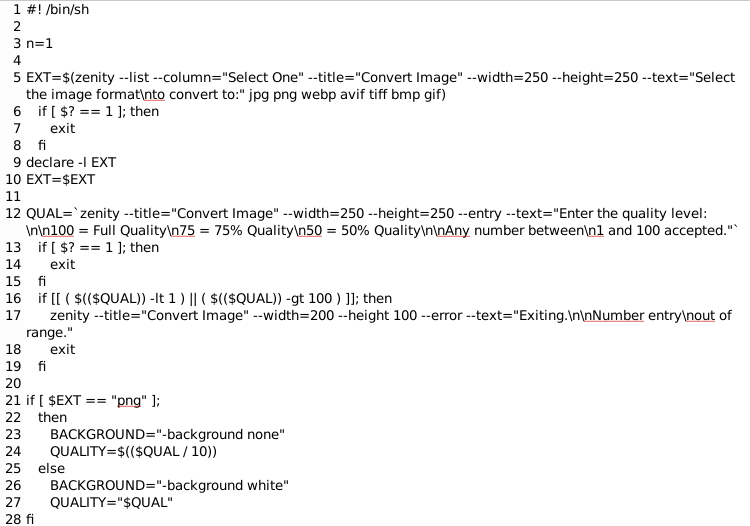 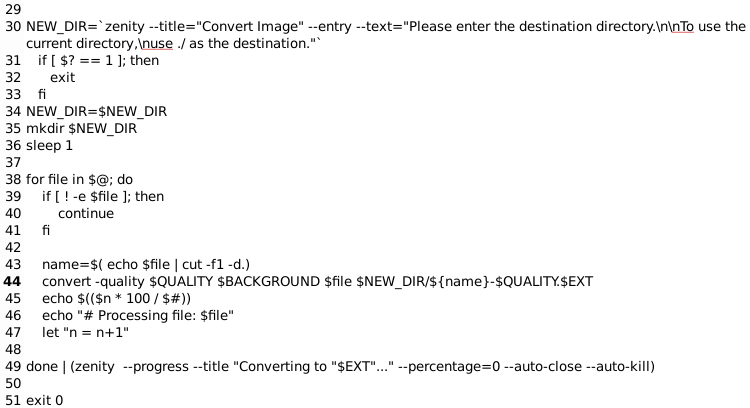 The first 10 lines of the script create the Zenity dialog box below (specifically, line 5), asking the user to choose a graphics file format to convert the original graphic to. I have altered the original script to prevent accidentally overwriting your original files. In previous iterations of this script, if you entered the same file extension for the output file as the input file, and you were saving that file in the current directory (./), you risked overwriting your original file. Such an overwrite of your original graphic file(s) has the potential to be disastrous. Of course, if the image is already in the format you desire, there's little other reason for you to be using this script, anyways. But, mistakes can and do happen, so I've taken steps to mitigate this particular disastrous outcome. Another thing you could do would be to specify a new directory (in the third dialog box of this script) to place all of your output files into. But, my solution should completely eliminate the possibility of your original files ever being overwritten. You can choose between JPG, PNG, WEBP, AVIF, TIFF, BMP or GIF file formats for the output file. The last two were added in a flight of fancy, and I suspect not too many users will want to use either on a regular basis. It would be trivial to add (or remove) file formats to this command in line 5 (hint: they are listed near the end of that command). If you choose to add additional graphic file formats to the script, just be sure that they are formats that ImageMagick recognizes (since it's what does the heavy lifting in this script). Lines 9 and 10, holdovers from the original script where users had to enter the file format manually, ensure that the file extension is in lowercase text. 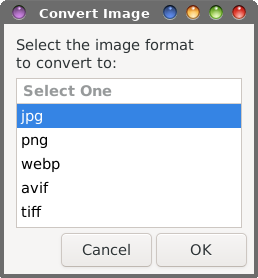 In the next dialog box (represented by lines 12-15 in the script), enter the number representing the percentage of quality level for the output file. You can enter any number between 1 and 100. Just keep in mind that larger numbers represent less compression (thus, a larger output file size and higher image quality), while smaller numbers represent greater compression (thus, a smaller output file size and lower image quality). 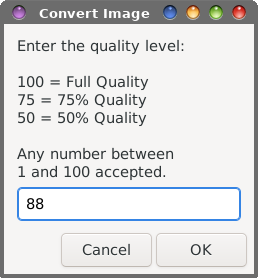 I've also added in some "error checking" with this version of the script, in lines 16-19. The number you enter MUST be between 1 and 100. If it is not, a Zenity error dialog appears, as shown below, and the script exits. The script also displays the error message and exits if you hit the "Enter" key without any input, or if you enter letters instead of numbers, or a mixture of letters and numbers. 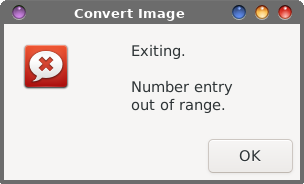 The third (main) dialog box (represented by lines 30-36) is where you specify the directory for the output file. You can enter "./" as the output directory (meaning the same directory as the input file). Or, you can specify a different directory. If the directory you specify doesn't already exist, it will be created for you. 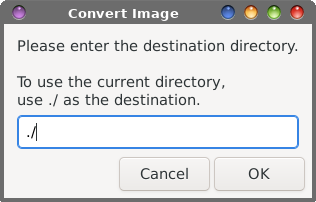 Lines 38-47 set up a loop that processes each file (yes, you can enter multiple files or use wildcards) with the ImageMagick convert command (line 44). It's in this line of the script where the valid value you entered for the quality level is appended to the end of the input filename, preventing the overwriting of your original file(s). 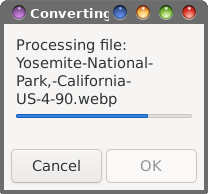 Finally, line 49 displays a progress dialog box for visual feedback for the user about where in the process the script is for converting the graphic files, before exiting cleanly when all tasks are completed in line 51. As with most of my scripts, it is intended to be run either as a standalone bash script from the command line, or (in my case, and in the case of other Xfce users) as a Custom Action from within Thunar. If you are "new" to Xfce and need assistance in setting up the Custom Action in Thunar, review my original article from March 2013. There, I show step-by-step how to create the Custom Action for this script. Mate and KDE users should also have very little trouble adapting this to either Caja or Dolphin file managers in a similar manner, but I'm not the one to direct that endeavor, since I really never use those desktops. I'm sorry LXQt users, but PCFileMan is a different animal altogether. Summary This article isn't a deep, detailed look at the WEBP graphics format. For that, reread my previous article from 11 months ago, where I dive deeply into it. It is a good output format that offers very good image quality with great savings in file size. However, it's going to take time for the LibreOffice and Scribus developers ... and many others ... to catch up. For example, my favorite image viewer is GPicView, because it's so small and fast. It is incapable (at this time) of viewing WEBP images. I have not tested the script with JXL files (why would I even have these files littering up the place when there's so little support for them in the first place?), but it should also work to convert from that format. Basically, if ImageMagick "understands" the input graphic file format, the script should be able to convert it to a more common graphic file format that you can use. So, for those times when you need to convert between graphic file formats, I give you this bash file to more easily facilitate the conversion of WEBP graphic files to a format that you can use with those programs. Are there other ways to get the "job" done? Certainly. But this script is simple and easy, and most of all, reliable. |