| Previous
Page |
PCLinuxOS
Magazine |
PCLinuxOS |
Article List |
Disclaimer |
Next Page |
Send A Gmail Message Without Opening Gmail |
|
by Paul Arnote (parnote) As the editor of The PCLinuxOS Magazine, I find myself emailing some files back and forth with members of the magazine staff quite frequently. Oh sure, we also use Google Docs, but there are some times that I need to send an individual file to individual staff members. For that task, email is a better solution, as far as I'm concerned. It is a pain, however, to have to always go to my browser (or email client ... I do not use a standalone email client. I prefer to use Gmail's web interface) and send the file from within Gmail's web interface. If I'm already looking at the file in my file manager, why shouldn't I be able to just send it from there? Well, I can. And so can you.  Before we get started, I don't want to get into a discussion about Google and their privacy reputation. I am fully aware of Google's reputation in this arena, and I choose to use their service despite it. It works for my uses, and I don't have anything to hide (at least, I don't think I do). With that stated, this article is about using Gmail's SMTP servers to send email from your Gmail account, without having to go into, or "open," Gmail. You can set this up to use any other email service or provider that you want, but you're on your own for figuring out how to set it up -- although I suspect your ISP or an internet search will be a valuable resource. Sendmail or Postfix? Just in case you're not aware, there are two main mail transport programs in the PCLinuxOS repository: sendmail and postfix. In the which-came-first-the-chicken-or-the-egg equation, sendmail has been around longer. Postfix came along later, aiming to make configuration easier while maintaining compatibility with the commands that users have grown accustomed to using with sendmail. Plus, postfix is faster and more secure. I started out to use sendmail. But, whoa! Not only was it complicated to set up, it was fickle as well. Sometimes it would work, sometimes it wouldn't. After writing my script and getting everything just how I wanted it, something prevented sendmail from completing the email transaction. I tinkered with a few things, and managed to get sendmail to work again. However, I never did figure out exactly what I did that caused sendmail to finally start sending emails again. So, so I decided to cut my losses, installed postfix and tried again. Note that you can only have one or the other -- either sendmail OR postfix -- installed. Installing postfix in Synaptic caused sendmail to be uninstalled. Similarly, installing sendmail will cause postfix to be uninstalled. Despite more steps, postfix seemed easier to setup. It also "felt" more stable, and worked whenever I called it into action. Thankfully, I didn't have to rewrite my script, since both sendmail and postfix use the same commands to send mail. Abbreviated instructions for both sendmail and postfix are in the comments of the send-gmail script, which is downloadable from the magazine's website, along with links to the original articles where I found the initial instructions. Those comments have been stripped from the version of the script published here in the pages of the magazine, for space considerations. We will, however, go over those instructions within this article. Feel free to attempt the sendmail route, if you wish -- and if you're brave enough. However, although it has a fewer number of steps, it's a far more complex program than postfix. The latter originally set out to simplify the entire process, and succeeded. I've included the instructions for sendmail below, for your convenience. Your mileage may vary. The directions for the setup of either sendmail or postfix should be the same, regardless of which desktop environment you are using. Laying the foundation with sendmail Step 1: Install sendmail from Synaptic Step 2: As the root user, enter the following commands on the command line:
     mkdir -m 700 /etc/mail/authinfo
     cd /etc/mail/authinfo
     echo 'AuthInfo: "U:root" "I:YourEmailAddress" "P:YourPassword"' > gmail-auth
        (the I: must precede your email address, and P: must proceed your password)
     makemap hash gmail-auth < gmail-auth
Step 3: Still as root, edit your sendmail.mc file (in /etc/mail). Place the following lines RIGHT ABOVE the first line that says MAILER. (DO NOT place the following lines at the top/beginning of your sendmail.mc file!).
     define(`SMART_HOST',`[smtp.gmail.com]')dnl
     define(`RELAY_MAILER_ARGS', `TCP $h 587')dnl
     define(`ESMTP_MAILER_ARGS', `TCP $h 587')dnl
     define(`confAUTH_OPTIONS', `A p')dnl
     TRUST_AUTH_MECH(`EXTERNAL DIGEST-MD5 CRAM-MD5 LOGIN PLAIN')dnl
     define(`confAUTH_MECHANISMS', `EXTERNAL GSSAPI DIGEST-MD5 CRAM-MD5 LOGIN PLAIN')dnl
     FEATURE(`authinfo',`hash -o /etc/mail/authinfo/gmail-auth.db')dnl
Step 4: Still as root, rebuild sendmail's configuration. Run the following command:
make -C /etc/mail
Step 5: As root, restart the sendmail service:
/etc/init.d/sendmail reload
Step 6: IF you've done everything correctly, test it. You should receive an email from yourself by entering the following in a terminal:
echo "This is a test" | mail -s "Testing" [your-email-address@yourdomain.com]
Remove the brackets from around the email address!
Laying the foundation with postfix
      relayhost = [smtp.gmail.com]:587
      smtp_sasl_auth_enable = yes
      smtp_sasl_password_maps = hash:/etc/postfix/sasl_passwd
      smtp_sasl_security_options = noanonymous
      smtp_tls_CAfile = /etc/postfix/cacert.pem
      smtp_use_tls = yes
Step 3: Create the file /etc/postfix/sasl_passwd.
[smtp.gmail.com]:587 USERNAME@gmail.com:PASSWORD
Step 5: Fix permissions and update postfix to use our sasl_passwd file:
      chmod 400 /etc/postfix/sasl_passwd
      postmap /etc/postfix/sasl_passwd
Step 6: Download cacerts.pem from http://curl.haxx.se/ca/cacert.pem and place the file in /etc/postfix. Right click on the link and select "Save file as..." from the browser menu. Otherwise, your browser may attempt to open it for what it is (a certificate file) and not go any farther. Step 7: Open the /etc/postfix/aliases file. Find the line that reads postmaster: root, and replace "root" with a REAL user (your username on your computer). This is on line 15 of my aliases file. Do the same thing on line 80, changing the second instance of "root" to a real user. Step 8: Run the command newaliases, then restart postfix with the command service postfix restart. Step 9: RESTART YOUR COMPUTER! Step 10: IF you've done everything correctly, test it. You should receive an email from yourself by entering the following in a terminal:
echo "This is a test" | mail -s "Testing" [your-email-address@yourdomain.com]
Remove the brackets from around the email address!
The send-gmail script So now that we have a foundation, -- the backend (either sendmail or postfix) in place to communicate with the Gmail SMTP servers -- we can create a script to handle all of the user end input. I chose to use Zenity to provide dialog boxes for data input, due to its simplicity and relative ease of use. First, here's the script: #!/bin/bash # send-gmail.sh # # A script that uses sendmail (mail) to send a file to the specified # user from the command line, or from a Thunar Custom Action. The # script is enhanced with Zenity text entry dialog boxes to walk the # user through sending the email. # # Postfix portion based on an article from: # https://rtcamp.com/tutorials/linux/ubuntu-postfix-gmail-smtp/ # and info from footstep11 in the PCLinuxOS forum To start off with, the script defines two variables, hasCC and hasBCC, and sets them to zero. It then uses a series of functions to define the data entry dialog boxes, controlled by Zenity. These dialog boxes allow you to specify the text of your email message, the recipient's address, the subject of your email, plus any CC (carbon copy) or BCC (blind carbon copy) recipients. The first three data items are required to send an email, but not every email is sent with CC or BCC recipients. Since CC and BCC recipients are optional, they present a special case. They also alter the command we use to send email. This is where the two variables come into play. If there are no CC or BCC recipients, the value of the hasCC and hasBCC variables remain zero. However, if the end user decides to send the email to CC or BCC recipients, or both, the value of the appropriate variable is changed to 1. It's the value of these variables which dictates which command to use to send the email (hence, the last set of four conditional if statements at the end of the script). One other thing that is required to send an email is a filename or path and filename, passed as a command line parameter. Remember, my original intent is to be able to send an email directly from my file manager, without having to open or switch to my browser or email client. In fact, the script starts off with showing the dialog box where you can specify the filename, or the full path and filename. If you have selected the file in your file manager, and if you have the script set up to function from your file manager's right-click context menu, the filename should already be displayed in the filename entry window. But more on that a little later on. It then calls each function, one at a time in a modular fashion, giving the user a chance to enter the required information in each dialog box. When you respond to the last dialog box (regarding BCC recipients), the file will be emailed to your designated recipients. What you get The send-gmail script has the potential to display 19 different Zenity dialog boxes, but it would be pointless and redundant to display all the different dialog boxes. While the script has very little error checking, it does check for the presence or absence of data. The presence of certain data (like a CC or BCC recipient) changes the command to send email. Similarly, if you enter an email address of less than 10 characters long (this limitation is in effect for the primary recipient, CC recipient and BCC recipient email addresses), a subject of less than three characters, or a message text of less than five characters, you will be given an opportunity to either re-enter the information or exit. Here are nine of the more common dialog boxes you will see: 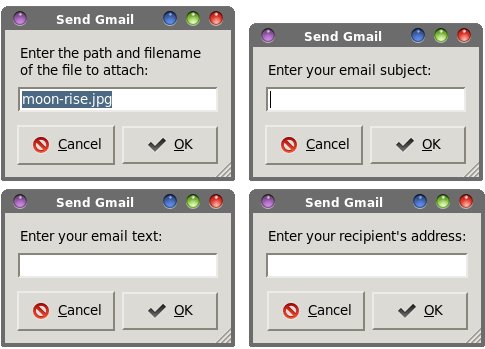 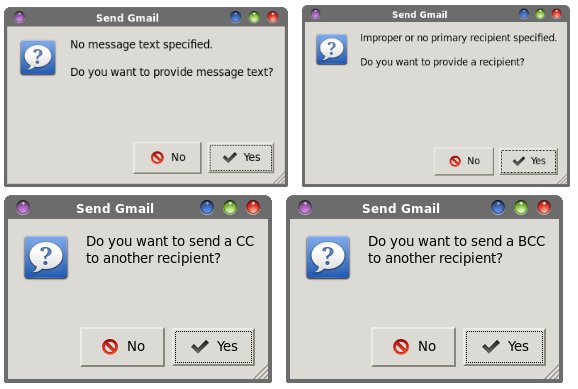 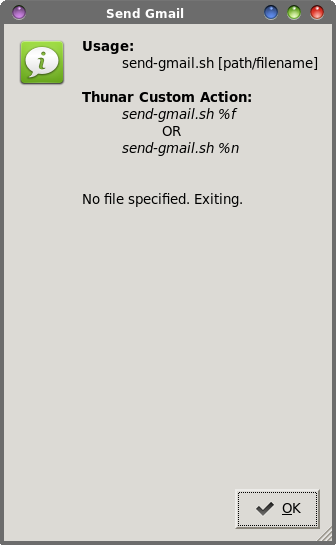 How to use The send-gmail script is a fully functioning bash script that can be used from the command line. When executed from the command line, you will still get the graphical dialog boxes into which you input data. Remember that you must specify a filename (or full path and filename) as a command line parameter. But then remember our original intent -- to be able to use it from your current file manager. Fortunately, many of the modern file managers give you the ability to extend their functionality, via their right-click context menu. It would be best to store the script in a directory that is in your $PATH statement, to make it easier to implement. Otherwise, you will have to supply the full path and filename to the script when you call it into action. The examples below assume that you have stored the script in a directory in your path. Under KDE, you can set up a KDE service menu. We've covered how to do that in a previous issue of The PCLinuxOS Magazine. Because it is a lengthy description of the process (although not a hard one to implement), I'll refer you to the previous article that explains the process. The command to execute should be send-gmail.sh %f. But basically, your entry should look something like what I have listed below. Be sure to save it as send-gmail.desktop, in ~/.kde4/share/kde4/services if you only want the script to be accessed by a particular user, or in /usr/share/kde4/services if you you want the script to be accessible to everyone who uses the computer. [Desktop Entry] Type=Service Name=Send Gmail Encoding=UTF-8 ServiceTypes=KonqPopupMenu/Plugin Actions=SendGmail MimeType=application/octet-stream Icon=gmail [Desktop Action SendGmail] Name=SendGmail Exec=send-gmail.sh %f Icon=gmail Under Xfce, you can set up a Thunar Custom Action. The command will be either send-gmail.sh %f or send-gmail.sh %n (either one will work ... %f is the full path and filename, while %n is just the filename). Under the "Appearance Conditions" tab, leave the file pattern set to the default value of *, and place a checkmark in front of every file type. Now, when you right click on a file, it will be attached to your outgoing email and sent to your specified recipient(s). Under Mate, which is essentially a continuation of Gnome 2.x, you can set up the script for use from Caja's right-click context menu. Simply place a copy of the send-gmail.sh script in ~/.config/caja/scripts. Make sure to mark the file as "executable." If you did it right, "send-gmail.sh" should show up on Caja's right-click context menu, under Scripts. Now, when you right click on a file and select Scripts > send-gmail.sh, the selected file attachment will be sent to the specified recipient(s). Under Cinnamon, the file manager is Nemo, which is a fork of Nautilus. You can set up the script to use Nemo's right-click context menu. Just place a copy of the send-mail.sh script in the ~/.gnome2/nemo-scripts folder, and mark the file as executable. Now, the send-gmail.sh script should show up under Nemo's right-click context menu, as an entry under the Scripts menu item. Select the file you want to send as an email attachment, right click on it, and select our new menu entry. Your selected file will be whisked off to your recipient(s). LXDE users, along with others who use PCFileMan file manager, are pretty much out of luck for using this script from within PCFileMan. The developers of PCFileMan only recently started allowing for custom extensions to the file manager. However, those extensions are written in C and have to be compiled with gcc. As far as I can tell, the only thing it allows are extensions written in C and compiled. Even then, the details are a bit sparse. There is hope (hope springs eternal, right?) that the developers will build in easier, user-accessible extensions into PCFileMan when LXDE makes the switch from being based on Gtk+ to being based on Qt. There IS one option for PCFileMan users, though (which is more than they've ever had previously). Right click on a file or directory you want to send. Select Open With... from the context menu. Click on the "Custom Command Line" tab in the dialog box that appears. Enter send-gmail.sh %f (provided you've saved the script into a directory in you path; otherwise you will have to prefix the script filename with the full path) into the command entry box, then click on OK. I know that it's a lot of steps, and it may just be easier to send the file from your browser or email client. Aside from that convoluted solution, the other solution is to open a terminal in the directory that contains the file/directory you want to send, and run the send-gmail script from the command line. Be sure to specify the filename, or directory name, of the file/directory you want to send. In fact, that might be way easier than using the "Custom Command Line" method we previously discussed. In any of the recipient entry dialog boxes (primary recipient, CC recipient or BCC recipient), you can enter multiple email addresses simply by separating each address with a comma. For example, pclinuxos.mag@gmail.com,yourfriend@somedomain.net,someoneyouknow@ thisdomain.com would email the file to all three addresses. By default, the script is set up to send single file attachments. It certainly can be extended to handle multiple file attachments, but this avoids the chore of listing through multiple files and adding each attachment to the outgoing email. If you want to send multiple files as an email attachment, it would be best to package them all up in a compressed archive file (.tar.gz, .zip, .bz2, .xz, etc.) and send the archive file to your recipient(s). However, there is one exception. If you select a directory of files to send to your recipient(s), the send-gmail.sh script will automagically create a .tar.gz file, with the same name as the directory, store that archive file within the selected directory, then send that same archive file to your recipient(s). By storing the archive file within the directory being archived, we keep things nice and tidy. If, though, you want the archive file to be saved in the parent directory of the directory being archived, you can easily change the script. Simply alter lines 161 and 162 in the listing above to read as follows:
      tar -zcvf $1.tar.gz $1
      FILE=$1.tar.gz
Similarly, you can alter the tar command to produce an archive file type other than a .tar.gz file. Changing the "z" in the tar command to "j" will create .tar.bz2 files, and changing the "z" to "J" will create .tar.xz files. Be sure to change the file extension to match the compression algorithm you choose to use. Also, if you want to use ZIP archives (for sharing with your Windows friends ... even though many Windows utilities exist that allow them to read a .tar.gz file, such as WinZIP and PeaZip), you can change the commands to read like this: zip -r -x $1.zip $1.zip $1 FILE=$1.zip One other quick point: the commands that deal with filenames (which is pretty much the whole script, since it's centered around sending an email with a file attachment) work very well with filenames that don't have spaces in them. If you are in the habit of using spaces in your filenames and directories ... STOP! Linux is not Windows, and it was Windows that introduced this abominable practice. We've covered this topic many times before here in the magazine, and it's a debate that goes on ad nauseum. You should NOT use spaces in filenames on a Linux file system. Spaces are used to separate command line parameters, so spaces in filenames and directory names are a BAD idea, since the command line -- and bash scripts -- see a space as a delimiter for the command line parameters. It's a foregone conclusion that we won't solve that debate here. If you find the spaces-in-your-filenames-and-directories habit too hard to break, though, simply put double quotes around the filenames in the script. I'll leave that for you to do on your own. Call it "diversional therapy." If you have a need for this script and you still put spaces in filenames (a dash or underscore works just as well, if you must), maybe forcing you to make the changes yourself will help underscore the reasons why you need to stop using spaces in your filenames. Caveats Remember that the send-gmail script has very little error checking built in. As such, send-gmail has no idea if what you entered as an email address is a proper email address or not. There is a daily 500 email limit on the number of emails that you can send using Gmail's SMTP servers. That limit is applied over a rolling 24 hour time period. So, if you reach the limit at 1 p.m., your Gmail account will be unable to send emails via Gmail's SMTP server until 1 p.m. the next day. I've never reached that limit (I don't send THAT many emails), but that may be an important consideration for users who send a LOT of emails. Google does this to prevent their SMTP servers from abuse by email spammers and mass marketers. In the event that you need to send more emails than the applied limit on Gmail, it might be better to use your own SMTP server to handle the task. Summary As you can see (if you made it this far), the send-gmail script can save you steps and time when you need to send a file as an email attachment. Certainly, there are areas where it can be further extended. For example, it wouldn't be a terribly hard task to display a file selection dialog box in the event that a filename wasn't specified. It also wouldn't be a terribly hard task to allow the user to select multiple files, create an archive file from them, then attach that archive file to the outgoing email. Nor would it be too difficult to allow the user to select which type of archive file to create. You could get as fancy as you like, adding in the ability to check if the entry is a bona fide email address. Already, this script has streamlined my ability to send files as email attachments. I hope you find that it does the same for you. I've attempted to make the use of this script as desktop-environment agnostic as I could. If you come up with some enhancements to this script, I'd love to hear from you. Drop me a PM in the PCLinuxOS forum, or send me an email at pclinuxos.mag@gmail.com. |