| Previous
Page |
PCLinuxOS
Magazine |
PCLinuxOS |
Article List |
Disclaimer |
Next Page |
Inkscape Tutorial: Create A Paisley Pattern, Part One |
|
by Meemaw I grew up in the 1960's, and sometimes we wore some pretty wild stuff. One of my high school friends, very talented artistically, painted her yellow car with hundreds of paisley patterns on our last school day before graduation. Go to Google, search for paisley, and you can find tons of patterns! 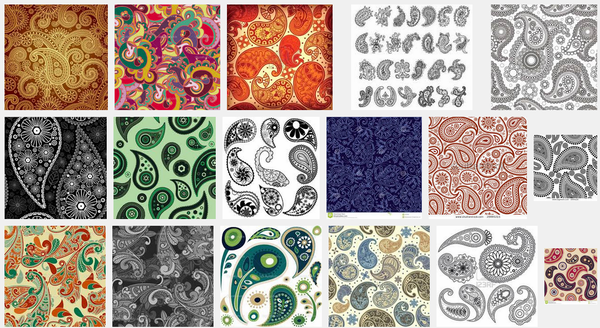 This sort of pattern seems to be making a comeback. I've found it on everything from clothing to tablecloths and from tablet and phone covers to tattoos. As you can see, this is basically a curved teardrop pattern with a lot of extra patterns inside it to make it fancier. How can we make one of these? We can use Inkscape. Last month we made several small patterns to use in a project, and we will use some of them now to make our paisley. We will start drawing the teardrop using the Bezier tool. Then we will "pretty it up" with the small patterns we made last month. Let's make one similar to this one: 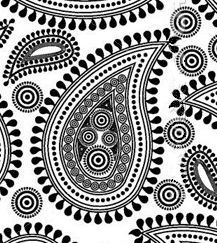 (Wow! I don't want to have to place all those little circles by hand!) Don't worry, we'll use a different method. Let's draw our teardrop first. Open a page in Inkscape and choose your Bezier tool. Using that tool, make a kind of teardrop shape, clicking with your mouse at least 10 or 12 times. That will give us nodes to use to manipulate our shape. Set the stroke black or gray, and the fill white. 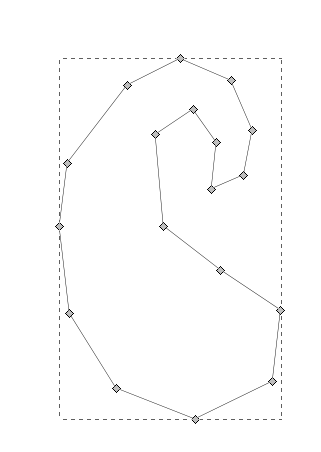 When we were making our basic shapes, we used the Auto-Smooth tool to round off our leaf. This time we want to smooth out this teardrop, so select all of your nodes by drawing a frame around them with the Node tool, BUT, before you hit Auto-Smooth, press Shift and de-select the node on the very end. We want it to have a point on it. 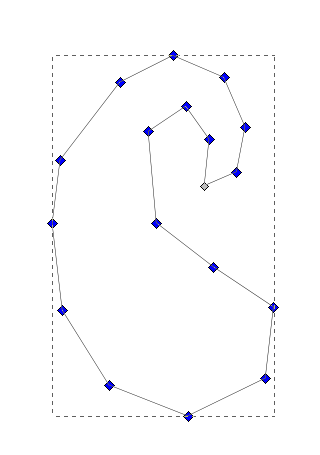 Now click Auto-Smooth. Each of your line sections will become rounded and the curve will be much smoother. You may still feel like adjusting a few of the nodes separately. Go ahead! It's your project. I adjusted some of them in the example below. 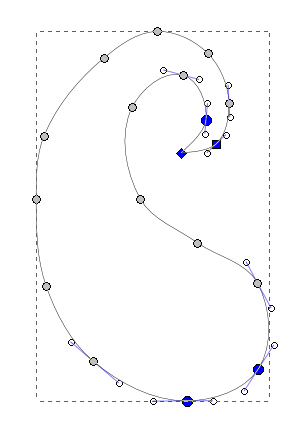 Now, instead of trying to draw another one of these, we are going to duplicate this one and adjust the size. Click on your object and duplicate it. Remember that the duplicate is placed directly on top of the original, and it is now selected. Click on Path > Outset to increase the size of your object, or press <CTRL> + ). Each time you press it, your new curve will grow a bit. My preferences are set to 2 px, and we want it 20 px bigger all the way around, so we should do this ten times. You can use the menu, but the keyboard shortcut is much quicker! 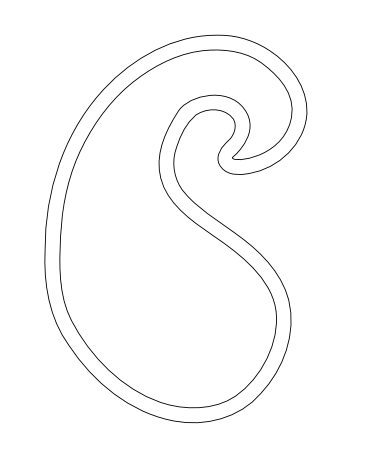 Now, choose the original object and duplicate it again. This time use the Path > Inset menu item or <CTRL> + (. This one will shrink inside of the original so you will have three separate curves. 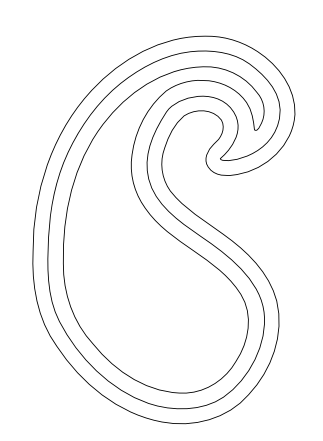 Now we want to place some decorations on our object. Remember those decorative patterns we made last month? Import them into your new project. It's easier to import the svg file so changes can be made to them if necessary. After you import it, you should click on Ungroup so you can move each of them around freely. 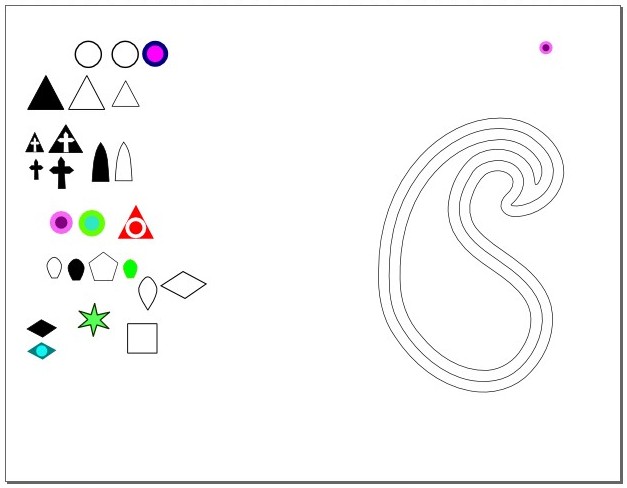 Now we are going to decorate our curves. Notice that I have duplicated and resized one of the circular shapes and it is on my page above my paisley curve. Click on the circular shape and, holding the <Shift> key, click on the outer curve. Now click on Extensions > Generate from Path > Pattern along Path. The following window will appear: 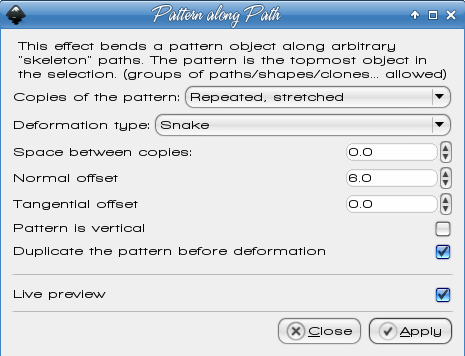 The following options are available, and I will explain each: Single; Repeated; Single, stretched or Repeated, stretched - This choice determines how the objects are arranged around your path. Single means that only a single copy is used, while repeated means that (obviously) the pattern is repeated all around the path. Stretched means that the pattern is stretched around whatever curve you use. Snake or Ribbon - Snake means that the copies are arranged in a flat manner, while ribbon means that they have a bit of perspective to them. Depending on your project, you may need the ribbon setting instead, but we're using Snake here. Space between copies - You can set your group of objects to be spaced out, or touching at the edges. This will require a number setting. A setting of zero lets them touch, while a setting of 3 pixels will space them out 3 pixels. Normal Offset - This will set your group of objects directly on your curve, but setting the offset with a positive or negative number can set them inside or outside your curve. Tangential Offset - This setting has the effect of moving your objects sideways on your curve, which can be helpful if you see a corner where your objects seem to have a result you don't like. For example, my diamond might show up as on the left, but shifting it a bit would give the result on the right. Each pattern is different, so you would have to play with the settings to get what you want. If making the setting positive doesn't seem to work, try a negative setting. 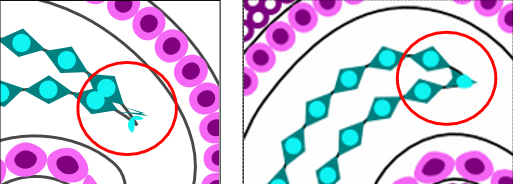 Pattern is vertical - I haven't used this except to experiment, but I found that it orients all of the objects at a 90 degree angle. I had my diamond shape oriented "longways", but when I checked the box, the extension oriented the diamonds with the short edges touching. In the example below, the outer line results if Vertical isn't checked, and the inside line results if it is checked.  Duplicate pattern before deformation - Duplicates the original pattern you are using before you close the window. If it isn't checked, the single pattern above the project will be deleted. It might be OK to leave it unchecked, but it's always nice to have a copy of the pattern until you are completely finished with your project. Live Preview - Lets you see your choices as you alter them. If you change one of the number settings, you move to another settings box before you see the change. In the example below, the pink & purple circles and the outside purple circle combination were added to the outermost curve, the blue & purple ellipses were added to the next curve inside, then the diamonds were added to the innermost curve. 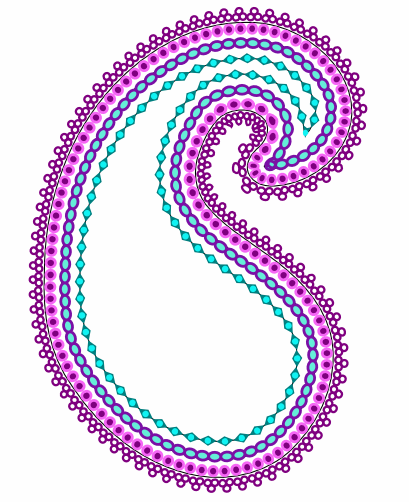
The settings are as follows:  1st; 0, 6, 0 (6 for offset put it inside the curve I used) 1st; 0, 6, 0 (6 for offset put it inside the curve I used) 2nd; 1,-8,0 (-8 for offset put it outside the curve) 2nd; 1,-8,0 (-8 for offset put it outside the curve) 3rd; 0, 0, 0 then tangential of 2.5 (to fix the corner) 3rd; 0, 0, 0 then tangential of 2.5 (to fix the corner) 4th: 0, 0, 0 4th: 0, 0, 0
All have Duplicate pattern before deformation checked. Make sure you have saved your work. This is a good start! I'm sure your selected patterns and colors are very different from mine, although I made a couple of different colored patterns. Next month we will finish this design. |