| Previous
Page |
PCLinuxOS
Magazine |
PCLinuxOS |
Article List |
Disclaimer |
Next Page |
The Z-Shell |
|
by Peter Kelly (critter) What is it? When you enter a command on the Linux command line, you are typing text into a shell, which acts as an interpreter between you and the operating system. This is mostly transparent and users can simply type in their commands or execute their scripts without having to know about such mundane matters. The shell program that most Linux distributions default to is the Bourne Again SHell, more commonly referred to as bash. Unix users might use the more powerful Korn shell, ksh or the c language type shell known as csh or the c-shell. If however, you spend a lot of time on the command line, then you may like to try the even more powerful z-shell, also known as zsh, which is available in the PCLinuxOS repositories. What can it do? These are some of the reasons to consider using zsh.
There is a lot more, but that should give you an idea of what zsh is capable of. How does it do this? The GNU utilities, being text based, need a method of inputting and editing a line of text to be used by the utility. This functionality is provided by the readline library. The bash shell and many of its 'built-in' functions use this library to provide some quite impressive editing features, such as command completion. The z shell improves on this by implementing its own z-shell line editor, or zle. This editor is mostly backwards compatible with the bash editing features, but is capable of a lot more useful editing time-savers and tricks. Options are available to make zsh more, or less, compatible with bash, and with more restrictive shells such as sh, ash and dash, as well as the POSIX shell (which confusingly insists on also being named sh!). The z-shell is most like ksh, the korn shell, and least like csh, the c-shell. For users familiar with only the bash shell, the one thing that most will notice is the addition of more features, should you wish to activate them. Everything else should just work out of the box, so you won't have to re-learn your command line syntax. There is one particular exception to this (although I have had no problems), in the handling of multiple-word variable assignments, but even this has an option to allow more bash-like action, should it affect you. There are many more differences in zsh, especially with respect to scripting and array handling. Array elements are indexed from zero in bash and from one in zsh for example. This behavior may be changed by setting the KSH_ARRAYS option, but all of your existing scripts should be fine, thanks to the #!/bin/bash on the first line, which tells the operating system to use bash (or whatever else you have put there: /bin/sh /usr/bin/perl...) to interpret the commands in the file. Not all of the abilities I have mentioned above are switched on by default, and a first run would seem to be rather unexciting (unexciting is actually quite a good thing on the command line). You are presented with a first-run setup screen. This allows you to activate some of the features that distinguish zsh from more conventional shells. Distributions such as Arch and Gentoo have ample documentation for zsh in their respective wikis, but they refer expressly to zsh as compiled/packaged for that particular distribution. In this introduction I want to show how to get up and running with the PCLinuxOS offering, how to set up and use some of the more useful features, and perhaps to whet your appetite to investigate further. Installation and initial set up Open Synaptic, re-load and mark all updates, then mark zsh and zsh-doc for installation or, as root from a command line, since this is what the article is about, do this.
# apt-get update 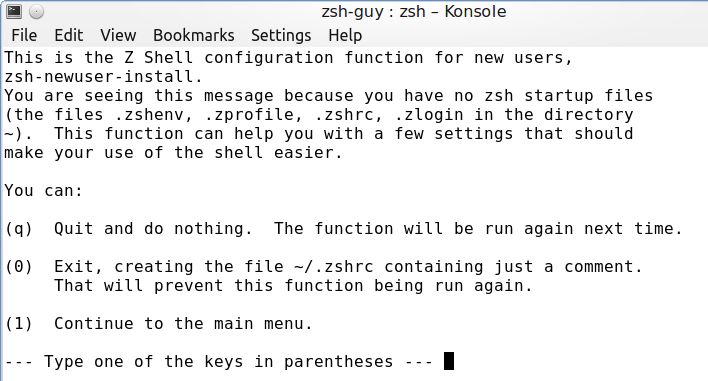 Open a command line (you will still currently be using whatever shell you usually use, probably bash) and type $ zsh. This will open an instance of the z-shell, and since you haven't yet got any configuration files set up, you will be presented with the following initialization screen. This and the following screens allow you to set up the initial working environment. 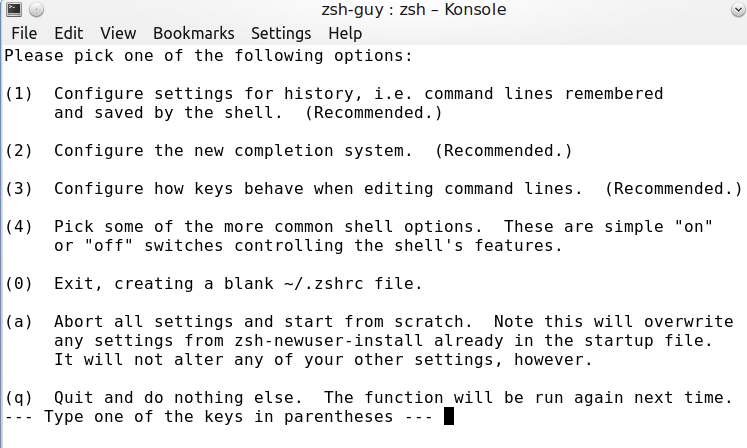 Press 1 and you will get a menu like that shown below. These options are saved to your local zsh configuration files, so they may be later changed with a simple text editor. 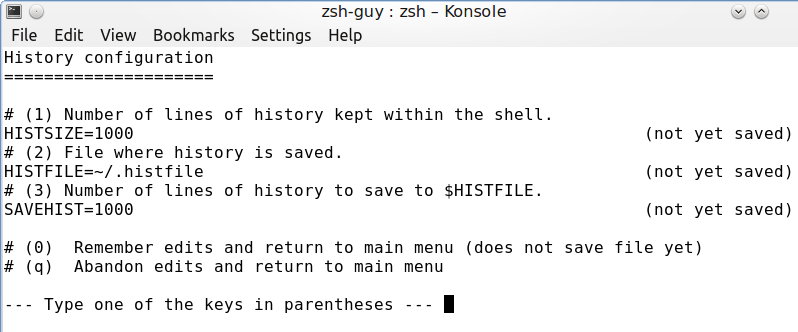 Option 1 brings up the screen below. Unless you have a reason to change any of these settings, just enter 0. Nothing will be saved until you accept the changes when you exit this utility. 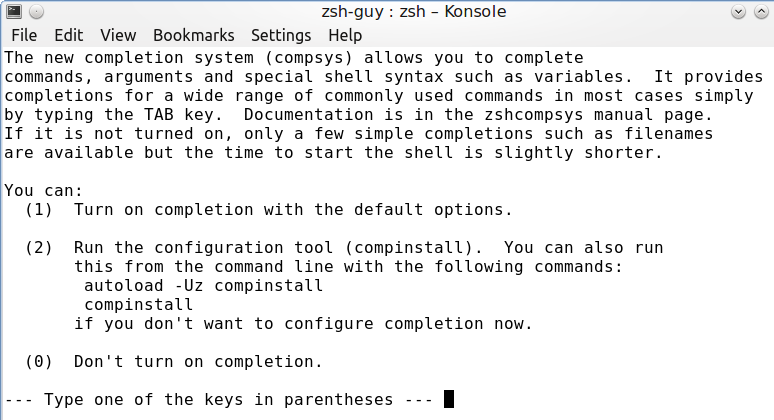 With option 2 you get the screen below. For now, just type 1 for the default options. Completion in zsh is very comprehensive, and the options can at first be somewhat confusing. 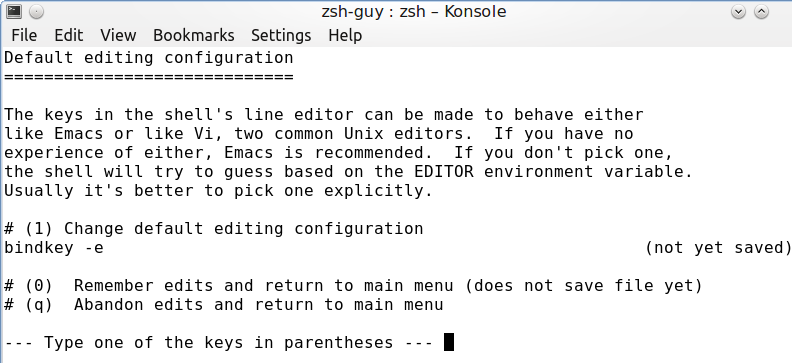 Option 3 gets us this screen, below. If you use the vi editor, you may be tempted to change the editing keys to reflect that, but bash uses emacs keys by default (e.g. control-a to go to beginning of the line). So, if you are used to those command line shortcuts, you may be better off sticking with those to avoid confusion. 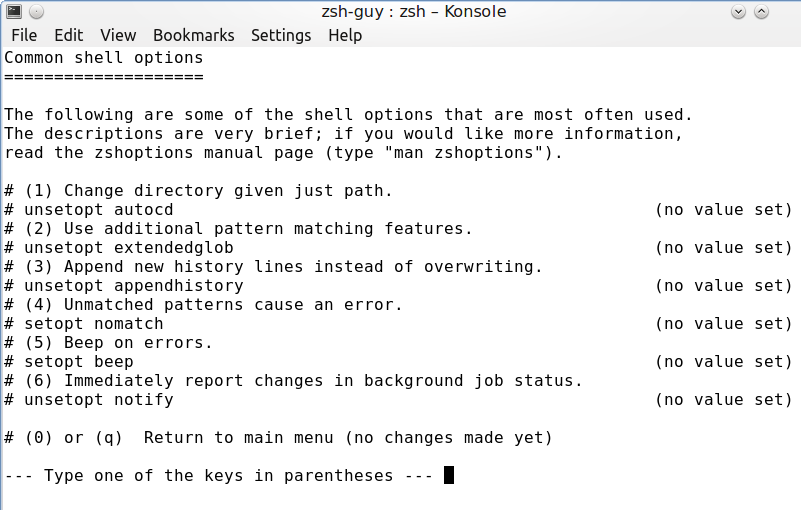 Option 4 is a little more interesting. I would suggest setting shell options 1 and 2. Type the option number and choose set.  Finally, return to the main menu and choose the option to save your settings Now that the configuration files have been written, it is time to make zsh your default shell. This is done by editing the file /etc/passwd as root, or with the following command: chsh -s /bin/zsh You will be prompted for your password, and then it will be necessary to log out for the change to take effect. Some terminal emulators, such as kde's konsole and mate-terminal, use profiles which may specify which shell to start on launch, so it may be necessary to edit or to change the profiles to open in zsh. You may see the warning /etc/profile.d/01msec.sh:21: = not found. The script issuing this warning is one of msecs security scripts which checks for the current directory being in the PATH (a known security issue and PCLinuxOS wisely sets this to 'no' by default). The reason for the message is because of the way that zsh handles tests. The code which is being complained about is, as stated in the message, line 21 of /etc/profile.d/01msec.sh: if [ "$ALLOW_CURDIR_IN_PATH" == "yes" ]; then The problem is the handling of '=='. Change the old-style test operators [ ] to the newer, preferred operators [[ ]], zsh will be happy, and the messages will go away. This should be perfectly safe, as the result of the test is the same. I have had no problems anyway. As far as I know, the new style is not defined in the POSIX standard, so be aware of that if compliance is an issue for you. Note that any aliases and functions defined in your .bashrc or .bash_profile files are not available here, as this is a new environment (although functions can be exported from bash to a sub-shell with export -f ). Command completion You are now in the z-shell. Although it may not look very different – well maybe the prompt, and we'll change that soon – but try this. You will no doubt be familiar with bash command completion, but now type a command that you regularly use but forget the options of. let's type mount, type a space, then one or two dashes, then press Tab. Now zshells completion prompts us with all of the options for the command (long options only, if you entered two dashes), along with their descriptions. Type the first letter or two of the option, and press Tab again for zshell to complete the typing for us. Completion is something that zsh does extraordinarily well. If you look at your .zshrc you will find the lines
autoload -Uz compinit This means that the module compinit which sets up completion in zsh has been loaded and executed. Menu selection Sometimes you will get a great many completion options, and tabbing through them all would be very tedious. So zsh provides a feature known as menu select. Add this line to the end of your .zshrc file: zstyle ':completion:*' menu select Now suppose, that as root (I'm presuming that root has also migrated to zshell), you want to install the gnumeric spreadsheet application, but are unsure of the correct package name to pass to the package management tool. 
Type  Press tab again and the first one will be highlighted. Now use the arrow keys to select apt-get. 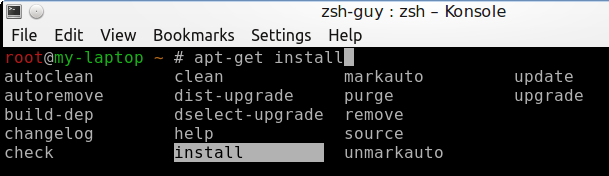 Type a space then the tab key twice to get a list of sub-commands to apt-get and then arrow over and down to the install sub-command 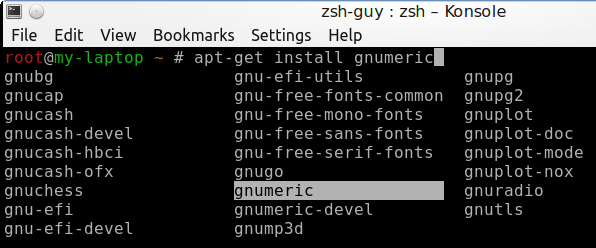 Now type a space, followed by 'gnu', then two tabs, arrow over to gnumeric, and press return. Apt will list any dependencies that also need to be installed/upgraded before asking for confirmation to go ahead and install. Although zsh knows a lot of completions for a lot of commands, it is inevitable that you will find some command whose options are unknown to zsh. In that case, zsh allows you to program your own completion commands as script functions, but that would perhaps be too much for this introduction. Spelling correction There are two options that control spell checking, correct and correctall. The first provides spell checking for commands, while the second checks arguments. Look at this screen-shot. 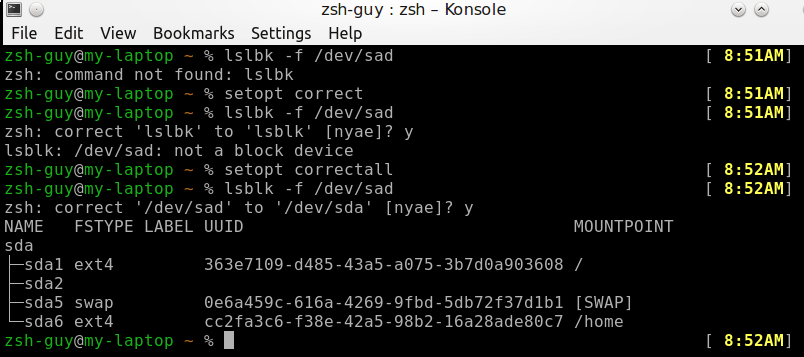 The command that I wanted to execute was lsblk -f /dev/sda but both lsblk and the argument /dev/sda contain typos. Pressing enter, the shell responds that it doesn't recognize lslbk as a command and aborts. With the correct option set, recalling the command and pressing enter the shell now recognizes the spelling error and prompts to correct it with zsh: correct 'lslbk' to 'lsblk' [nyae]?. Typing 'n' means no correction. Perhaps you have an alias called lslbk not known to the spell checker. A 'y' means go ahead and change it, 'a' means abort the command and 'e' displays the line for editing, just in case you don't like the offered correction. With 'y' entered, the command is evaluated, but now we get a complaint that device /dev/sad does not exist. Setting correctall and trying again, the shell now offers to correct /dev/sad to /dev/sda. Typing 'y' corrects the argument and the command is executed correctly. Having these two setoption statements in your .zshrc makes all of this happen automatically. Batch renaming Normally when you want to rename a file, you use the mv command to move it from one name to another. That is the way that it has always been done under Unix/Linux. If you needed to rename a batch of files, perhaps changing a common extension say .zip to .z, then things are not so simple. You could set up a routine to loop through a set of files, identifying possible candidates, or you could use find and xargs or exec. You could also install one of the utilities that has been written through the years by others facing this same, wearisome task. However, if you are running zsh, you could use zmv. The zmv command is not available by default, and must be loaded by the command autoload -U zmv Usually this would be put into your .zshrc file. The basic use of zmv is the same as mv. That is, mv source dest becomes zmv source dest. But there is one very important difference. If we introduce a wild-card character (also known as a globbing operator) into the source, then we can re-use the expanded glob as a back reference in the destination. Taking our zip example this is how it works. zmv '(*).zip' '$1.z' The quotes are needed to prevent the shell from 'interfering' before the zmv command gets hold of it, and the parentheses are used to create the back reference. We can use more wild cards and create more back references. If we had files like this (unlikely I know, but...)
onetestcase.zip and we needed to rename them like this
one_results_case.z Then we could simply use this command: zmv '(*)test(*).zip' '$1_results_$2.z' and the renaming would be done. Personalizing and prompting Now, about that prompt. Add these lines to .zshrc
autoload -U promptinit This loads the promptinit module and then executes it. zsh comes with quite a few pre-defined prompts which you can list with prompt -l or preview with prompt -p Depending on your terminal background color you will get something like these previews. 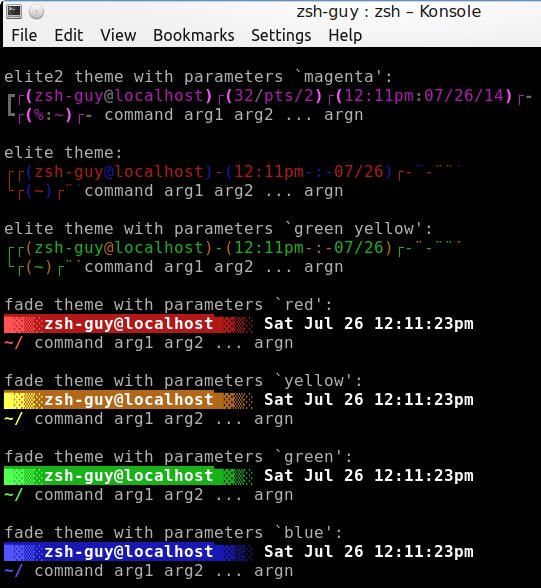 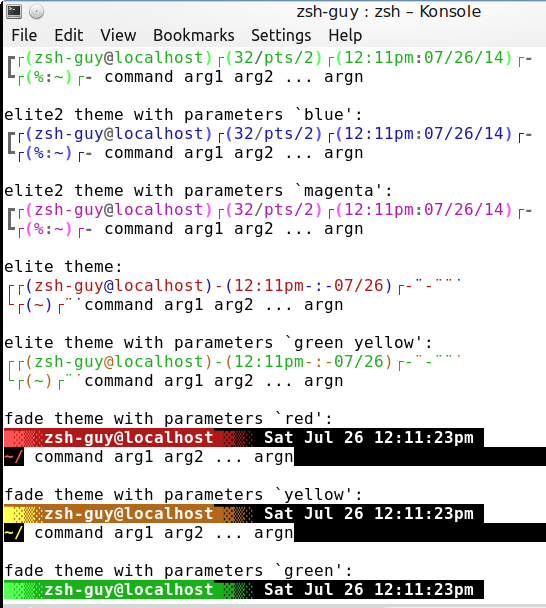 To set the prompt to one of these, simply add the name and parameters to .zshrc after the initialization of promptinit. For example, to set the prompt to the fade theme with the parameter 'blue', enter this in the configuration file: prompt fade blue Note: The default prompt for normal users is usually '$', but the default in zsh is '%'. I like this as it reminds me that I am using zsh, not bash. The prompt for elevated privilege users (e'g' root) remains '#'. If you prefer to construct your own prompt then fine. Zsh even allows a left and a right aligned prompt, with the right hand prompt auto-hiding as your typing approaches it. Colors are handled differently in zsh, so before defining a colorful prompt you should add:
autoload -U colors 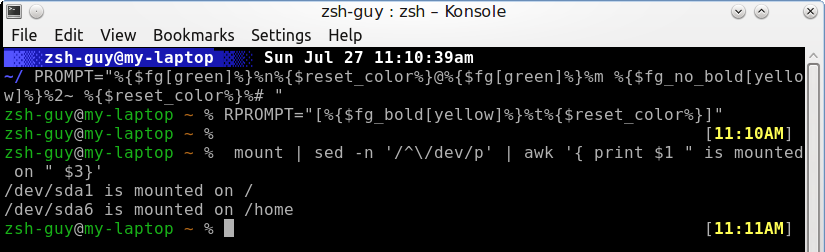 The prompt is set using PROMPT= and the right prompt using RPROMPT=. The prompt is assembled from a string of text and variables, which are described admirably on the Arch Linux wiki here. Notice how the right prompt disappears out of the way as you type longer commands. Once you have it as you like it, save it to .zshrc, after the required autoload functions. If you want more personalization, then you can install one of the community driven frameworks, such as Robby Russell’s oh-my-zsh (you will need to install git and wget from the PCLinuxOS repositories, Oh! And back up your .zshrc before installing). Oh-my-zshell comes with over 120 themes and a heap of plug-ins, modules, aliases and functions that enable you to completely transform your command line experience. It is generally frowned upon to install anything from outside of the repositories, but I believe that it is safe to make an exception for this package. However, you will have to decide for yourself. If you want to try it, then enter this at the terminal.
wget --no-check-certificate That will set up everything on your machine. Restart zsh, or logout/in, and then start reading the oh-my-zsh docs. Extended globbing File-name globbing is the strange term used when we substitute wildcard characters, such as '*' and '?' for characters we don't know. The command ls -ld D* will produce a long listing of all directories that begin with an uppercase 'D', followed by zero or more characters. We can also specify ranges, classes and groups of characters or integers. While all of this is very useful, zsh takes it a stage further. A very useful feature is recursive globbing, which enables you to find any file matching a pattern in the current and all lower level directories. ls **/.*rc This will find all hidden configuration files in the current directory tree. The double asterisk is used to trigger this. If you want to include symbolic links, then use three asterisks ***. To find all files except those matching the pattern, precede the pattern with a '^'. ls -d ^D* This finds all directories that do not start with uppercase 'D'. Another useful feature introduced into the zsh version of globbing is qualifiers. This is an expression, in parentheses, used at the very end of the search pattern, which restricts the output to only qualifying files. ls -l /etc/*(#q@) This example will find all symbolic links in the /etc directory. Use '.' For ordinary files, '/' for directories, '@' for links, '=' for sockets, 'p' for pipes. There are many, many more listed in the documentation. You may also find useful: * for executable files, and r, w, x for owner read, write and execute enabled files. We even have a form of 'fuzzy' matching in zsh which will try to match files even if they are misspelled. This is useful when you are not entirely sure of the target name. ls -d (#a1)Ducuments will correctly identify the directory Documents. The number 1 in the parentheses is the number of mistakes to forgive but if you are too forgiving then you will get too many matches, change the 1 to 10 to see what I mean. Multiple redirection This one is easy and so useful. In bash, to copy the output from a command to a file and also display the output on a terminal, you would have use the tee command but you are limited to two data streams. cat test_result | tee copy1 In zsh, you can do this: <test_result >copy1 >copy2 >copy3 and get as many copies as you like (I don't know what the limit is). That's just one input and three outputs. If you want it to also appear on screen, then pipe the output to a final cat command like this: <test_result >copy1 >copy2 >copy3 | cat I think that's a lot more logical. Global aliases This is an extension to the already useful alias provided by bash-like shells. Almost anything can go into a global alias, and it can be used almost anywhere. When I type the command 'mount' on the command line, I get more than I usually need. The output is littered with virtual and non-hardware related mount points when I usually am interested in only the drives the system has marked as mounted. A global alias takes the option -g, and I have one defined like this alias -g mtd='| grep /sd' 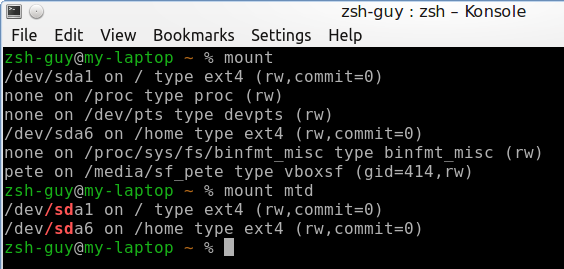 Notice that I can include the vertical bar pipe symbol within the alias definition. Alias suffixes Most modern desktop environments allow you to associate certain file types with a particular application. With z-shell's alias suffix feature, this is now possible on the command line. Use alias with the -s option, the file extension to associate as the name of the alias, and then add the application to use. Here are a couple I like from the z-shell wiki. alias -s txt='less -rE' This one allows you to type the name of a file with a .txt extension on the command line and then press enter to examine the file using less. You are returned to the command line when you quit. This next one I really like. alias -s html="/usr/share/vim/vim62/macros/less.sh" Press enter on any .html file, and it is opened in less, but with vim's syntax highlighting. Math Floating point arithmetic is enabled by default in zsh. Integers behave as in bash. Echo $(( 7/3 )) produces the result 2, while echo $(( 7.0/3.0 )), which in bash produces an error, zsh determines to be 2.3333333333333335 – close enough for most purposes. 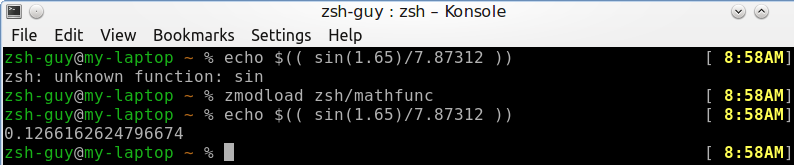 For more serious number crunching, the bc and dc utilities used to be called upon, but zsh has a very good math module. Load it with the command zmodload zsh/mathfunc You really do need to read the documentation if this is of use to you, as it covers almost all the math that non-Einsteins would require. Auto CD One of the things that I recommended activating in the initial set-up was 'change directory given just path.' This adds 'setopt autocd' to your .zshrc. This is very useful, since the cd command is one of the most used commands in a terminal – but now you can forget it, almost! With this option set you simply type the name of the directory to go there. 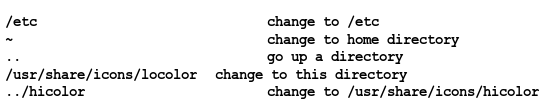 Naturally tab completion works to help typing the directory names. Another option that may sometimes be useful is named directory paths. This is activated with the command setopt cdablevars 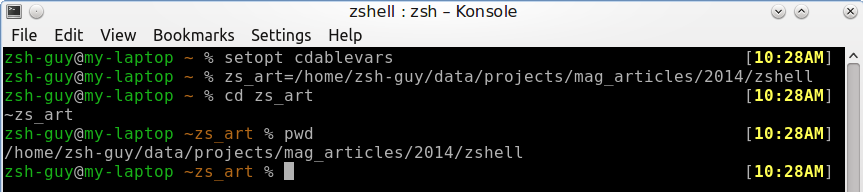 If you have some directories that you often use, but they are buried deep in the directory structure, then you can set a variable to point to that directory. Then cd to the variable and, yes, you do need to type cd here. The name of the variable goes into the prompt, so make sure that you use meaningful, to you at least, variable names. I think you can see from the time prompts on the right of the screen-shot how much all this completion and automation improves production, and I am not a fast typist. Using the directory stack Most, if not all, shells variants have some means of manipulating the directory stack but I have never seen a system as flexible as the one in zsh. Bash uses the commands pushd and popd to good effect, but it is quite easy to get lost when changing rapidly between many directories. The advantage that zsh gives us is to be able to directly manipulate the stack. This is in addition to the traditional pushd and popd commands. In a long terminal session, I may visit dozens of directories, some of these buried deep in sub-directories and often I need to re-visit some of them from far away in the depths of another directory. With the option autopushd set, this is so much easier. Each directory that you visit is pushed onto the stack and you can view the current stack with the following command: dirs -v I'm so lazy, I even use an alias for this short command: alias stk='dirs -v' 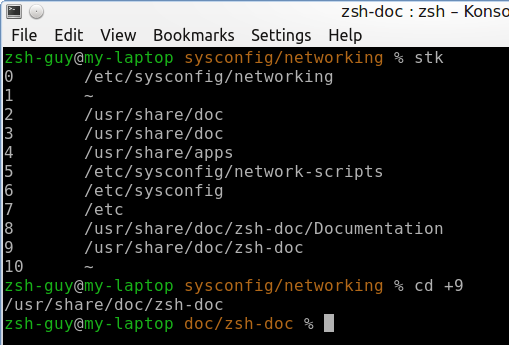 Now you can simply cd to the numbered directory. Use 'cd +n' or 'cd -n' to go to the nth directory from the top or bottom of the stack respectively. Here is a short demonstration of it in action. And more... Yes, there is more. This introduction has barely scratched the surface, but I hope that it has shown enough to give you the flavor of zsh. Although a lot is possible with zsh, it is also possible to use it just like bash, or you can add just the bits you like. The documentation is good, although a little technical. There are a set of man pages, and even functions to help you find things in them, and there is also a ton of info on the internet. |