| Previous
Page |
PCLinuxOS
Magazine |
PCLinuxOS |
Article List |
Disclaimer |
Next Page |
Editing Your Vacation Photos With XnViewMP |
|
by Meemaw So, we have taken PCLinuxOS on vacation, and now we have loads of vacation photos. We can use GIMP to edit them, but sometimes GIMP just has too many choices for us. Don't get me wrong, I love the GIMP program, and use it all the time, but sometimes I just want to crop a photo and resize it, and don't need all the wonderful options that are in the GIMP. This is when I open up XnViewMP and use it. XnViewMP is in the PCLinuxOS repository. I have used XnViewMP for several years. I even reviewed it in my series on photo viewers and editors, which started in the May, 2011 issue of the magazine. XnView wasn't reviewed until September, but that's because I worked my way up from basic to full-featured viewers. Now that I am more familiar with it, I can show you a few things I didn't cover in 2011. You can always open a single photo in XnViewMP, simply by right-clicking it and selecting Open With... and choosing XnViewMP. Of course, it is always in your Graphics menu, and you can open it there as well. One of the things you notice about it is that the window contents are different depending on whether you have a single photo open or if it's the browser. Also, your browser layout may look different from mine because all of that can be edited to your liking. Let's open a single photo first. 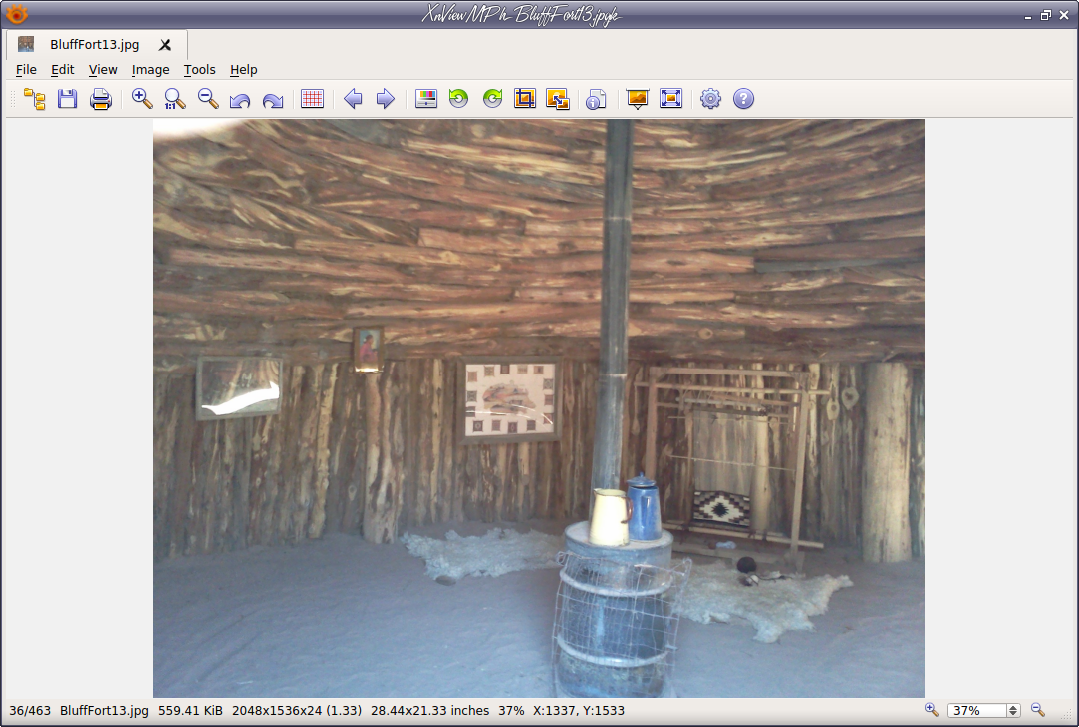 At the top of the window you can see a tab that shows the name of your file. Your program allows you to have multiple photos opened at the same time with tabs that make switching easy. The toolbar is under the tabs area, and it can be configured with items of your choosing. My toolbar has the following icons: Browser, Save, Print, Zoom In, 100%, Zoom Out, Undo, Redo, Show Grid, Previous Image, Next Image, Enhance Colors, Rotate 90* Left, Rotate 90* Right, Crop, Resize, Photo Properties, Quick Slideshow, Fullscreen, Settings and About. All these icons can be rearranged and you can add to the toolbar or take away those items you don't want. At the bottom of the window is some important information. The first number (36/463) tells what item it is out of the number of items in the folder. All my file browsers are arranged in alphabetical order, so you will want to make sure that it's done the same way here. You can do that in the browser window. Also there is the name of the file, its size, dimensions, print size (I think), your zoom size of the photo and the coordinates of your mouse. At the bottom right is your zoom ratio again, but here you can change it and move the visible part of your photo around if you wish. Let's do a few editing tasks, though, because that's what we are here to do. Since the normal tasks I use (crop & resize) are in the toolbar, I don't go anywhere else very often, but you will want to get familiar with the Image menu as well. This is where all the editing tools are located. The ones you will probably use the most are Image > Adjust, but you should look at the other submenus anyway, just in case you have the urge to apply a sepia color to a photo for a special effect (by the way, it's under Image > Map). You'll see that Enhance Colors is in the Image > Adjust menu, but since it is something I do on a regular basis, I added it to my toolbar. Enhance Colors has a lot of the same tools that all other photo editing programs have. You can also see Levels there in the menu, which we have also covered in GIMP. Let's use Enhance Colors first. 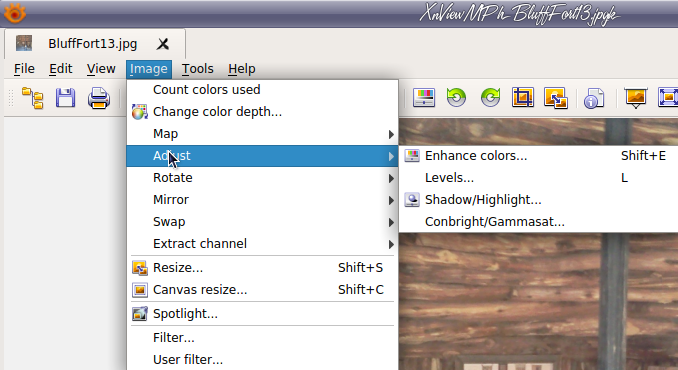 My photo is one of a Native American home (hogan) in the Bluff, UT Fort Museum. I think it's a little drab (because it was dark in the house when I snapped the photo). We can brighten this a bit. Choosing Enhance Colors will give you this window: 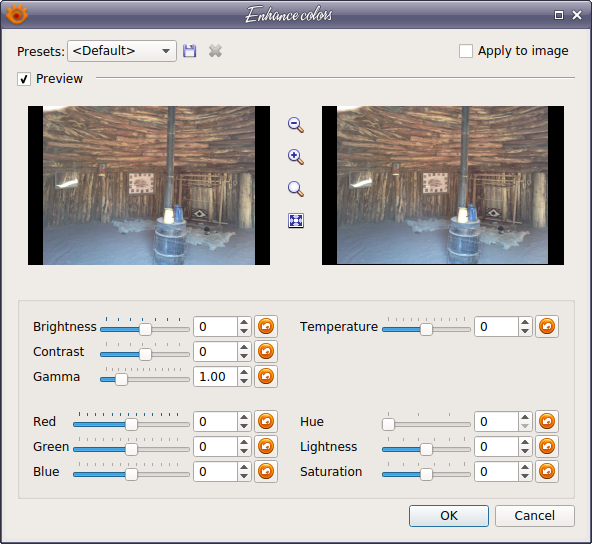 You can see that Brightness and Contrast is there, along with Hue, Lightness and Saturation. I changed the Contrast to 15, the Hue to 1, Lightness to -7 and Saturation to 10. Here are before (left) and after (right). 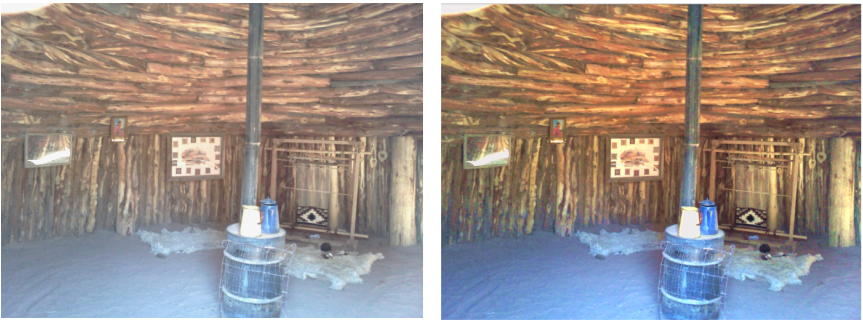 I'm not sure about Temperature but we can try it and see what it does. If I use the original photo and set the temperature setting to 30, I get the following: 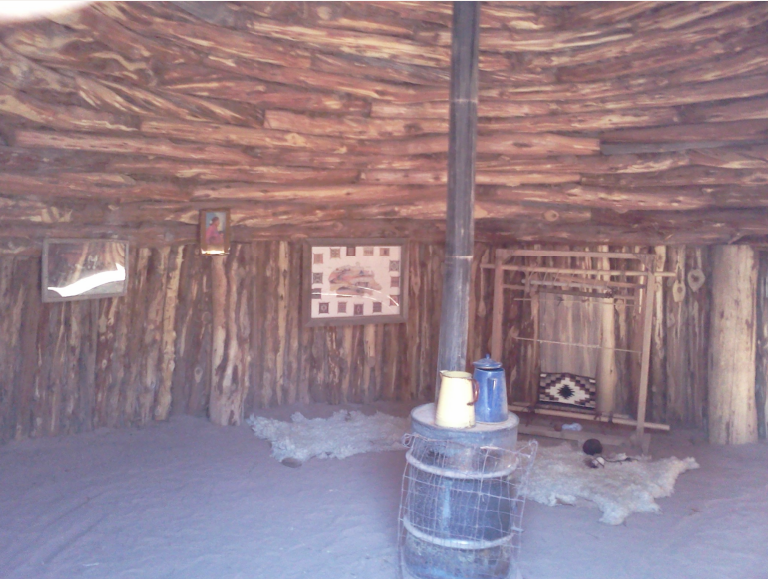 It seems to put more red into the photo, and -30 seems to put more green. I can see where that might be useful sometimes, but it should probably be used sparingly. If you get different results, since I only tried it on one photo, please let me know. Cropping and resizing your photos are easy! To resize just select it from the menu, and you'll get a window. Enter the size you desire (or choose one from the preset sizes at the top) and click OK. 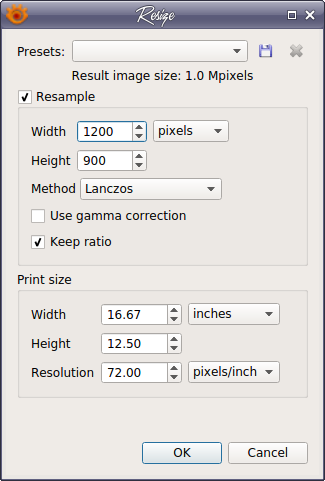 To crop, choose that from the menu (or on the toolbar). An extra line will appear showing dimension boxes and coordinates, along with the Crop button, plus an extra button that says "Save Selection As....". I like this one as I sometimes want to crop a photo for a certain project, but I don't necessarily want to get rid of the original. This button allows me to save a cropped version in one step while preserving the original. 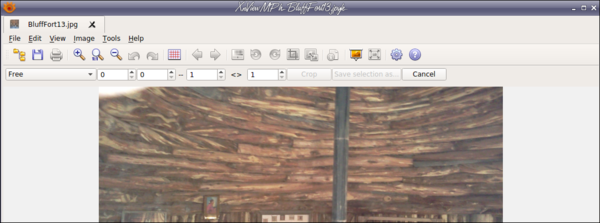 In this program, the single photo window is called the "View" window and the browser window is called - surprise - the "Browser" window (and when you edit your toolbars you will have to choose between them in the settings). Let's look at the browser window for a bit. I had the photo we were editing open and opened the Browser window by clicking on the browser icon in my toolbar. 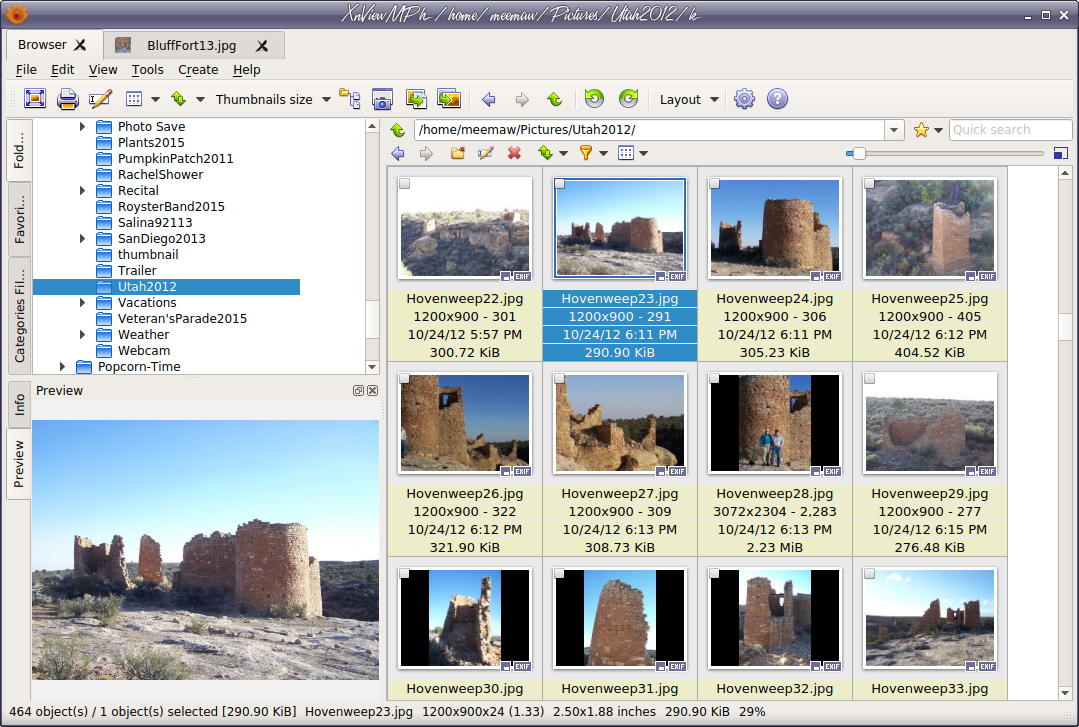 Wow, there is a lot of information here! This window can be arranged however you want. I like it with the tree at the top left, the thumbnails at the right and a preview at the bottom left, but you can change it however you wish. In this window you will have the tabs at the top showing what's open. The browser always opens in a tab on the left side of the window. There are two toolbars here: one at the top of the window and a separate on above the thumbnails. The top one is as follows (subject to your changes): Full Screen, Print, Rename, Edit IPTC-IIM/XMP, View As..., Sort by..., Thumbnails size, Show files in subfolder, Capture, Export, Batch Convert, Back, Forward, Rotate Counterclockwise, Rotate Clockwise, Layout, Settings and About. Many of these are self-explanatory, but I'll explain some of them. Full Screen does what it nearly always does: show you your selected image in a full-screen on your monitor. To go back, simply press <ESC>. Edit IPTC-IIM/XMP allows you to edit the properties of your selected image. Clicking the icon gives you the following window: 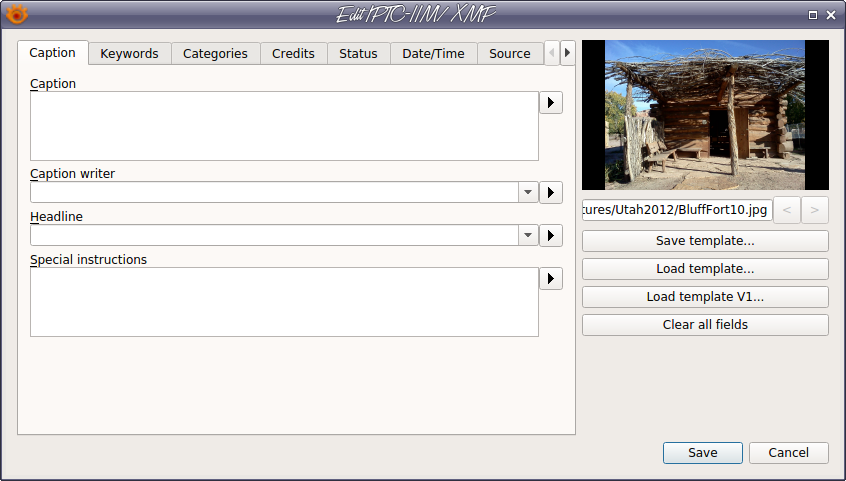 This allows you to add captions or keywords (to help in searches), plus categories and much more. If you click the arrow to the right of the Sort button, you can see many methods to sort your photos. I always stick with alphabetical by filename, but for other jobs you can sort by file size or type, date taken, category or color (there's a feature to allow you to assign a rating &/or color label to each photo, but I don't use it). Capture is useful as well. Most of PCLOS's desktops have a screenshot feature, but if you have XnViewMP open, you can do it from right here. The capture window gives you several options. NOTE: You can't take a screenshot of the XnViewMP window from the XnViewMP program, as it disappears after you pick your options. Export allows you to save your selected photo in a different format. The window that appears gives you many options for exporting your image. Batch Convert lets you change a group of photos at the same time. In this window you will have several tabs: Input, Actions, Output, Status and Settings. For Input, you may have already chosen your files before you clicked the Batch Convert button, but you can also drag them to the window. For Actions, you will need to add an action (resize or add a border) and configure that action there. For an action you use repeatedly, you can save it by clicking on the save button at the bottom of the window and giving it a name. In Output, you need to specify if you want to overwrite the original file or whether you want a new, renamed file, and where you want it stored. In Status, you won't be able to see anything until you have actually done the conversion, and then you will be notified of what was done and if there are any errors. Settings are a few little things that aren't available in any of the other windows (like background color for any preview panes). 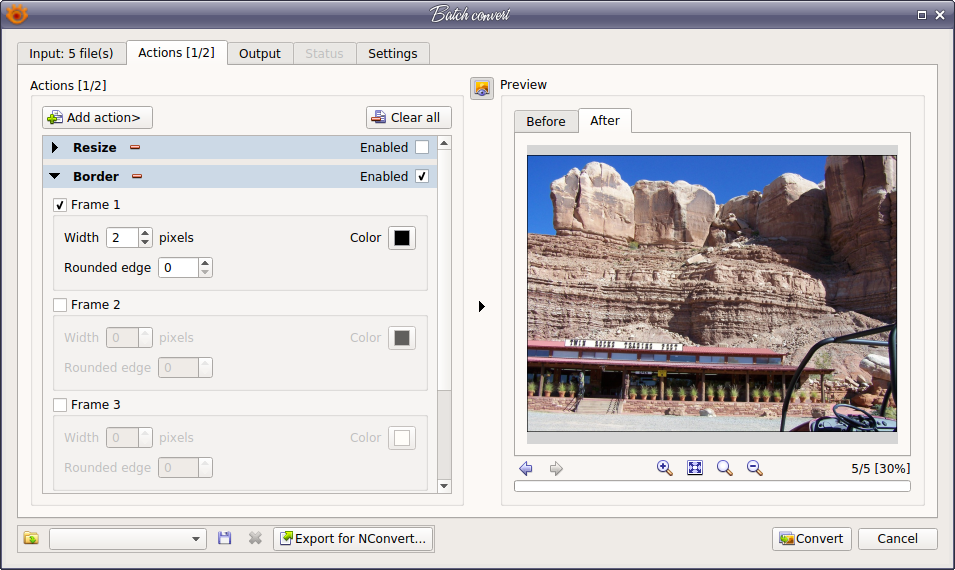 As I said earlier, there is also a toolbar above the thumbnail section which has the following: first line has a location bar which tells you what folder you are in, a favorites button, and a search bar. Under that are forward and backward arrows, and buttons for New Folder, Rename, Delete, Sort, Filter, and View As, which gives you options for how much information to display. You can view only thumbnails, or add the filename, labels or details, or view as icons or a list. The slidebar you see will increase or decrease the size of the thumbnails. In your settings, you can also configure the information that you see under each photo. Go to Thumbnails (under Browser) and click on the Labels tab. You will see a long list of things you can show under each thumbnail. I generally want to see Filename, File Size, and Height and Width. XnViewMP has programmed a couple of Custom labels, one being Custom 2: (Width)x(Height) and one being Custom 1: {Focal Length}mm f/{F-Number} {Exposure Time}s {ISO Value}iso. You can choose whatever labels you want, and there are a couple of custom labels you can add and program yourself. You will find many more effects you can apply to your photos. When you have time to "play," I hope you will test some of these out and see what you can do. Many of the photos we take usually need little more than to be cropped or resized and brightened a bit, but you may find a special effect you want to use. I have used this program for a while, and there is still much I don't know! As with any program, you learn as you go along, and I hope I have given you a good start on the many features of XnViewMP. |