| Previous
Page |
PCLinuxOS
Magazine |
PCLinuxOS |
Article List |
Disclaimer |
Next Page |
Git: The Ultimate Undo Button |
|
by Peter Kelly (critter) Most modern computer applications, such as word processors and graphic design programs, have some method of allowing the user to undo actions that are no longer required for some reason. Usually though, when you quit the application, that capability is lost. Unless you made a backup, the old version is gone forever. Programmers realized a long time ago that this was an unsatisfactory situation and decided to do something about it. The result was known as a version control system and many of these systems soon appeared with varying abilities, complexities and the inevitable disadvantages of one solution compared to another. For most of us who are not developers that are working concurrently on software projects with many other developers, these systems are complex beasts that require more effort from the user than is saved.
Git One system though is different, and it is called Git. Git has an excellent pedigree, along with some definite advantages:
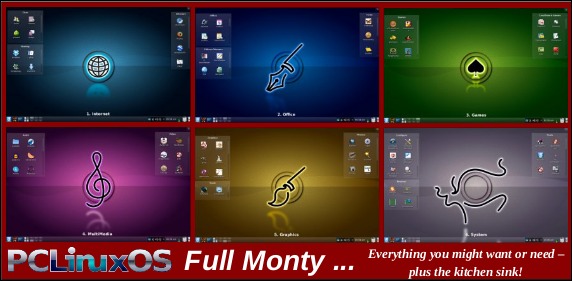
So what is Git? It is described as a 'distributed revision control system,' but don't let that put you off. That description says what Git is capable of, not what it can be used for. Raw Git is a command line utility, but due to its wide adoption (it is now the most popular revision control system out there), there are graphical front ends to sweeten your life and to save your sanity. Is Git for me? Although designed to be used by many users on a project, a single user can benefit from the system just as well. I do a lot of my work on my main computer, and then continue to work on things from my laptop. The laptop is able to connect to the main computer over the network, but even a single laptop or desktop computer can utilize the benefits of Git. How it will be useful to you depends on what you do, but let me give a simple example. You have a large collection of music files ripped from a collection of CDs with the tracks from each CD in its own folder. Some of the CDs were compilations, and you would like the tracks to be reordered by artist. If your collection consists of thousands of tracks, then this is quite some task. If you later decide that the original order was better, then unless you made a backup and now have two collections, then you face another massive task. However, if you first create a Git repository, which requires just three simple commands, then to switch between the two sort orders is just another couple of simple commands. This is also pretty quick, as the actual music data does not have to be re-written, only the change of location is recorded. Also, once the repository is built, if you happen to lose a file then recovering it from the repository is another simple task. Using Git Git was designed as a command line utility, but there are now several graphical applications available. The graphical 'front ends' are great to help you visualize the progress of your project, and to show what changes you have made. We can utilize them to control our projects, but the real power of Git is on the command line. So, I'll show both. There are an awful lot of commands and options in Git, but for the purpose of controlling a project and taking periodic snapshots to which you can revert at any time, we need very few. In this demonstration project, I will create a Git repository, add some project files to it and take a snapshot of the project at that initial stage (in Git-talk these snapshots are known as commits, because you are committing your latest work to the current state of the project). In the next stage I will add some more files, modify some others and delete some of the original files and then take another snapshot. Finally I will revert back to the initial snapshot which will also reinstate the files that were deleted from the hard drive (yes, the files were actually deleted but Git can reconstruct the files from the data it recorded in the repository). To do all of this, I need to use only the commands: init, add, commit, rm and revert. During the explanation of the demo project, I shall use a handful of other commands that output useful information to help with running the repository. They should help to clarify exactly what is being done and why, but they are not absolutely necessary. There a few other commands that I occasionally use, but this is enough for most single user work, and it is only a tiny fraction of what is available. Getting started Git is not installed by default in PCLinuxOS, but is available from the repositories. Start up synaptic, reload, mark all upgrades and apply to get your system into a fully upgraded state. Next, scroll down to git, mark it for installation, and apply. This will pull in some other files that Git depends on. Just accept them. You now have Git installed. Before you use Git for the first time, you need to supply a little information. This is not a simple pleasantry, but a way of telling Git who has done what. Git needs your name and your email address, but as we are not collaborating with others, we can make these up as we wish. I entered the commands:  The 'connaught' in the e-mail address is actually the host-name I gave to this computer. Git is now ready for use. To demonstrate the use of Git, I am going to create a simple web page with a couple of other pages we can link to. It does not have be a web page. It can be any type of document or set of documents that get changed from time to time. It could even be programming code! You also do not need to understand about web pages and HTML to follow along. It is not difficult to use Git, but it is slightly different to most other applications. The screenshot shows the output of the few commands used in the demo, which does look rather overwhelming. But, if you follow along with the command line instructions, then it should become clear. 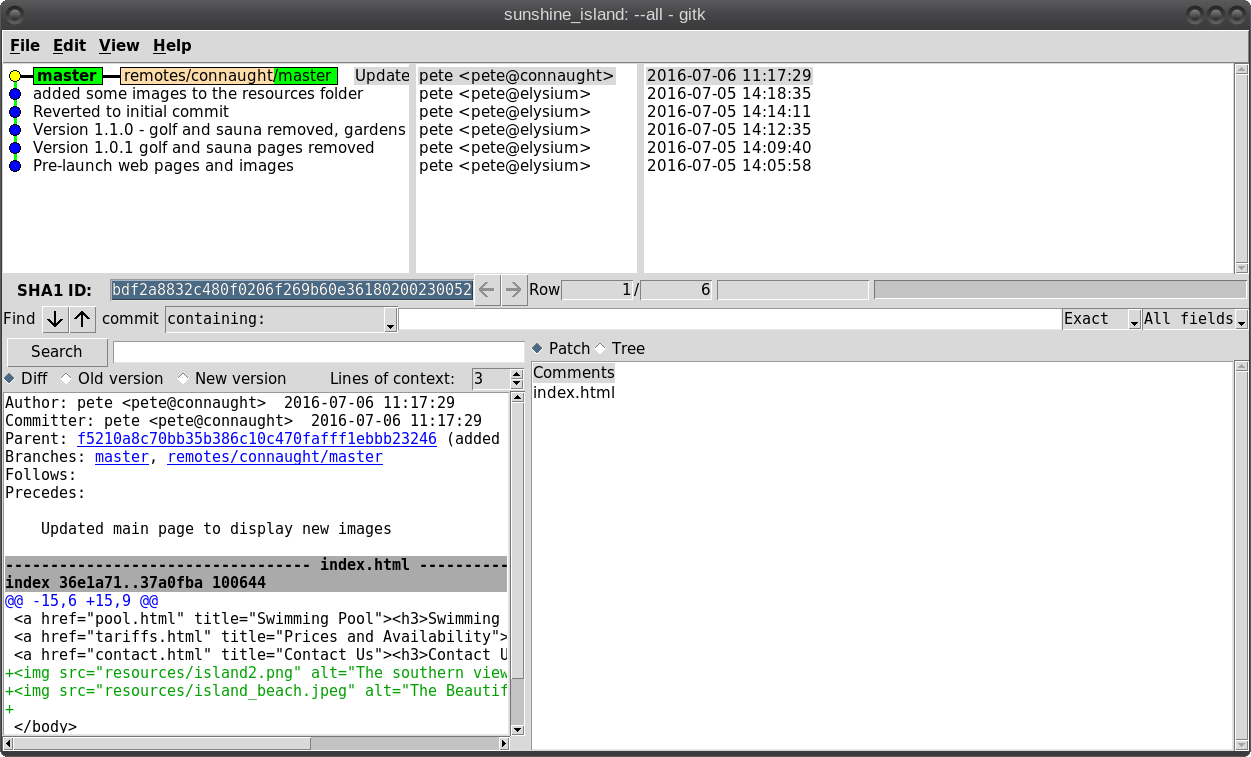 Don't worry. Git does almost all of that work for you. The first thing we need to do is to create a directory to hold the files of our project, which will be called 'sunshine_island,' and then to switch to that directory. To do this, open a terminal and move to where you would like to store the project, then enter these two commands:  We will now be in the new projects directory, which is referred to as the 'working directory.' It is completely empty, so we need to tell Git that this is a 'Git repository,' and set things up so that files in this directory are tracked by Git. The command to set things up is the command git init  This creates a hidden directory structure in the current directory called .git that contains all of the information required by Git to monitor the files that you create, change or delete in this project. This directory is referred to as the 'Git directory.' You can explore this directory, but don't change anything, at least until you decide that you know what you are doing. Next, we need to add some files for Git to track. First though, a little bit of theory.  The Git repository is currently just a blank template. When we add files to the working directory, Git needs to be told which of those files to track and which to ignore. To tell Git to ignore a file or file type, create a file named .gitignore and list them there. For example, some editors make a backup file with the name of the file beginning with a tilde '~myfile.txt'. If you add ~* to this file, then all files of that type will be totally ignored by Git. Git uses the add command to place references to files in a holding or staging area, where they sit until we are ready to 'commit' them to the repository. When a file is committed for the first time, all of the data in the file is is added to the repository with a reference key. The key is a unique string of 40 hexadecimal characters, known as an SHA-1 checksum, which is used not for security reasons, but for its uniqueness. Unlike file names, an SHA-1 key is unlikely to be repeated during the life of this universe, so Git knows exactly which data is to be referenced. We don't need to know too much about all this though to use Git. If a file that Git has been told to track is changed in any way, then Git knows about it and can tell you. If you then 'add' the file to the staging area, only the data that has changed is recorded. Once the changed files have been 'committed' to the repository, those data changes are added to the Git database and referenced with a new checksum. From this database, Git is able to reconstruct any set of files to any previously committed state - as we shall see. The demo project This the scenario. Sunshine Island is a holiday brochure for a resort that you are setting up. You don't yet know what sort of visitors it might attract or what facilities might be expected, so this is very much a 'test the water' sort of site which you may need to change rapidly if potential visitors have different expectations. You may also need to revert to the original specification if your interpretation proves to be misguided. And for legal reasons, you should have a record of what you offered, when and to whom. Your first idea is for a resort that offers high class accommodation, a golf course, cocktail lounge, sauna, pool -- the full monty. So far the web page description looks like this: 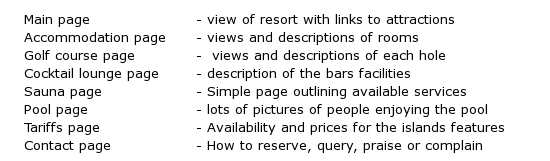 Within the Git enabled working directory, you can now create the necessary web pages. Initial feedback is not good. It suggests that the golf course would frustrate visitors, as the monkeys love to steal golf balls. Also the sauna is a bad Idea, since this is a tropical location and a hot sauna is not popular. The rest is not too bad, but changes will have to be made. It is decided that the golf course be removed and replaced with extensive tropical gardens, birds of paradise and cute, tame animals. The sauna gets replaced with an air conditioned library where residents can relax if the weather gets a little too hot for them. The following changes are required to be made to the original idea.  Using Git with the project The web page files are created and added to the working directory, together with a folder named resources, which holds all the images, video clips and sound files used by the web pages. The directory listing looks like this.  Git has a status command to show the current state of the repository 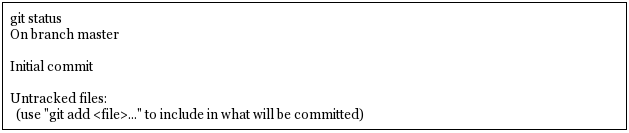 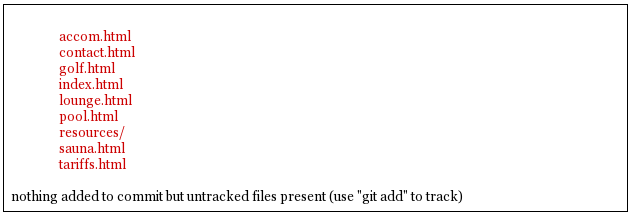 There is quite a bit of information here. In the output is a list of all the files Git knows about and has not been told to ignore. All our files are listed as untracked and appear in red. The resources directory ends with a slash to show that it is indeed a directory. Git helpfully tells us that we should use the command 'git add' to start tracking the files. As we want Git to track all of these files, we can use the '*' wild card (you could also use a period - 'git add .'), rather than name each file.  Now issue the status command again. 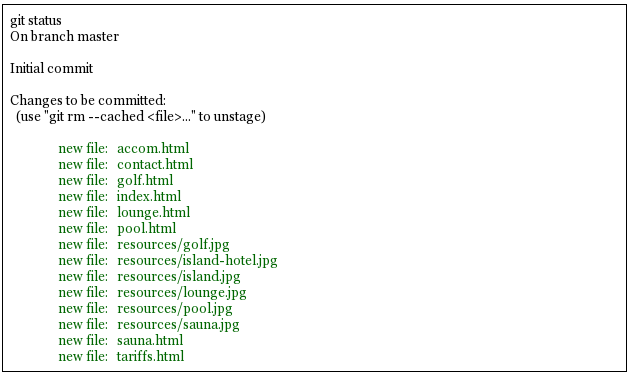 The status command now lists all of the files, including each of the files in the resources directory, as new files, and shows them in green. The comment 'Initial commit' tells us that there is nothing in the repository yet, and any files that we commit will be the initial commit. These files have been added to the staging area and we say that they are 'staged.' From here they can be 'unstaged,' or they can be committed to the repository. When we commit the files, we are prompted to specify a 'commit message' that will describe the reasons for this commit. Git will not proceed without the message. We can use the -m option on the command line to provide the message, or git will open an editor showing what we will commit, and with the cursor ready for us to type in the message. The default editor is vim, but this can be changed in the git config file, just as we provided our e-mail address. I'm going to use the -m option here.  We now have a working repository, and we can at any time revert to this current status. Git also keeps a log which is displayed like this 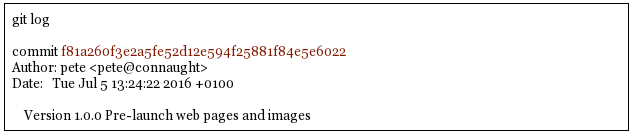 The SHA-1 reference is displayed in brown, and we have who did it, when and why. This is repeated for each commit. The SHA-1 reference can be used to access a particular snapshot but just the first few characters are enough, about 6 or 7 usually suffices, as you can see in the output from the commit command. To achieve this working repository, we have used the three commands  That's all. We had a few commands to set up Git initially, and we used the 'status' and 'log' commands to get some information, but those three commands were all that was needed to create the repository. It really is that easy. Changing the project Our test audience were not too impressed with our proposed resort, so some changes are needed.
To delete the files from the hard drive (don't worry, git has this covered), and to stop git tracking them, we use Gits 'rm' command -- not the usual terminal 'rm' command -- as we want git, not the usual operating system 'rm' command, to keep control of what is happening in the 'working directory'. 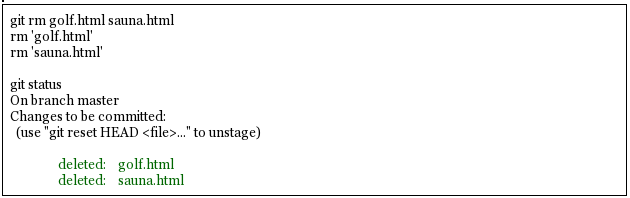 We can commit this change and a new SHA-1 reference is created to reference this change point in the project's history. Note that nothing is actually done until the commit command is issued. 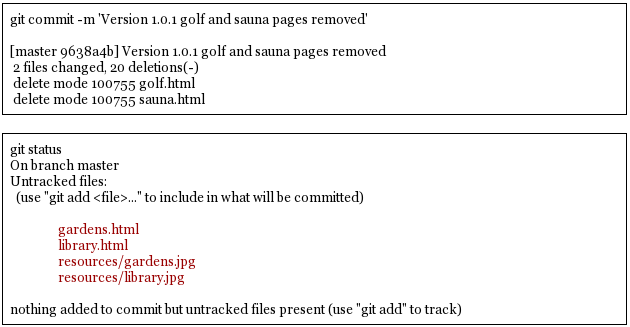 The new files need to be added to the working directory, and then to Git's list of files to track. The files are separated by a single space. 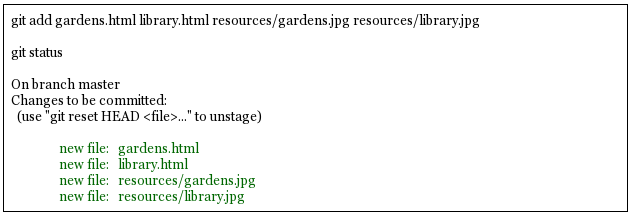 Four files are ready to be committed. The main web page file, index.html, also needs to be modified before we commit. 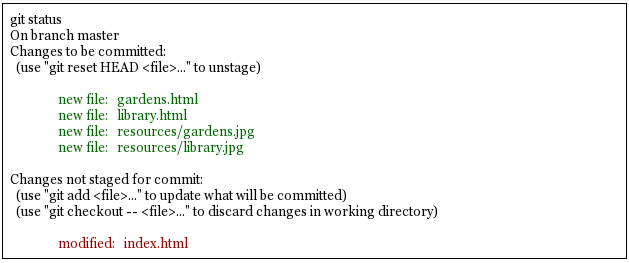 We now add this file to the staging area. 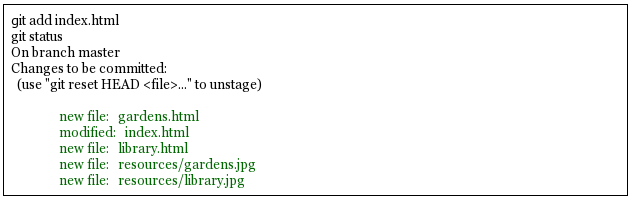 We can see that now there are five files ready to be committed, so we perform the commit. 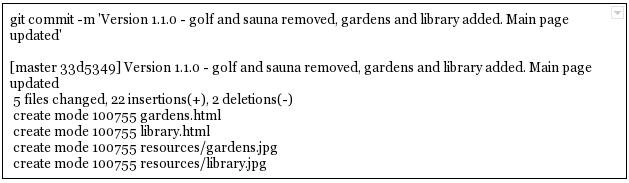 We now have three snapshots of our program, to which we can revert at any time: this current version 1.1.0, the initial version 1.0.0, and an intermediate stage we saved with just the golf and sauna pages removed. Even though some files were deleted, they can be recovered. This sounds as though the git repository could very soon grow to be excessively large, but in fact Git is very economical, as it doesn't work at the file level, but records only the changes in the files' data. Reverting to a previous edition You are just beginning to update the tariffs page, having written a new massage centre page to replace the library when you get a phone call. This is from Mr. Big, the guy who writes the checks, and he is mad. “This is not what I signed up to” he rants. “I liked the golf course. Put it back the way it was, or you're fired!” Oh dear, we deleted some of those files.  No golf or sauna files there. This is not a problem, we can easily jump back (or forward) in time with the help of the SHA-1 key. From the Git log, we find that the original commit had a key that began with f81a260. Git refers to your present position in the commit tree by the name HEAD, so you just need to reset HEAD to where you want to go. To roll back in one go through the range f81a260 to HEAD without being asked for a message for each stage in the process, we can use the Git revert command with the - -no-commit flag. Once we are in the desired place, we can commit this status to Git. 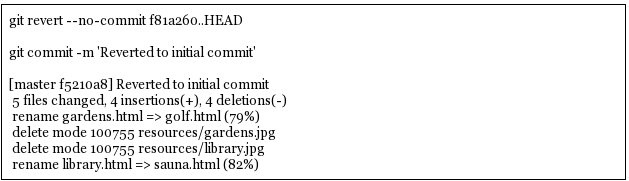 Listing the files now in the working directory, we get this:  The golf and sauna files are back, so it looks as though you get to keep your job. And, when he's calmed down, you can re-introduce the changes you made with just a couple of commands. Disaster prevention Git will never lose, misplace or corrupt any of the tracked files in your project, but there is always the danger of some fool (?) overwriting or deleting the repository or of hard drive failure. Git was designed to be a multi-repository system so that any user could have their own copy of the entire repository. From any of these copies, the entire project and all of its changes in history can be re-created. To prevent a disaster, it is wise to create a copy somewhere else, in a different directory, on a different partition or hard drive or on another computer, as I do with my desktop/laptop set up. The new location is going to be my home directory on my laptop, and from there I can access my desktop computer. You simply need to be where you want the repository to be created, and to be able to access the original repository. From the home directory on the laptop, host-name 'elysium,' with the desktop mounted as /mnt/connaught-home I enter: 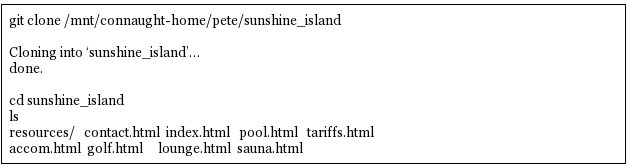 The cloning process is extremely quick, and I can now work with the project on either machine. If the original repository was lost, damaged or destroyed, then I could simply reverse the process. Keeping things in sync Obviously having two copies of the project and working on them independently can result in a hopeless mix up with the elements of the project being in different states. This is exactly what Git was designed to prevent, and it is exceedingly good at its job. Git is capable of handling differences in thousands of repositories all over the world over many years of project development, and it has the ability to revert to any previously committed state. With our simple single user, two location set up this really is just a walk in the park.On my desktop computer 'connaught,' I add some image files to the resources folder and then check the repository status. 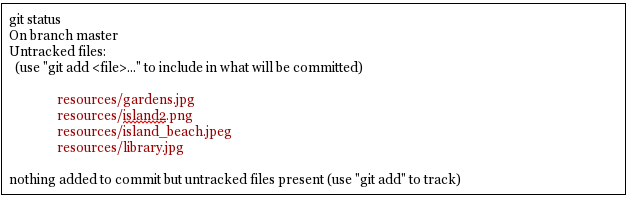 I add these files to the repository, then checked the status again. 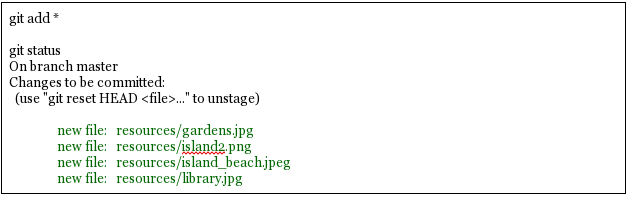 Happy with that, I decide to make a commit. I'll incorporate these files into the source code of the HTML pages later. 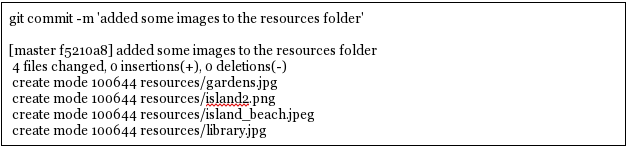 The Git log shows this new entry (plus the others):  Later, I decide that I will use my laptop computer 'elysium' to incorporate the images into the source code of the HTML files. The repository on the laptop was 'cloned' from the one on the desktop, so the repository refers to the desktop as 'origin.' This is the default. To bring in any changes from the desktop to the laptop, I can use the pull command. 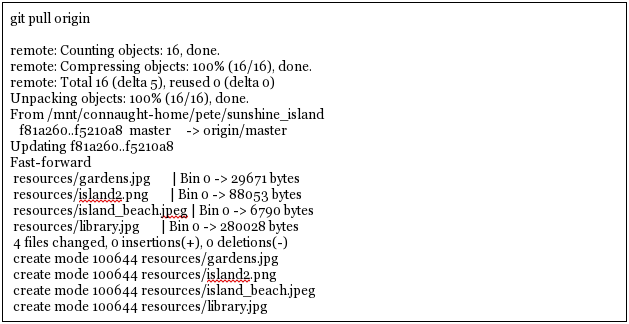 The laptop repository is now at exactly the same state as the desktop. Local and remote repositories To transfer information between repositories, Git has three main commands: fetch, pull and push. Fetch gets the changes from a remote repository. Pull, as we have seen, gets the changes and merges them into the local repository, while push is simply the converse of pull. The Git 'remote' command will list all known remote repositories, and adding the -v option will give a more verbose output. The cloned repository on the laptop is automatically assigned the name 'origin' to its ancestor, but back on connaught, the desktop, we would have to supply the full URL of the laptop to perform the same operation. This is not very convenient, and can lead to errors. So, Git allows us to define aliases for remote locations with the 'remote add' command. 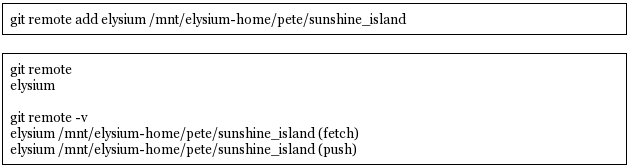 In our setup, the same URL is used for transfers in both directions. Now we can use the same 'git pull' command, as we did on the laptop substituting elysium for connaught. Having done some work on the laptop, I now want to update the desktop to continue working, so I pull in the changes. However, this time I need to specify master as the branch to pull (we will cover branches soon). 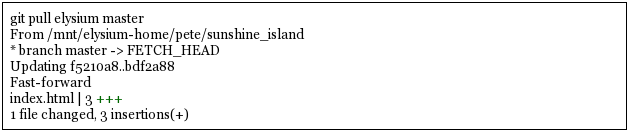 git gui -- a graphical interface There are many graphical interfaces available for Git, but the one I am going to demonstrate here is git gui (that's two words), which is part of the git installation. There are more available for installation in the PCLinuxOS repositories, such as QGit and Giggle. The Eclipse IDE (Integrated development Environment) also supports Git as a separate 'perspective.' Eclipse is also available from the PCLinuxOS repositories. 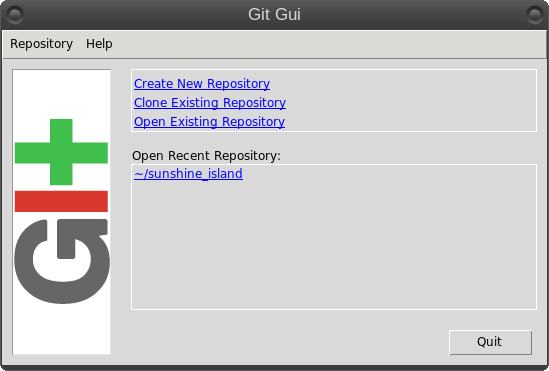 Actually git gui is a tool for making commits, branches and merges, and has access to another tool called gitk, which is a graphical history viewer, but we can do almost everything we need with these tools. To launch the application, type git gui in a terminal, or in the alt+F2 run dialog, or you can add a shortcut to your desktops main menu. This is not done by default. The options are pretty much self explanatory, and as I have used this before, my sunshine_island repository is offered in the recent repositories section. Selecting sunshine_island, I get this not very informative window. 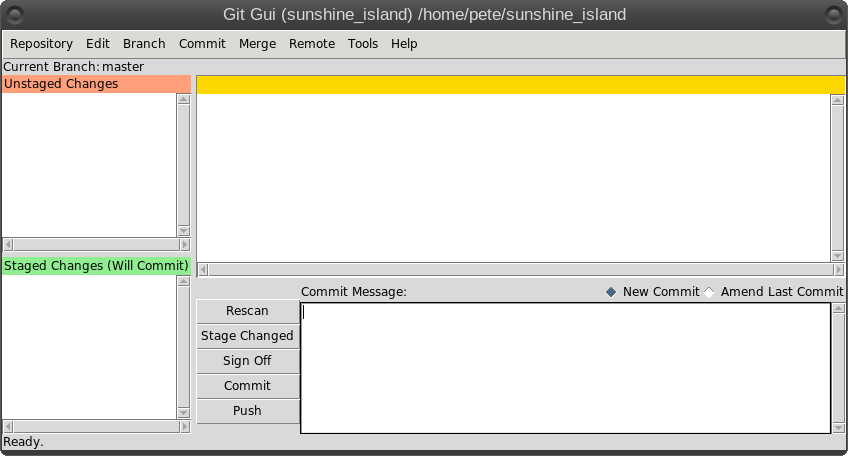 A few minutes exploring the menu options should give you a good idea of what this tool can do, and you will recognize many of the options from our command line terminal sessions. In the previous sessions of our demo project, you were instructed by Mr. Big to revert to the original ideas, which you did, and subsequently added some images. In your heart of hearts, you know that Mr. Big will eventually come around to your way of thinking, so you decide to work on the alternative version alongside the current one. To do this, you will create a branch. You can think of a branch as a fork in the road of your projects direction. Just like a fork in a real road, each branch leads to a different destination, although they may meet up again at some point in the future. In a graphical environment, it is much easier to visualize the repository and the concept of branches, which is why I delayed explaining branches until now. From the menu, select Repository > visualize All Branch History. You will get something like this.  This page is a lot more interesting. In the top left window, we can see both the local and remote repositories and all of the commit history. Marked in green are the current branches of each repository, which at the moment is master, as this is the default created by Git, and we haven't yet created any others. Clicking on any of the lines in the history changes the contents of the other panels to reflect that commit. Above the bottom right panel are two radio buttons, Patch and Tree. Patch shows the changes at this point in the history, and Tree shows the files that would be found in the working directory at that point. Clicking on one of the files will show the contents of that file on the left (images are not rendered as images here, but in QGit they are which is a nice feature). Click on the line that has the commit message beginning with 'Version 1.1.0...' This is the snapshot that we want to start with in our new branch. Copy or make a note of the first 6 or 7 characters of the SHA-1 ID. Close this window and in git gui select branch > create. 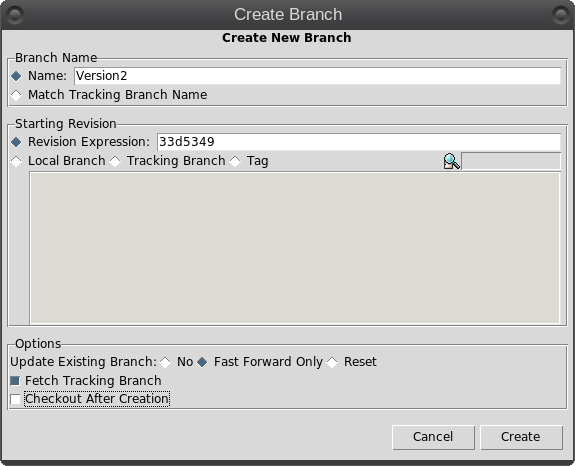 In the dialog that appears, give the new branch a name, select 'Revision Expression' and enter the SHA-1 reference, then deselect Checkout After Creation. I would normally leave this box checked, but for this demo I will uncheck it. Click create. Nothing seems to have changed but bring up the 'Visualize all Branch History' window, and you will see the new branch at the chosen revision point in the local repository. Close this window, and from the git gui menu, select branch > checkout, select the version2 branch, click checkout, and then re-open the visualization window. 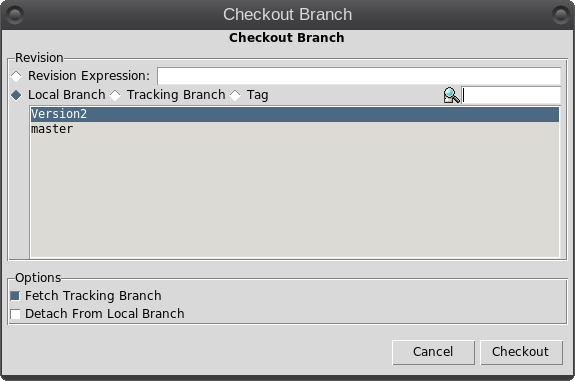 Branch version2 is now in bold indicating that it is now the current branch, and it is at the revision position that we chose. The remote repository remains at branch master. It is important to realize that the checkout command will also change the contents of the working directory as required. 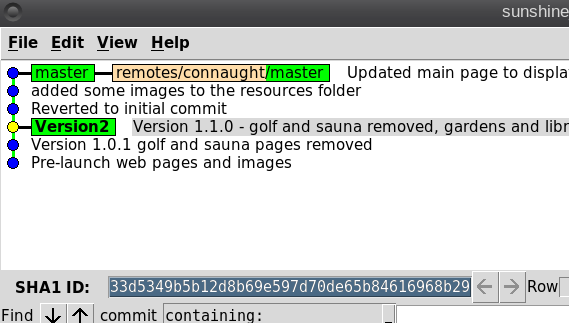 We can now do some changes, and they will only be visible in the branch version2 while the master branch that is currently in use on the distributed web site will not change. Reload the new images into the resources directory and edit the main page to show them. In the git gui window, press F5 to update the display and these changes will show as unstaged changes. 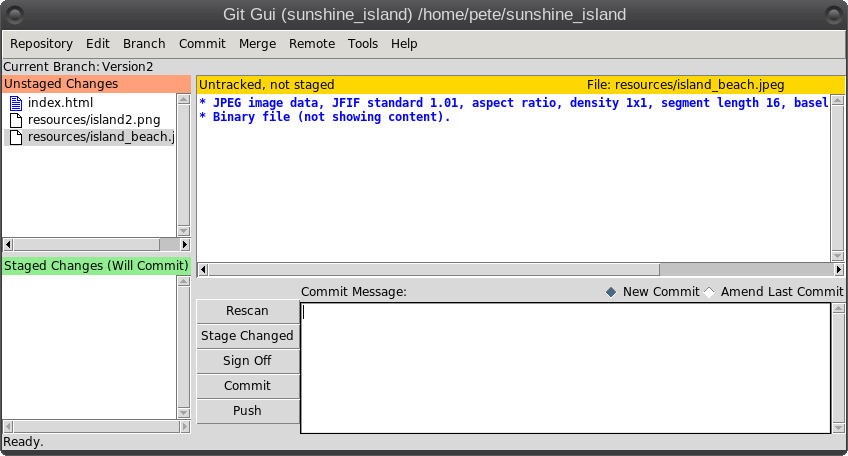 Highlight the changed files and select Commit > Stage Changed Files to stage them for committing, and they will move into the lower left pane. 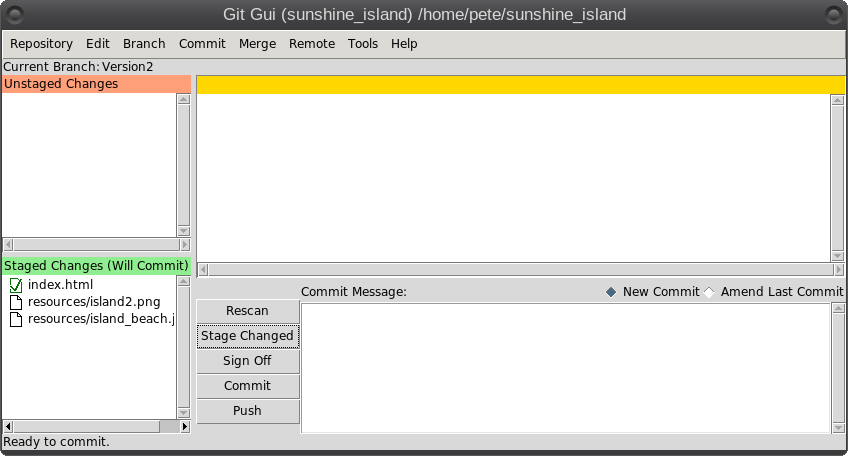 Type a suitable commit message in the box lower right, and select Commit > Commit to perform the commit action. 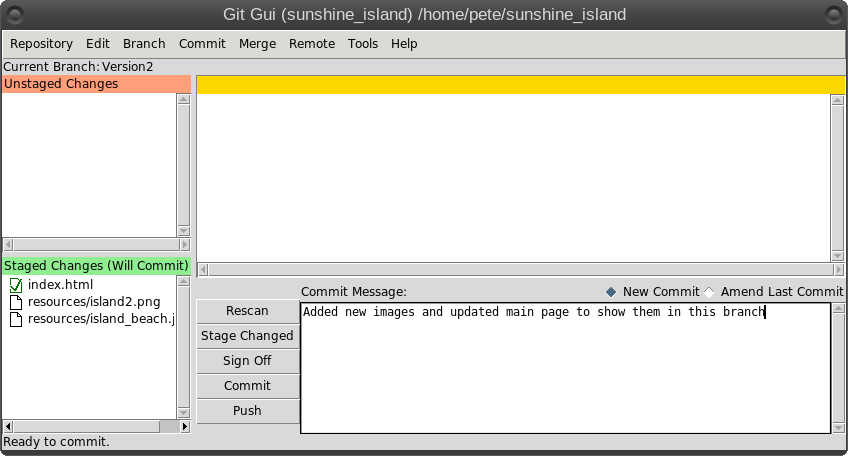 In the visualisation window, we can now clearly see the effects of our branching and commit. 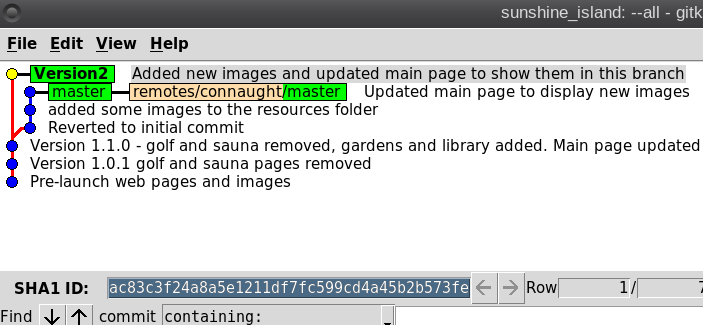 We can carry on working on this branch, but if we need to change things on the currently published web site, we can easily check out the master branch. We can also pull in these changes in the remote repository, or we can push them to the remote from the git gui menu option remote > push. At some stage, you may want to merge the two branches together to incorporate changes in each. You can easily do this with the git gui merge menu option. 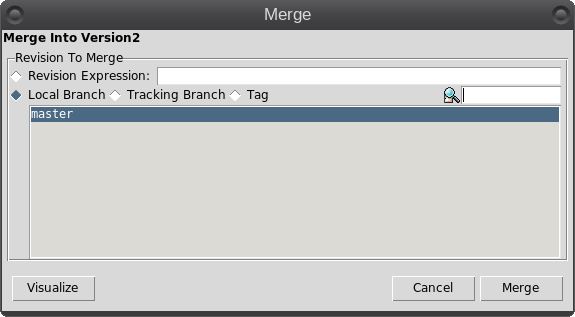 In the dialog that appears, your current branch is already selected, and you have only to select the branch that you want to merge in. There is also a very helpful Visualize button that allows you to see the results before actually performing the merge. In our demonstration project, there is little to be gained from merging the branches, but we will do it anyway.  Uh-oh! That failed, but the situation is not as bad as it first seems. As the warning tell us, there is a conflict in index.html, and we must manually resolve this conflict, and then commit the adjusted file to complete the merge. Git has a tool called git mergetool, which uses one of several tools similar to the Linux diff command to show the conflicts. My personal favourite of these is meld, which is in the PCLinuxOS repositories. You can add this to your .gitconfig file by adding or changing these two lines:  From the Branch menu, checkout the master branch to make it the current branch, then issuing the command:  Displays this window, or something similar if you don't use meld. 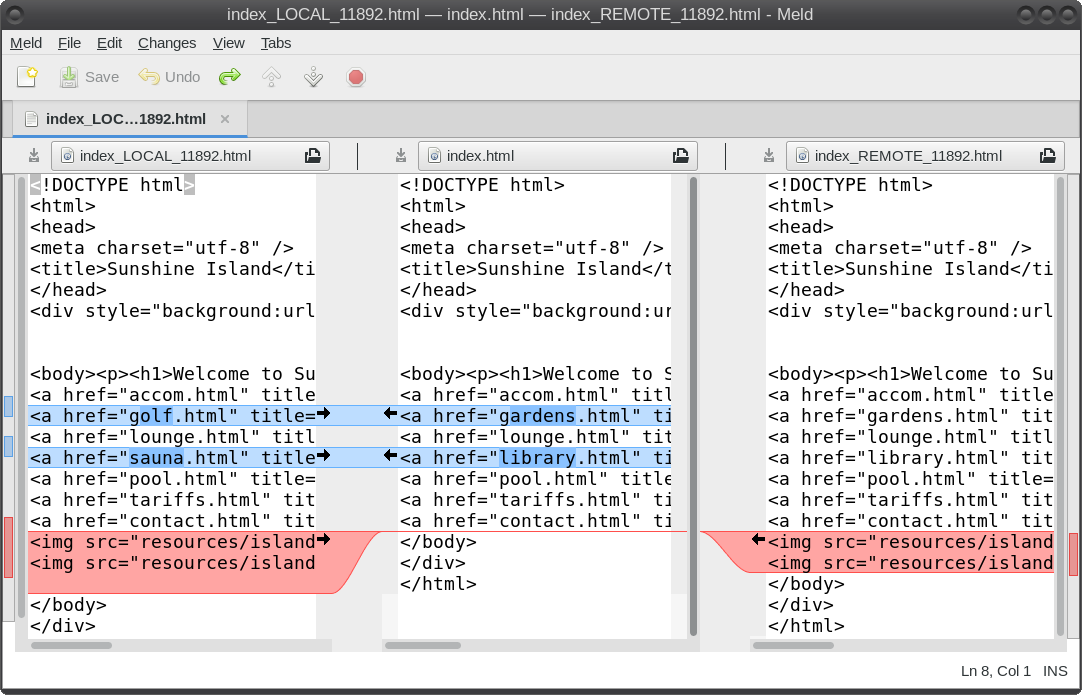 This clearly shows the conflicts, and you can edit the centre panel to modify what will be put into to the merge, and then complete the merge by doing a commit.  After performing the final commit, the history looks like this: 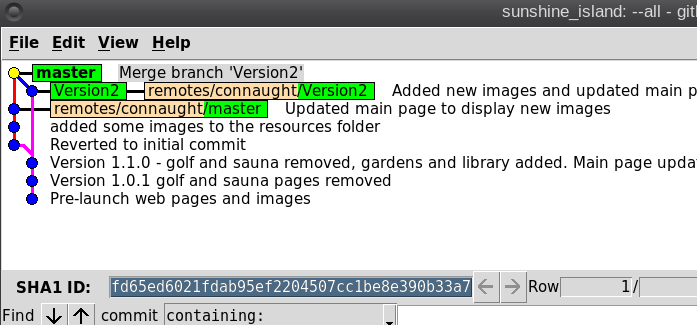 Git is a very powerful tool and I have covered only the very basics of what it can do, but for many people this is enough. Once you get to be familiar with the basics and have used Git a couple of times, it is also easy to work with. This article was created using git, which helped enormously with getting the demo project synchronized with the images and terminal outputs. There are many ways that I could have performed the operations used in the demonstration and Git purists will probably pour scorn on me for my minimalist approach, but it works and so this is how I do it. The steps outlined here are not suitable for a multi-user collaboration, as no consideration is given to other persons contributions, but for a single user, they work just fine. If you want to learn more then the documentation on the git website is pretty good and includes a link to a book, 'Pro Git' written by Scott Chacon and Ben Straub. It is published under the creative commons license, can be read online and is very comprehensive, but is also suitable for beginners. |