| Previous
Page |
PCLinuxOS
Magazine |
PCLinuxOS |
Article List |
Disclaimer |
Next Page |
Virtual Box: Going Retro On PCLinuxOS |
|
by phorneker If you have been around computers as long as I have, you will have a collection of software in storage on CDs and diskettes. This was certainly the case when I was rummaging through all my old belongings stored away from the last century. My first computer was a Compaq Presario 425 with 4MB of RAM, a 200MB hard drive (IDE), and a single 3.5" floppy drive. The machine was an all-in-one 486SX where the monitor and CPU were integrated into one unit. The video chip was a Cirrus 3440, and there was a parallel port, a serial port, and a built-in modem which (thankfully) supported the Hayes AT command set, which was the standard for modem access at that time. However, the audio chipset that was included was proprietary and was used only by the so-called voicemail software that was pre-installed as was the Windows 3.1 interface developed by Xerox at the same Palo Alto facility where the first graphical user interface was developed. On that machine, I installed an original SoundBlaster audio card and disabled the built-in audio to get a real audio chipset. Compaq (before the HP takeover) provided a utility that allowed the entire system to be backed up to thirteen diskettes, in addition to a Diagnostics diskette and a BIOS setup diskette which were included in the original packaging. Besides the graphical interface and the voicemail software, a copy of PFS:WindowWorks 2.0 was preinstalled on the machine. To this day, I still have the backup diskettes in storage, and can still be used inside VirtualBox.
Getting VirtualBox This is the easy part. VirtualBox Manager comes standard as a part of an official PCLinuxOS installation. Simply select VirtualBox Manager from the More Applications menu and follow the on screen instructions. VirtualBox is installed from a self-extracting archive executed as a shell script. The application is installed first, followed by the downloading and installing of the corresponding Extension Pack to VirtualBox, followed by the compilation of the necessary kernel modules, and finally giving users permission to access VirtualBox (a group called vboxusers is created and all users on the PCLinuxOS machine are assigned to the group). VirtualBox Manager performs all of these tasks for you in order to get VirtualBox running properly. When finished, all you need to do is to reboot PCLinuxOS and VirtualBox will be ready to use. Select Oracle VM VirtualBox from the More Applications menu to launch VirtualBox.  This is what should appear the first time you launch VirtualBox. Right now, there is nothing to run as we have no operating systems installed inside VirtualBox. Note: You can install PCLinuxOS inside VirtualBox provided the machine running VirtualBox has sufficient memory to support the host operating system and PCLinuxOS. PCLinuxOS runs best with 4GB for KDE5, and 1GB for the MATE version, and that is just running on the host machine, let alone VirtualBox. When you create a virtual machine inside VirtualBox, you are allocating memory from the host system to run the virtual machine. The more memory you give to the virtual machine, the less memory is available to the host machine to run applications. Keep this in mind when you create virtual machines to run in VirtualBox. Next, get FreeDOS To create a virtual machine, we will need something to run on that virtual machine. Any operating system that can run on an Intel x86 processor (32 or 64-bit) will work (including PCLinuxOS). As we are going retro for this article, we can use CP/M-86, DOS, OS/2, or just about any UNIX-like operating system available since 1968, as long as it can run on a x86 processor. DOS as we knew it was supposed to have been a dead platform (according to the powers that be at Microsoft). That could not be any further from the truth. In fact, DOS never really went away. Since 1981, the year that the original IBM Personal Computer (Model 5151) was introduced, there have been several variations on the product. DOS was originally known as QDOS (for Quick and Dirty Operating System) created by Seattle Computer Systems and purchased by Microsoft to market as the original MS-DOS. Variants on DOS over the years have been available as follows:
Many of these variants can be found (and downloaded) at WinWorldPC as well as archive.org in its The Old School Emulation Center (TOSEC) section. The latter has other interesting collections of software available for download, as well as a virtual arcade where you can revisit the 1980s when video arcades were popular places to hang out (and of course play video games without having to bring in a roll of quarters per visit.) Of course, all of these versions of DOS are abandonware (and commercial when it was being developed actively). However, to be sure you get a DOS that really works as expected (and not have to worry about licensing and other legal issues), I recommend downloading FreeDOS. The current version of FreeDOS installs similar to some Linux distributions. I recommend version 1.2 rather than 1.1 or 1.0. Versions 1.0 and 1.1 have a look and feel of a classic DOS installation. Version 1.2, however, is very polished and has a look and feel of an old school Linux distribution rather than a classic DOS installation, yet it still remains the same DOS we have known and loved for years. The current version weighs in at 1.2GB, which means you will need a blank DVD to burn this distribution (if you wish to use FreeDOS in an old PC that happens to have a DVD-ROM drive). You can also install it to a USB flash drive. The developers of FreeDOS have placed emphasis on getting many USB devices to work as USB as DOS itself predates USB. Thankfully, in VirtualBox, you do not need to worry about USB devices working with FreeDOS as by default VirtualBox does not provide a USB controller to virtual machines running DOS. (The virtual machine can be configured to include a USB controller, but why would we want to do that in DOS?) After downloading (to ~/Downloads unless you told your web browser to save the file elsewhere), there should be a file called FD12INS.ISO. This is the installation disc for FreeDOS. This DVD image is bootable, so no floppy is needed to get FreeDOS started on machines that can boot from a DVD.
VirtualBox does not require a floppy diskette to start FreeDOS. If you must have a floppy diskette for another machine, you can download it from the FreeDOS website, or you can copy it from the BOOT directory of the FreeDOS DVD. If you choose the latter, you will need to use dd to copy the image to a blank diskette. FreeDOS 1.2 is a complete DOS distribution containing not only DOS, but utilities most users will need, networking software including TCP/IP stacks (WATTCP and MTCP) and network applications, a few games and multimedia applications, the OpenGEM desktop, (and two other lesser known graphical desktops for DOS), a set of file archivers to handle most any file archive available on the Internet, and a suite of development tools, namely the DJGPP Development System, OpenWatcom, FreeBASIC, FreePASCAL, Regina REXX, Netwide Assembler, FASM (for Fast Assembler), JWASM (compatible with Microsoft Assembler), Lua, Euphoria and some lesser known utilities.
Linux versions of Lua, FreePASCAL and Regina Rexx are installable from the repository. The development tools on the FreeDOS DVD can be used in DOSBox as well as in virtual machines running OS/2, Windows 9x, NT 4.0, 2000 and XP. Now, Let us build a Virtual Machine Now that we have VirtualBox installed and have a copy of FreeDOS, we can now create a virtual machine and install FreeDOS on it. Click on New to get started building a new virtual machine for FreeDOS. 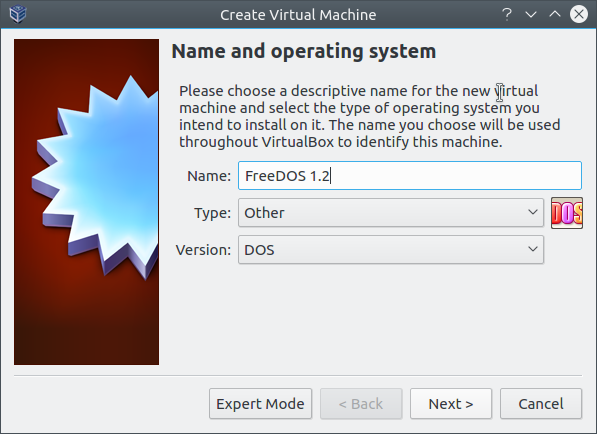 There are three fields that need to be filled out. You can call your virtual machine anything you want. However, VirtualBox will attempt to determine the operating system type and version based on what you type into the NameM field. Since we are using FreeDOS 1.2 for this article, it only makes sense to call the virtual machine FreeDOS 1.2. By default, the type field is set to Microsoft Windows, and Version is set to XP (x86-32). This is because most users of VirtualBox since its inception installed the 32-bit version of Windows XP as a guest operating system. When we typed in FreeDOS 1.2 in the Name field, the type changed to Other and version was changed to DOS. VirtualBox has detected from what we put in that we intend to install a version of DOS in this virtual machine. There is an Expert Mode button. This allows you the option of creating a new virtual hard drive, importing an existing virtual hard drive image, or not using a virtual hard drive at all. The last option could be useful for testing Live-CD/DVDs to see if that particular operating system will run in VirtualBox at all. Click on Next to continue.  This screen allows you to specify how much of system memory to allocate to this virtual machine. VirtualBox has recommended sizes which are set as defaults depending on which operating system you are installing. FreeDOS does not require much in terms of memory to run. VirtualBox recommends 32MB of memory to run FreeDOS which should be more than enough memory to run DOS applications. The same holds true for the following:
Click on Next to get to the disk settings. 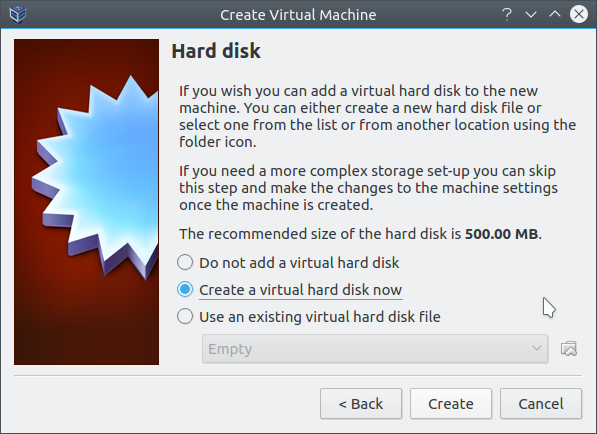 Here you have the option to not use a hard disk, to create a new virtual hard disk, or to import an existing virtual hard disk. The first option makes absolutely no sense for FreeDOS, so we shall not even consider that option. The third option is used if you already have a virtual disk file that can be used in VirtualBox. For this article, we shall use the second option, which happens to be the default chosen here.
While VirtualBox recommends 500MB for FreeDOS, you can use any amount of disk space you want or require depending on the application(s) running in FreeDOS. Click on Create for the next step. 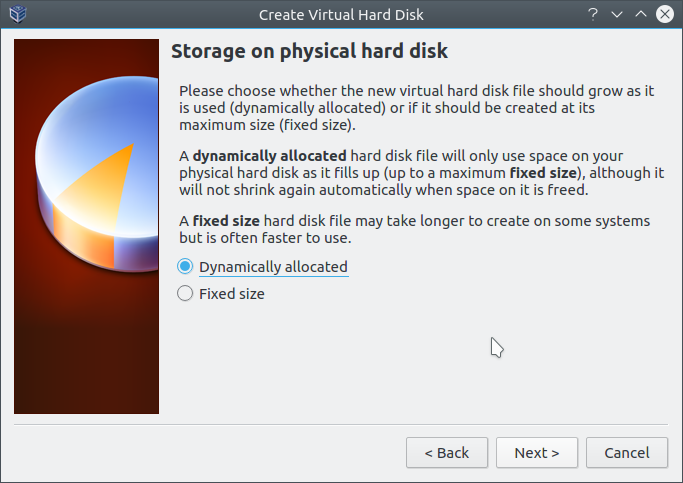 Here you can choose a smaller disk image size to start (having that size grow as the disk storage needs grow), or allocating all required disk space from the start. Selecting the fixed size option will create a virtual hard disk the size you choose. This will take longer to create, but will be faster to access as disk space will not need to be allocated during FreeDOS operation. It is OK to choose either option as it really makes no difference in the performance of FreeDOS in VirtualBox. It is just a matter of whether you want a smaller virtual disk to start or all space allocated at the start. The dialog box here better explains this than I can. Click on Next to get to the next step. 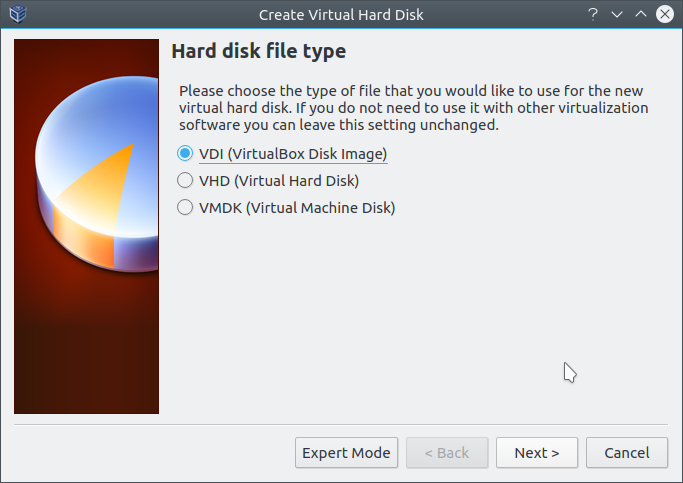 For this option, I would choose the default setting here. The other options can be explained in another issue and have to do with the types of virtual disks that can be used by VirtualBox. Click on Next to choose the size of the virtual hard disk. 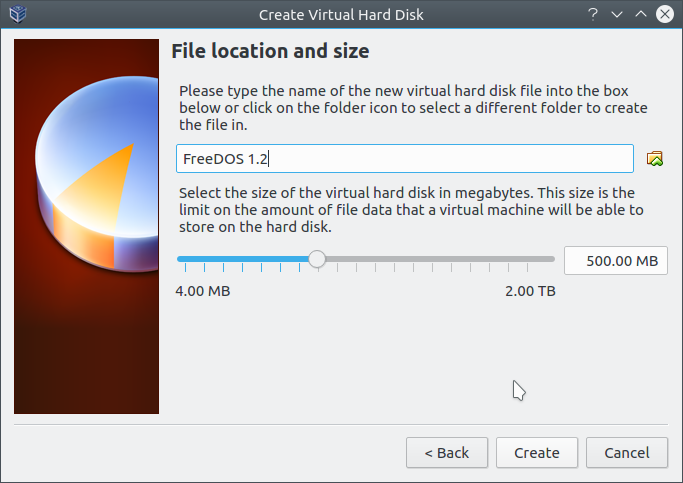 Here you can change the size of the virtual disk file. For FreeDOS 1.2, the default is 500MB. You can increase that as much as you wish, provided you have sufficient physical disk space available on your hard drive to allocate the virtual hard disk.
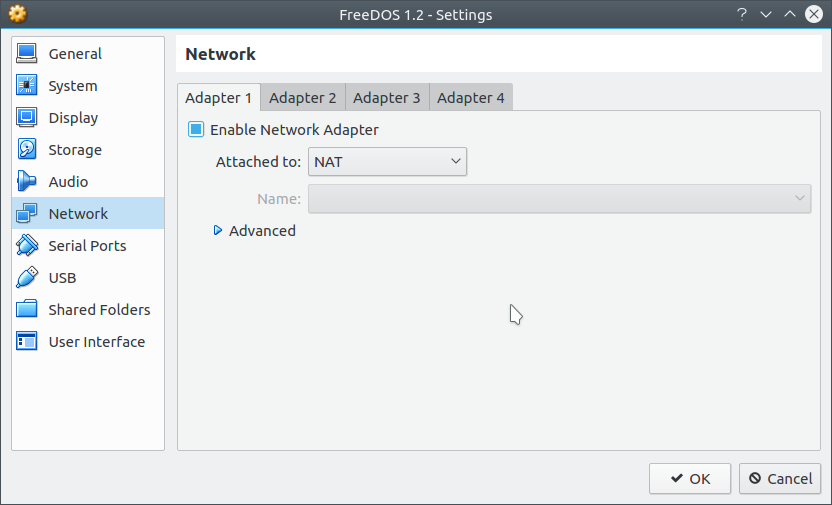
Once you have chosen a disk size for your virtual hard disk, you cannot change it after it has been created. Therefore, plan your FreeDOS disk storage needs accordingly. Click on Create to create your new virtual hard disk and virtual machine. 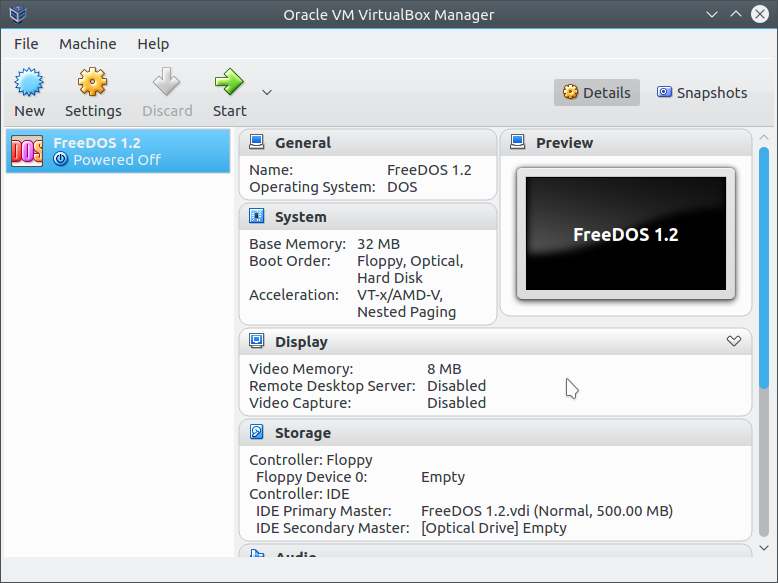 Now your virtual machine for FreeDOS 1.2 has been created. Before we start up that machine, it must be configured. Just as a real PCLinuxOS machine has internal and external peripherals that must be configured, virtual machines in VirtualBox must also be configured. What Hardware is Emulated in VirtualBox To configure the virtual machine, we shall click on Settings. (You can also right click on the name of the virtual machine and select Settings from that menu.) 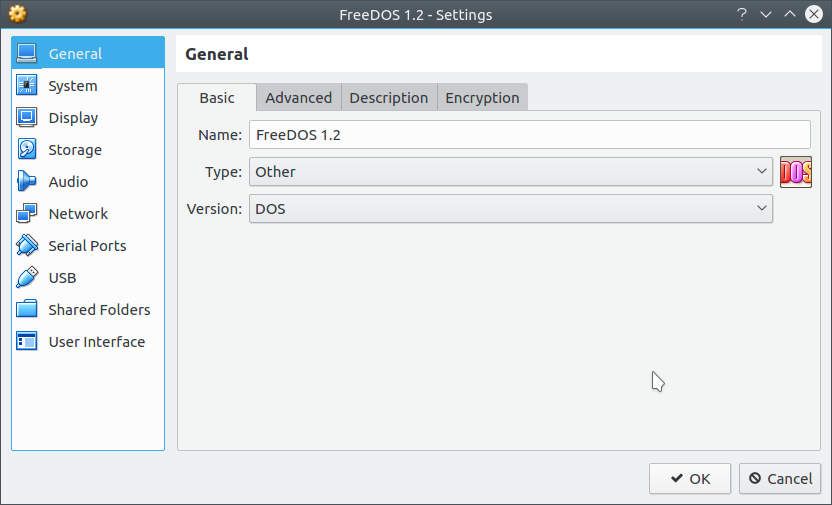 Most of these settings do not need to be changed to get FreeDOS to run. There are some settings of interest that effect what can be done in FreeDOS in VirtualBox. A virtual machine in VirtualBox is initially configured with one floppy drive, one CD/DVD-ROM drive and one hard disk, with the newly created virtual hard disk already installed. We need some way to boot the operating system inside VirtualBox. The System tab gives us some basic settings including where VirtualBox should look for a operating system to boot. The default settings here will work fine. By default, the virtual floppy is searched first, followed by a CD/DVD-ROM drive, and finally the virtual hard drive. 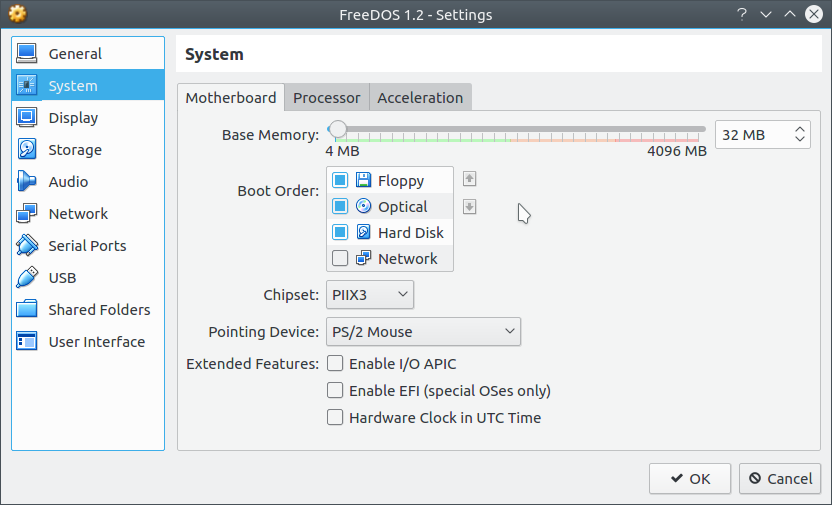 VirtualBox supports either a PIIX3 or the ICH9 chipset for peripheral controllers. Though FreeDOS works best with PIIX3 (which is an old-school chipset found in Pcs built in the late 1990s), I was able to boot FreeDOS natively on my laptop, which has a ICH8 chipset. The Dell Dimension 4600 has a ICH5 chipset and can boot FreeDOS as well (of course, getting the USB subsystem to work is another matter). All other settings here should be left as is. For the video adapter, a simulated VGA board with VESA 2.0 extensions is installed and is compatible with generic drivers for Trident boards. As for the monitor, it is simulated with a resizable window. Simulated text is 80 x 25, but can display 132 x 30 (in a widescreen format) or 80 x 30 with generic Trident drivers (tested with Word Perfect and Quattro Pro). 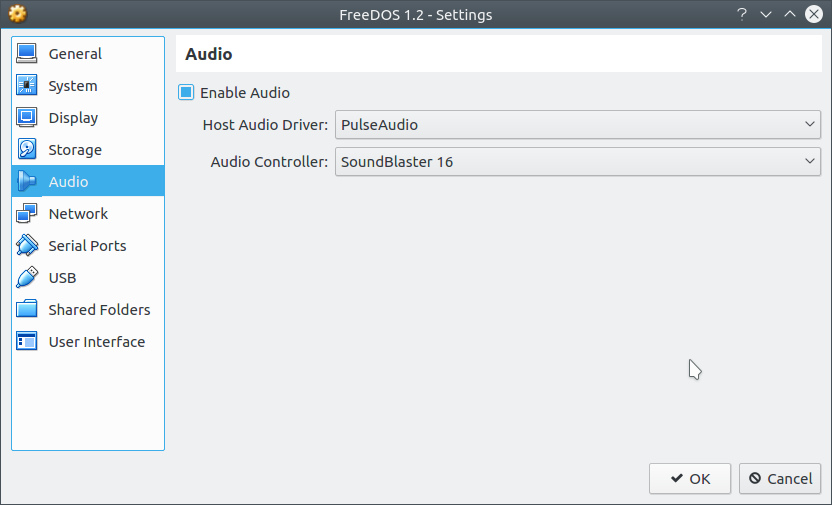 As for audio, VirtualBox emulates a SoundBlaster 16 (a wise choice as that was the most common sound board that could work on most any x86 operating system), a AC97 compliant audio board or Intel HD audio. For FreeDOS, this setting should be left as is. FreeDOS 1.2 contains drivers for the SoundBlaster 16 as part of its distribution so no separate drivers need to be downloaded. Let us click on Storage. 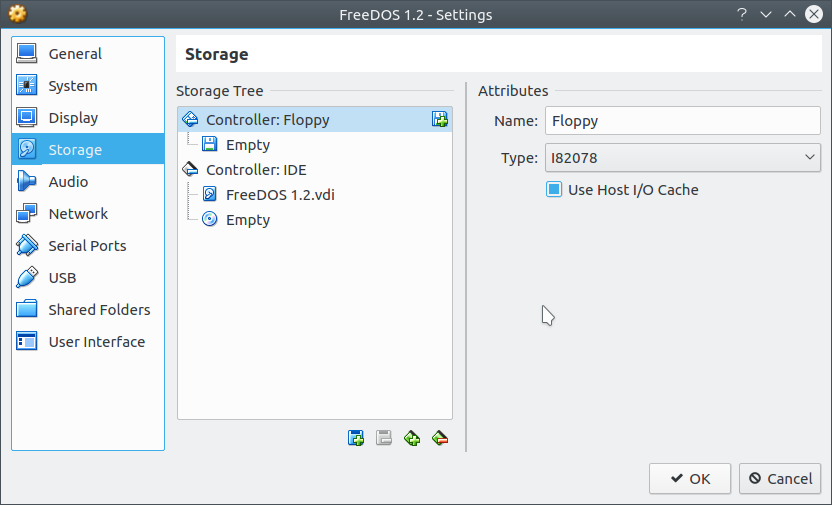 Here we can see that the virtual hard drive we created is already available, and that there is a single floppy drive and a CD/DVD-ROM drive. These are marked empty as no disk images have been assigned to them. This will change when we start the virtual machine. We can add a second floppy drive to the system, and additional IDE or SCSI controllers to the virtual machine. The Use Host I/O Cache is enabled to accelerate disk performance from virtual disks. Note: Any CD-ROM or DVD-ROM images assigned to VirtualBox must be in iso9660 format. These files have the .ISO extension in their names, for example FD12INS.ISO is a DVD image for the FreeDOS 1.2 installation disk. You can assign disks from this menu, but when you run the virtual machine for the first time, VirtualBox will ask for the operating system CD, either as a disk image, or you can tell VirtualBox to look at the CD/DVD drive directly. FreeDOS 1.2 can be networked within VirtualBox, so let us take a look at the Network settings.
By default, VirtualBox has one network adapter enabled, and it is setup for use with VirtualBox's internal network (hence the Network Address Translation setting where it says "Attached To:".) Clicking on Advanced gives us a look at what is being emulated.  Now we see that VirtualBox chose for us a AMD PCnet FAST III network board with a AMD 79C973 chipset. You can also choose a AMD PCnet PCI-II with a AMD 79C970 chipset. The PCnet FAST III is much faster (even emulated) than the PCI-II and hence is the default. Also, the PCnet Fast III will work with OS/2 Version 4 as well as Windows 9x through XP. Also emulated are the Intel PRO/1000 MT series adapters (with desktop and server editions) with the 82540EM, 82545CG and 82545EM chipsets. The MAC address can be changed to anything you want (so long as it is a valid MAC address not used anywhere else in your network). NAT stands for Network Address Translation, and VirtualBox implements a internal network that allows the virtual machine to access the Internet, yet does not allow incoming traffic from the Internet. For this installation, we want to use Bridged Adapter to allow FreeDOS to access the Internet using the same network adapter PCLinuxOS uses to access the Internet. 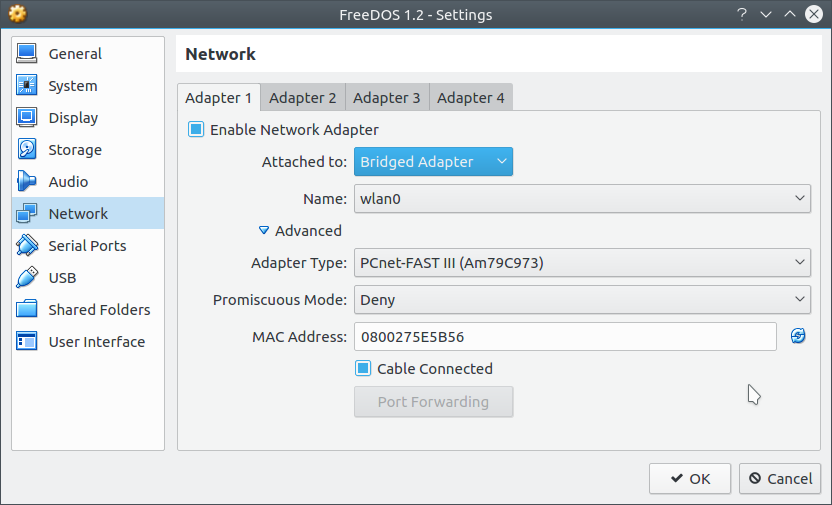 Here, FreeDOS can access the Wi-Fi on my laptop. To this date, there are no Wi-Fi drivers available for DOS, and hence, this is the only way FreeDOS (or any other DOS for that matter) can access your machine's Wi-Fi connection. Other settings here should be left alone, as they are set for secure access to the Internet. Also, one important thing is missing in VirtualBox, but there is a way around it. At some point, we will want to print something from FreeDOS. You can configure and use a network printer from VirtualBox, but what about the locally attached printer. Searches on the Internet resulted in solutions to this problem, but most of them are geared towards VirtualBox running on Windows, which does not help matters here. While there are no parallel ports to emulate, there are, however, four emulated serial ports we can use. Let us now click on Serial Ports. 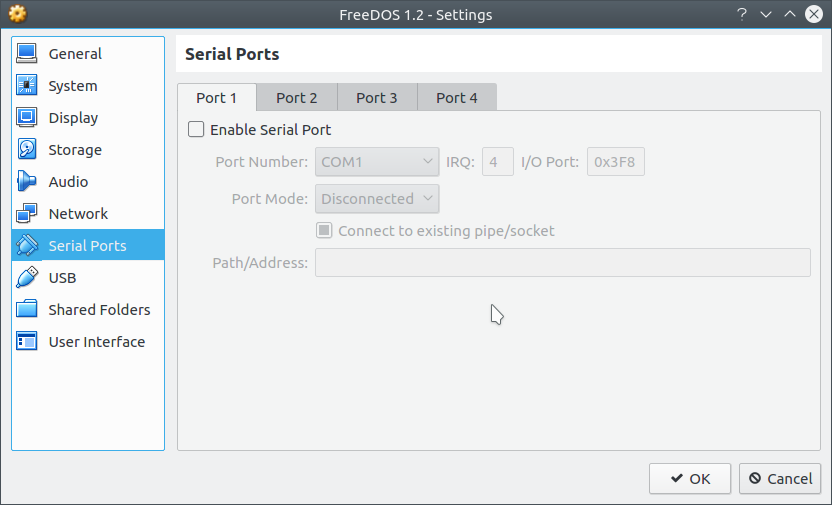 By default, no serial ports are enabled. The first thing we need to do here is enable a serial port, so why not enable the first serial port by clicking on Enable Serial Port. 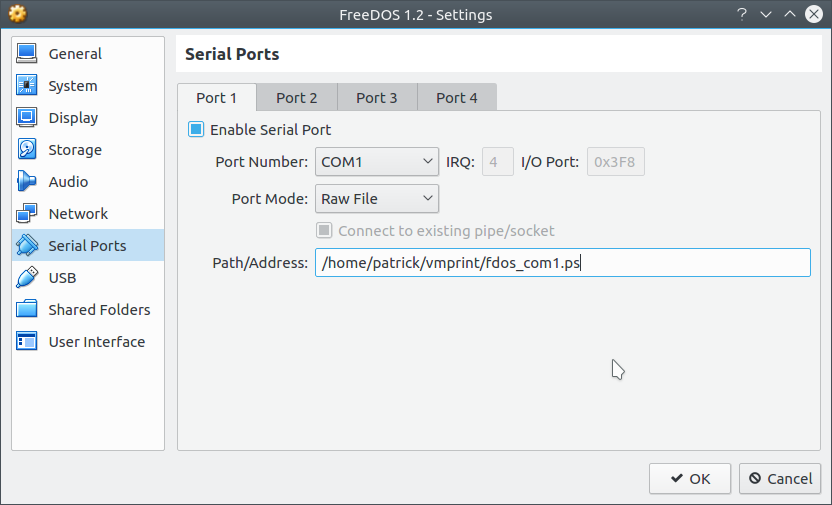 Here we can emulate the serial port for printers by writing the printer output to a file. In this example, I have created a pseudo print spooler in a directory called vmprint and have VirtualBox write printer output to a file called fdos_com1.ps. To do this, select Raw File from Port Mode and enter the full pathname of the output file we are going to use to emulate the FreeDOS printer. If you have a real serial port (or a Serial to USB adapter) you can select Host Device, then enter the device name in the Path/Address field, such as /dev/ttyUSB0 (for a Serial to USB adapter) or /dev/ttyS0 (for a real serial port). There are other modes you can use for Port Mode, but that is a topic beyond the scope of this article.
When we are finished, click on OK. We are now ready to start the virtual machine. Start the Virtual Machine Click on Start in the main menu. As this is the first time we launched the virtual machine, you will be prompted for the operating system CD/DVD. 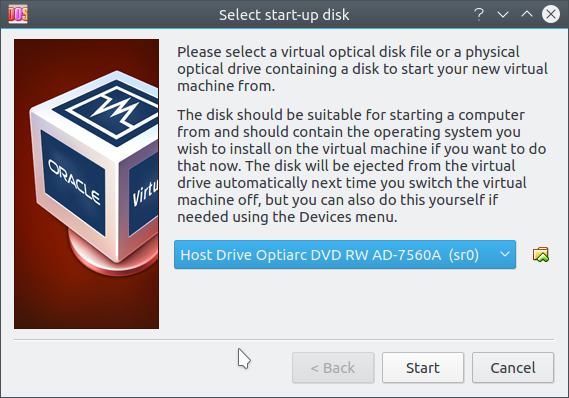 If you burned FD12INS.ISO to a DVD, please insert that DVD into your system's DVD drive (if you have not already done so). Otherwise, click on the folder icon inside this dialog and select FD12INS.ISO from the directory where you have downloaded the FreeDOS 1.2 installation DVD. Click on Start to begin installation. 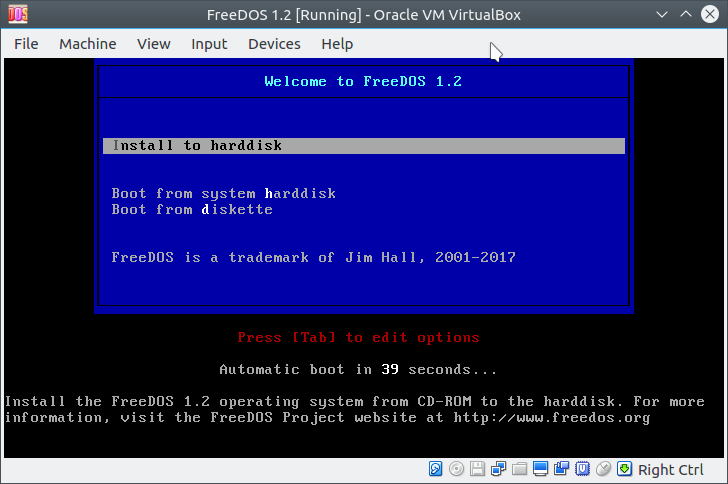 I wrote an article regarding FreeDOS back in 2012. That article was for installing FreeDOS 1.0 on QEMU. As we can see, FreeDOS 1.2 is vastly different from FreeDOS 1.0 in terms of the installation procedure. Yet, FreeDOS 1.2 is still a DOS. Also, QEMU has not been in the PCLinuxOS repository for a long time. All you need to do here is press Enter to start the installation of FreeDOS to your virtual hard drive. 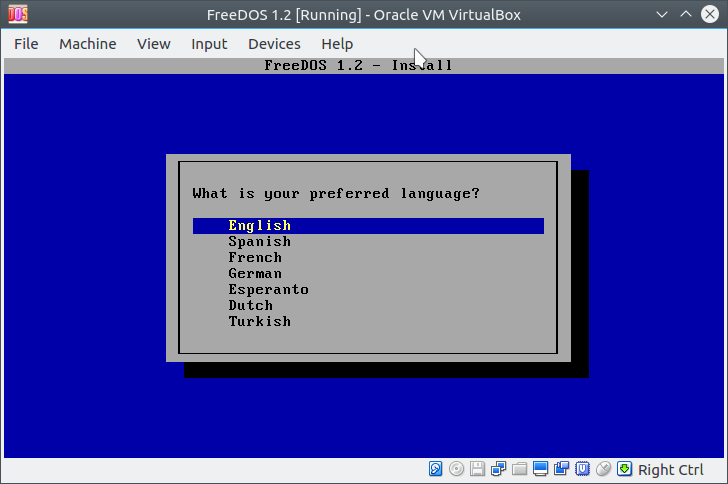 Many of these instructions displayed here are self explanatory. It is safe to choose the defaults for these questions. Press Enter to move to the next step. 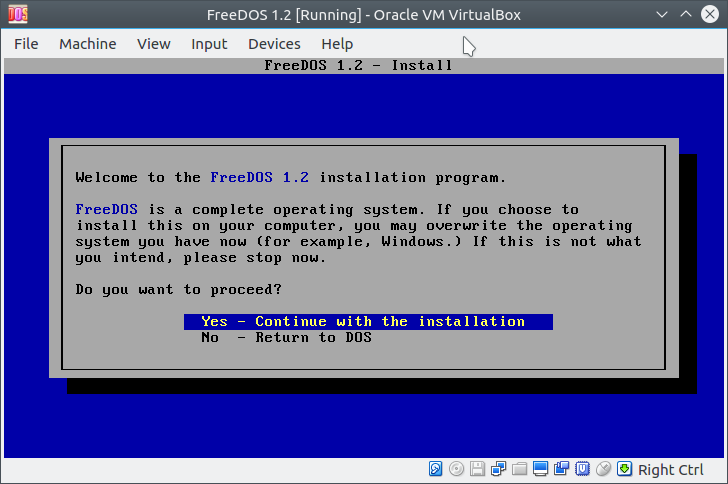 Here the developers of FreeDOS remind us that their product will replace the operating system on the hard drive where FreeDOS is to be installed. As we are installing FreeDOS on this virtual hard drive, we can say Yes to this question.
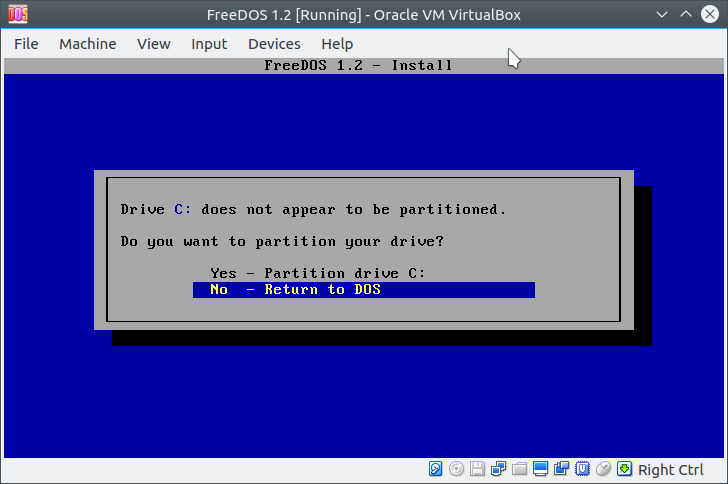
As with any new hard drive, the virtual hard drive we created has to be partitioned. For FreeDOS 1.2 (or any other DOS for that matter), we need to create a partition for installation. FreeDOS will automatically create the largest available partition for installation. In this case, the entire virtual hard drive will be given one FAT32 partition (as that is what FreeDOS uses). Select Yes here and press Enter to continue. 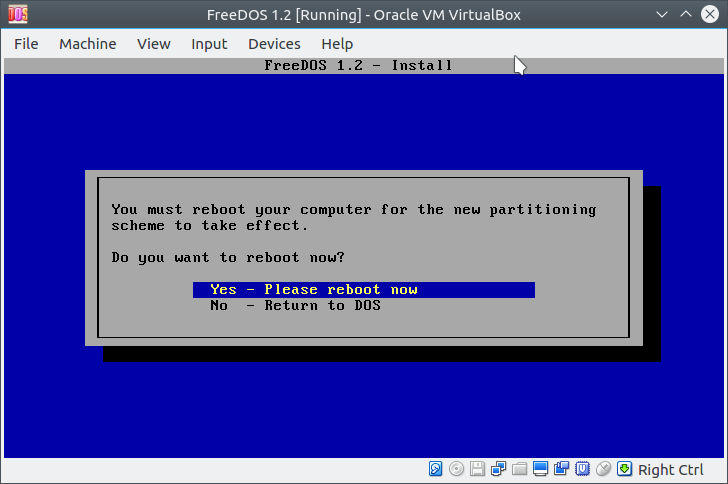 As with any operating system (including PCLinuxOS), changes in the partitioning of the hard disk, whether virtual or physical, require a system reboot for these changes to be recognized by the operating system. Press Enter to reboot the virtual machine. We then return to the main installation menu for FreeDOS. Press Enter again to continue the installation. 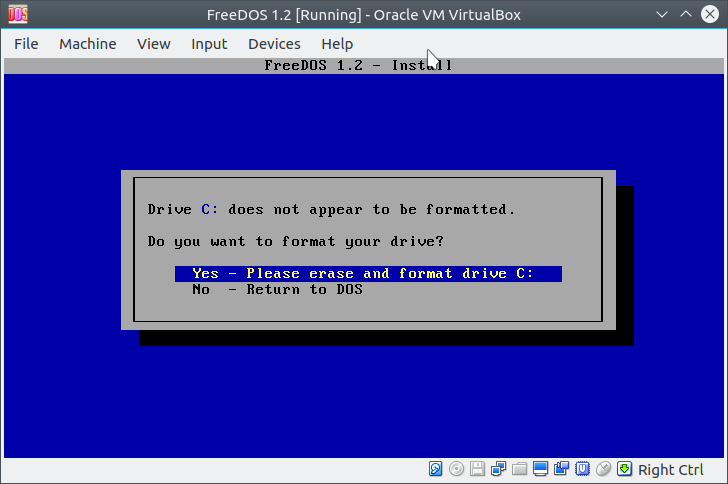 We have only partitioned the virtual hard disk. Now, it needs to be formatted for FreeDOS installation. Press Enter again to format the virtual hard drive so FreeDOS can install in that virtual hard disk. 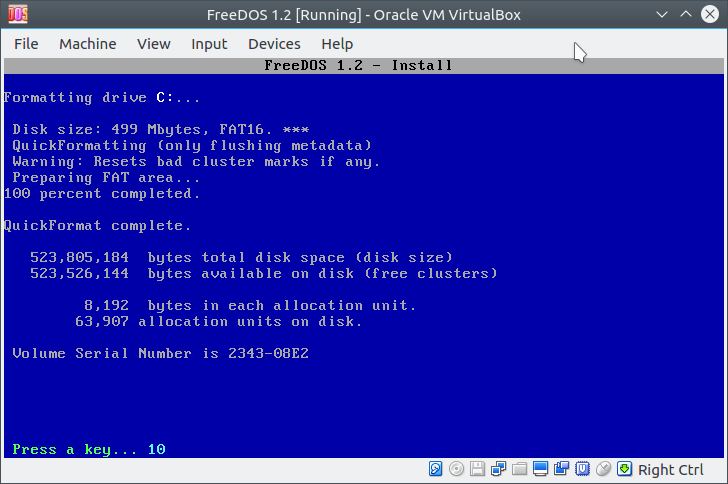 In this example, we have created a 500MB virtual hard drive, and that hard drive was formatted for FAT16. Had we created a virtual hard drive greater than 2GB, the virtual hard drive would have been formatted for FAT32. 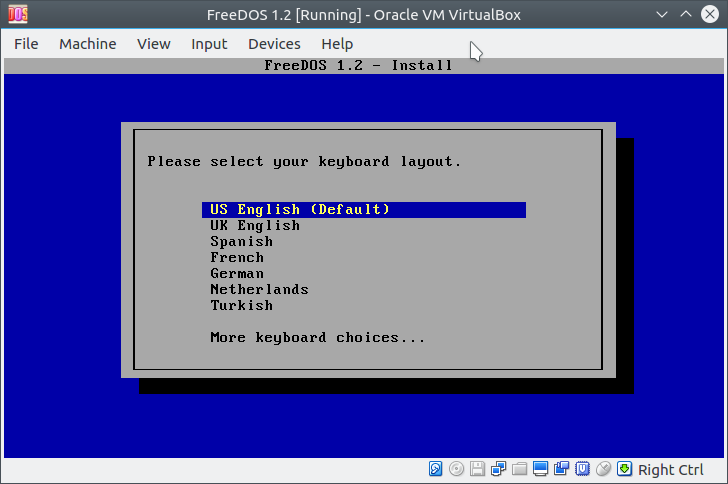 Most of us will press Enter here to accept the default keyboard layout.  Here, I recommend accepting the default choice as Full Installation includes packages from the UTILS directory on the FreeDOS installation disk most DOS users will want and use. Full Installation is not really the entire distribution. FreeDOS will install what is necessary to get a installation similar to what you get from a PC-DOS 6.3 (or MS-DOS 6.22) installation. The FreeDOS 1.2 installation DVD contains a few DOS games, multimedia applications and utilities, networking utilities, three graphical desktops, and a suite of development tools. Simply press Return to install the BASE packages and some packages from the UTILS directory. The sources are completely optional but are offered to comply with the GNU General Public License, of which many components of PCLinuxOS itself are distributed. 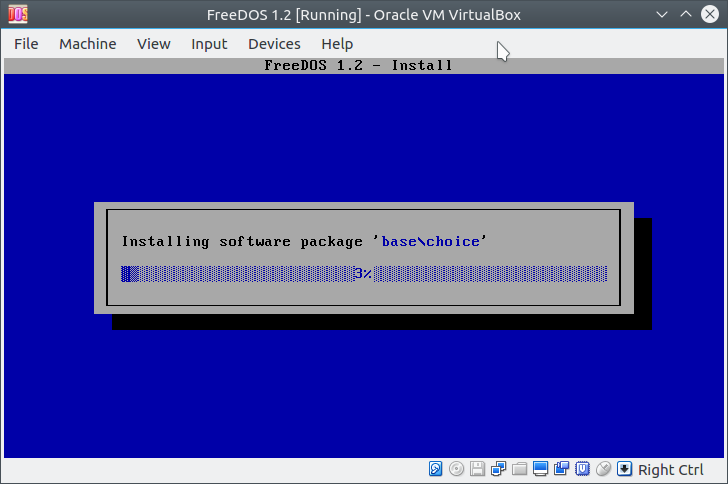 ...and now we wait for the installation to finish. 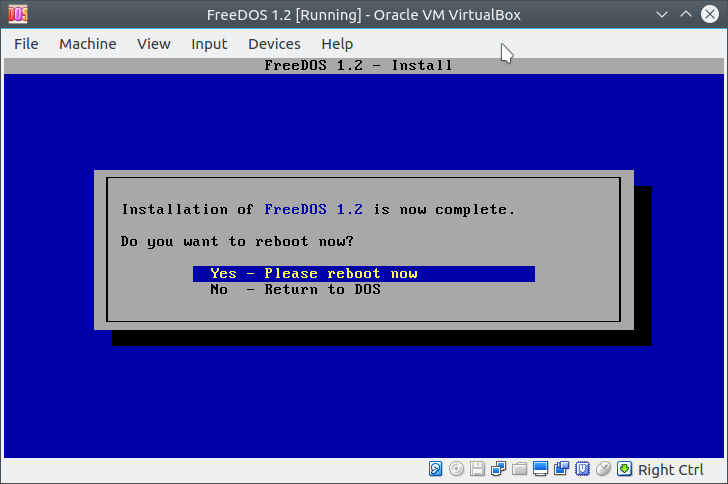 ...and once finished, we will need to restart the virtual machine. You will need to leave the FreeDOS 1.2 disk in the DVD drive as we will need it for the next steps. 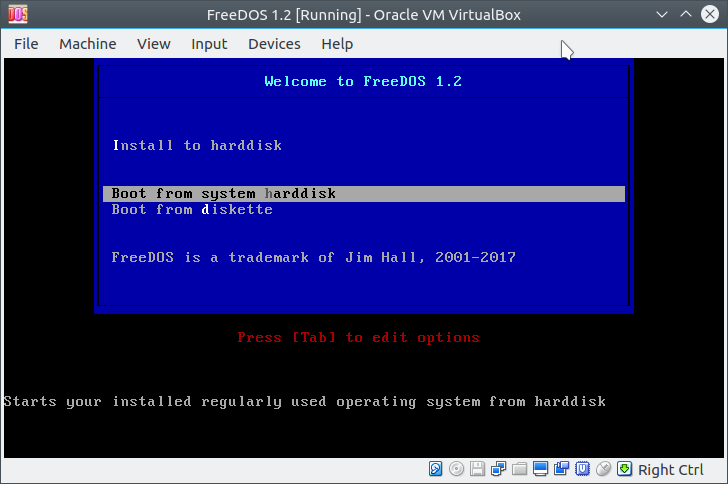 From the FreeDOS main installation menu, we will now need to tell FreeDOS to boot from the virtual hard disk instead of the DVD. Press the Down Arrow key to select Boot from System Hard Disk and press Enter.
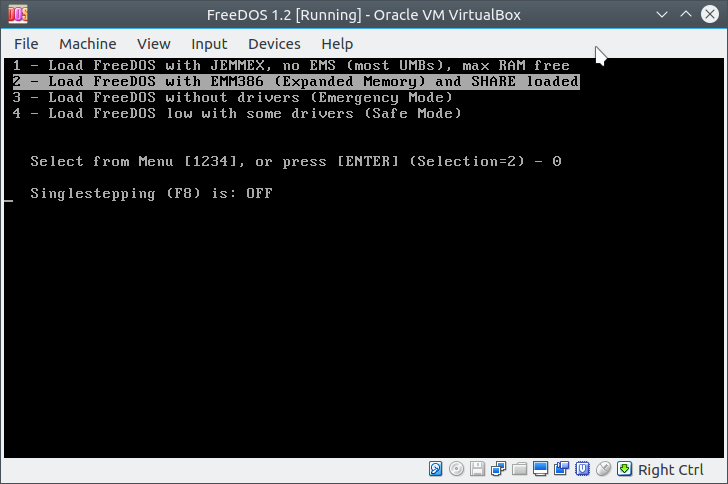 The default here should be used for maximum benefit of FreeDOS. Press Enter (or the number 2) to continue. 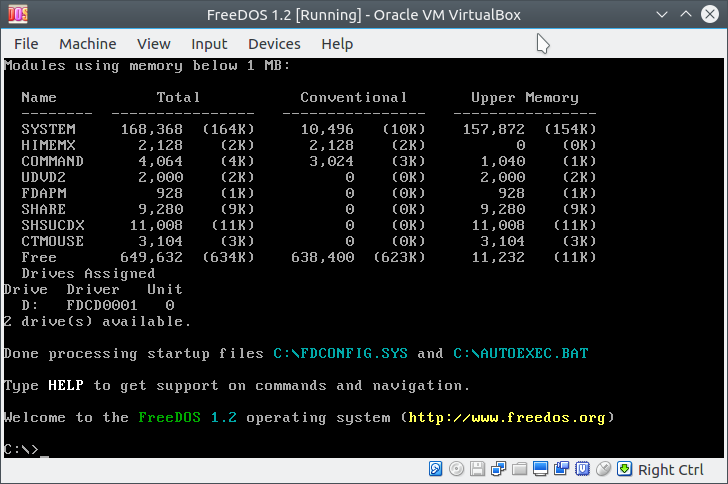 ...and if everything installed as planned, you should see this. We are now in FreeDOS. Configuring and Networking FreeDOS This was just the basic installation of FreeDOS. Now we want to be able to do many of the same things here as we do in PCLinuxOS. FreeDOS 1.2 now comes with a utility called fdimples. Here is where you need to have the FreeDOS installation DVD available. We will need this utility to install networking as well as other applications, games and other useful programs already on the installation DVD. If the FreeDOS installation DVD is not in the DVD drive, fdimples will only show you what has been installed. Simply type fdimples to launch the utility. 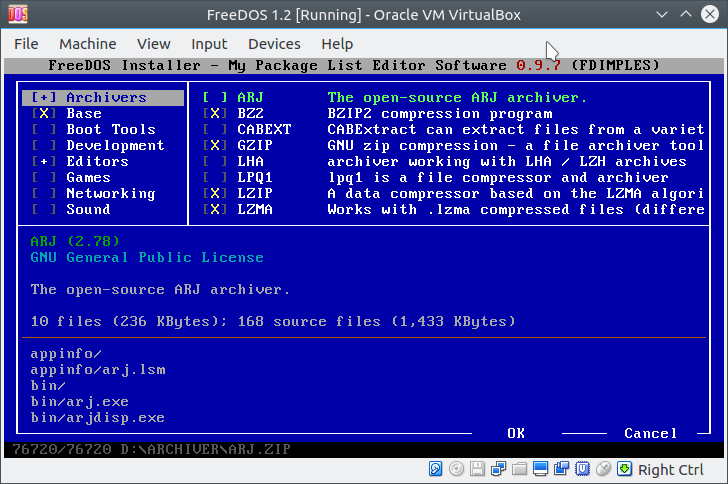 You can select entire categories of applications or you can choose individual packages, not unlike some old school Linux distributions. Press Tab to switch between panels. Press Space to select and/or deselect items. When finished, press Tab until the OK is highlighted, then press Enter to install all selected items from the installation DVD.  For this example, I have the Sound, Networking and Archivers categories selected. Everything from these categories will be installed from the installation DVD with fdimples. We should have at least the Networking packages installed as we will be configuring FreeDOS to use the Internet. Installing the Networking packages will provide the networking capability to FreeDOS. Once the networking packages are installed, we will need to reboot FreeDOS to get things working. Up to now, the FreeDOS installation took care of the rebooting process inside VirtualBox. This time, the reboot is not automatic. To reboot VirtualBox, instead of the three finger salute (that is, pressing Control-Alt-Delete), we hold down the ,b>right side Control key, then press R. Note: The right side Control key is not the same as the left side Control key on the keyboard. The main difference is the location of the keys on the physical keyboard. If you have clicked the mouse pointer inside the FreeDOS window, you will need to release the mouse pointer to PCLinuxOS by pressing the right side Control key. In VirtualBox, this is known as the Host key. Alternately, we can select Machine → Restart from the VirtualBox menu. What is different with this reboot? Since the networking packages were installed, FreeDOS automatically connected to the Internet as it has its own IP address.  This is the result of configuring the virtual machine to use the Bridged Adapter. Now, FreeDOS is sharing the network connection with PCLinuxOS. While fdimples only installs packages from the installation DVD, there is a second utility that installs and updates packages from the FreeDOS repository located at ibiblio.org. 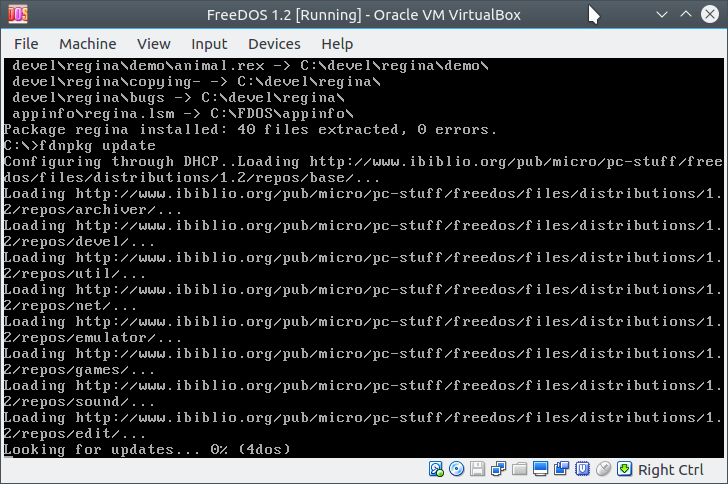 The fdnpkg utility is the package manager that comes with FreeDOS. When we installed PCLinuxOS, one of the first things we did was to do an initial update of the installation. We used Synaptic for that. FreeDOS is no different in that regard. Type fdnpkg update to do the same thing after all packages are installed. This checks for package updates and installs these updates when necessary. We're Done ...and that's it. We now have FreeDOS installed and working on VirtualBox.
The FreeDOS repository can be found at: For FreeDOS 1.2. The FreeDOS installation DVD was created from this repository, and updates are indicated by the presence of subdirectories within this repository. The software available in the FreeDOS repository is only a sample of what can be run under FreeDOS. In the next few issues, I will present things that can be done with FreeDOS running under PCLinuxOS. Actually, this is the best (and safest) way to run FreeDOS on PCLinuxOS. Application Notes for FreeDOS FreeDOS has a definitive layout in which applications that are installed from the repository and from the installation DVD. Those of you familiar with the various DOS implementations will notice the difference. For example, the DJGPP Development System is installed in C:\DEVEL\DJGPP where normally, DOS users install the same software in C:\DJGPP. However, this will not stop us from installing CD-based applications such as the Word Perfect 6.2 suite. We can install DOS applications in FreeDOS the same way we always did. This particular application will install in FreeDOS 1.2 the same way it installs in PC-DOS 6.3 (or MS-DOS 6.22). There is, however, one notable exception: The Geoworks productivity suite. Geoworks will install and run in any other DOS (as well as OS/2 and Windows NT versions 3.5 through XP), but it will not run in any version of FreeDOS! This is because this productivity suite was written in assembly language and used undocumented functions of DOS, which of course will never be available in FreeDOS. To run Geoworks in VirtualBox, you will need to install a separate version of DOS such as PC-DOS 5.0. (I chose this example as this was the particular version of DOS that Geoworks was designed to run under. Thankfully, I have a physical copy of PC-DOS 5.02 that I pulled out of storage. GeoWorks will run under MS-DOS 6.22, PC-DOS 6.3 and 7.0 as well.) The same could be said for Windows 3.1, however, you will need to type WIN /S to run Windows 3.1 in FreeDOS (not that anyone should install Windows 3.1 in FreeDOS to begin with as there are three other graphical interfaces available on the FreeDOS installation DVD). Let the Retro Computing Begin With this setup, we have now entered the world of retro computing. FreeDOS 1.2 provides a way to run most of your old DOS software that has not been used in a while. There are some other issues that need to be discussed about DOS software, such as how to get those floppy based applications into VirtualBox, but that will be for another issue. To shutdown the virtual machine, simply close the window. You will be prompted to either save the state of the machine, or to do a virtual shutdown (ACPI style) of the machine. For FreeDOS, the latter will be sufficient as we normally have done that with real DOS machines. Enjoy the nostalgic trip. |