
| Previous
Page |
PCLinuxOS
Magazine |
PCLinuxOS |
Article List |
Disclaimer |
Next Page |
Add Album Art To Your MP3 Files With Ease |
|
by Paul Arnote (parnote) As I wrote last month, I recently "discovered" podcasts. This has led me to renewing my "relationship" with MP3 files. Last month, I wrote about resampling a collection of MP3 files so they all fit on a 700MiB CD-R that I can play in my truck's MP3 CD player. As you can imagine for something that is "new" to any noob, I have a lot of "catching up" to do when it comes to podcasts. So, I've spent some time exploring, downloading some to my computer, while adding others to my "lists" on the various services that offer podcasts. One thing that I noticed is that some of the podcasts have each "episode" or "chapter" displaying the cover art for that particular podcast. Others, though, only display the bland "generic" MP3 icon in my file manager (Thunar). Hey! I want those to have pretty pictures on them, too!  Notice how the icons for the MP3 files at both ends of the image are the generic MP3 icon used by my file manager. But then look at the nice, colorful, bright images that represent the three icons in the middle. This is called "album art." None of the "pretty pictures" are displayed on my truck's MP3 CD player. It couldn't care less. But, when I view the files on my computer, having the MP3 files all displaying the same cover art (or album art) lets me know that this particular group of MP3 files are all part of one bigger package. It also helps them stand out from the crowd, so to speak. So, I embarked on a "mission" to figure out how to add album art images to my MP3 files. Some of the solutions I found weren't ... solutions. The method(s) didn't work. That is, until I tried one method that I tried to steer away from initially. In the end, it ended up being the easiest solution. That solution was to use ffmpeg to embed the album art into the MP3 files. What caused me to steer away from it initially was a couple of comments that made sense to me at the time. They were along the lines of "Using ffmpeg to insert album art into a MP3 file is like using a sledge hammer to drive a tack." Another criticism warned about the risks of re-encoding MP3 files, since the MP3 compression algorithm is most assuredly a lossy compression method. That means that every time you re-encode a MP3 file, you risk losing more and more sound fidelity. Fortunately, with ffmpeg, that last criticism is easy to circumvent. So off to the bash drawing board I went! Just like with last month's MP3 Bitrate Convertor script, I wanted to create a bash script that could run either as a standalone script, or that could also be tied to a custom action in Thunar (which is primarily how I would use it). It also had to have a GUI element to it, to help insulate those who prefer to stay away from the command line ... well, away from the command line. The script turned out to be much easier than I anticipated. Below is the script. As you can see, it's not very long. It's only 18 lines, and that's counting five blank lines. You can download it from the magazine website, or you can just type it in as you see it here. The line numbers are there just to delineate the lines of the script, and shouldn't be entered if you are typing it. The entire script is only 534 bytes long, so I doubt you'll go over any speed limits or download quotas by downloading it. The file is named mp3-album-art.sh.txt. When you download it to your computer, place it in the directory where you store your bash scripts, remove the .txt file extension, and make the file executable. 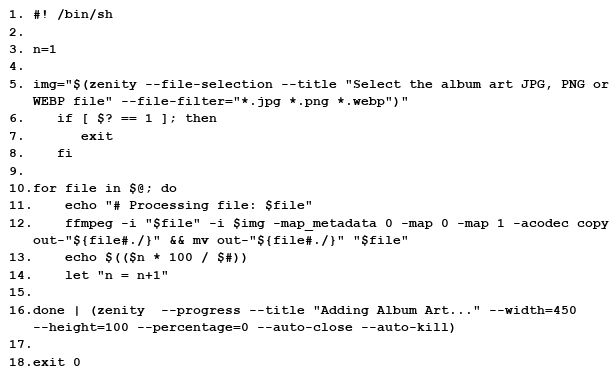 So, let's look at what's going on in this bash script. Of course, since it is a bash script, it starts off with the typical bash shebang on line 1. Line 3 sets up an integer in the variable "n", which will be important later on when we are displaying the progress dialog box. 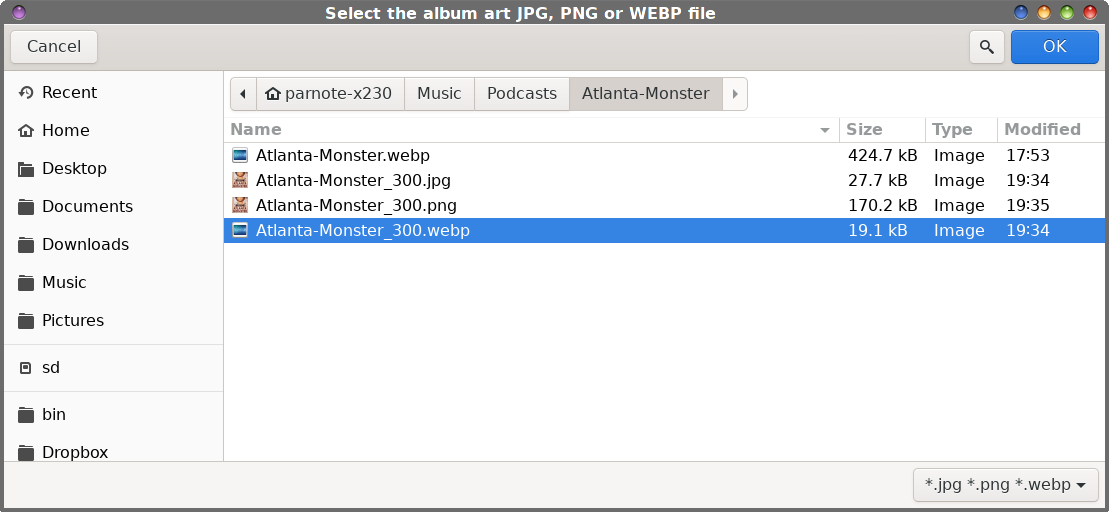 Lines 5 through 8 display the file selection dialog box. This is where you will select the image to embed into your MP3 file as album art. Keep in mind that your MP3 files will "grow" by the size of the album art file, so choose something on the smaller side. This may require you to resize your album art image. Also, your album art image must be either in JPG, PNG or WebP image formats. Lines 10 through 16 sets up a for-do loop to walk through all of the files provided to the script as command line arguments. With line 11, it then also sets up the information to display in the progress dialog box. Line 12 is where the "magic" happens. Ffmpeg is launched, with both the input MP3 file and the selected graphic file imported. The most important part of the ffmpeg command is the -acodec copy parameter, which tells ffmpeg to merely copy the audio information, rather than re-encode it. This allows us to avoid having to re-encode the audio file, and risk further audio quality degradation. The rest of the ffmpeg command line options write out a temporary file, and then copy that temporary file back into the original file. Line 13 increments the progress dialog box as it works through multiple files. Line 14 increments the integer that we set up in line 3, as it keeps track of where it is in the list of files to process. Line 16 closes out the for-do loop, and displays the Zenity progress bar dialog box, so you know where in the process you are. Line 18 exits the script cleanly. Using The Script Of course, the script runs from a command line, as intended, with a full graphical interface ... which consists only of a Zenity file selection dialog box. As is my usual goal, I also want to be able to run it from a custom action in Thunar. As I stated last month in the MP3 Bitrate Convertor script article, this should also be able to function in a similar manner in Caja on the Mate desktop, or in Dolphin on KDE Plasma. Since I don't run those desktops and haven't for a while, I'm no longer familiar enough with how to add them to those file managers' context menu to walk you through it. There are plenty of external resources that cover how to do so, anyways. 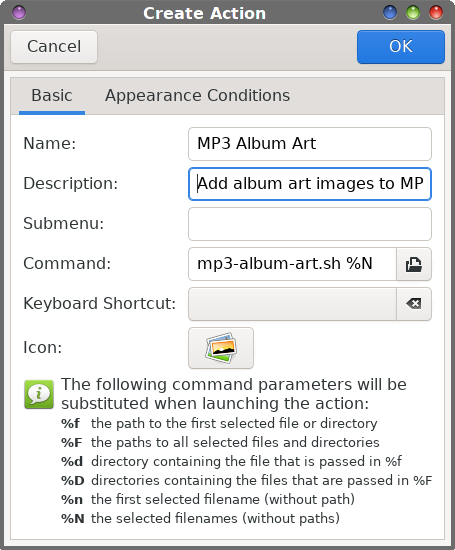 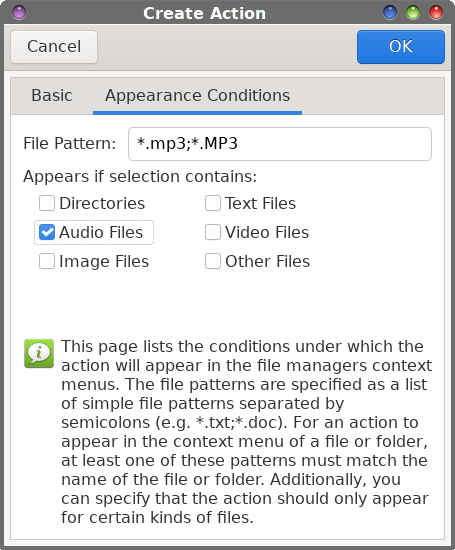 In Thunar, go to the Edit > Custom Actions... menu and click on the "+" symbol that is at the top of the row of buttons on the right side of the dialog box. In the "Create Action" dialog box (above), under the "Basic" tab (left), fill in the Name (which will be the menu item name that will appear in your context menu). I named mine "MP3 Album Art." You can add a brief description in the "Description" field, if you want. It's not required, but may be appreciated if you go back in to look at it eight months from now. On the "Command" line, enter mp3-album-art.sh %N. I keep all of my bash scripts in my ~/bin directory, which has been added to my $PATH statement. That way, my scripts can be located and run without having to provide a fully qualified path to my bash script. Otherwise, if you don't have your bash scripts stored in a directory in your $PATH statement, you'll have to provide a fully qualified path to where you stored your script. Under the "Basic" tab, you can also choose an icon to display and represent your script. Under the "Appearance Conditions" tab (right), enter *.mp3;*.MP3 on the "File Pattern" line, and check the box next to "Audio Files." Click OK and your new Thunar custom action will be saved. Caveats You'll want to keep your image files as small as possible, of course. Watch your file sizes of your album art, because when you embed the image into your MP3 file, your MP3 file will grow by that much, as a general rule. So, you might have to resize your image file to something smaller. Some album art you download can be as large as 500KiB, which is way too large to be adding to your smaller MP3 file. Usually, resizing your image file to something between 250 and 300 pixels in width should be sufficiently large enough to see well, but shrink the file down to a much more reasonable size.  While you can use PNG and JPG files for your album art, you might want to opt for images in the WebP format. They are typically significantly smaller than either PNG or JPG files. If you're unfamiliar with WebP images (I was until very recently), you can read up on them in the WebP article, elsewhere in this issue of the magazine. Summary Adding album art for your MP3 library can be fun. At the very least, it can brighten up your file manager. As an added bonus, your album art will be displayed in VLC or Parole or any of your other audio file players, instead of a blank, empty screen. Everyone needs a little splash of color and a sense of belonging. Adding album art to your MP3 files helps keep all of the files from one "album" appearing the same, so you know at a glance that they all belong together. |