| Previous
Page |
PCLinuxOS
Magazine |
PCLinuxOS |
Article List |
Disclaimer |
Next Page |
GIMP Tutorial: Tool Features You May Not Have Seen |
|
by Meemaw We use many tools in our graphics journey. In GIMP, we use Bucket Fill, Eraser and Clone tools all the time, but they have some features you might not have seen yet. I look at tutorials a lot, and saw these tips on Davies Media Design's YouTube channel. His tutorial was titled "5 Things You Didn't Know GIMP could do". If you know all these already, that's awesome, but if not, I hope you learn something useful. Bucket Fill Did you ever fill an item and then decide you wanted it a different color? When you used Bucket fill again with the new color, did some of the old color remain on the edges? I've done this a few times when I wanted to change the background or color of an object. Here we see a closeup of a circle that is blue: 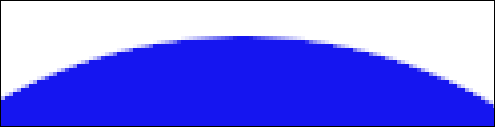 Now, you've decided it should be green so you filled it: 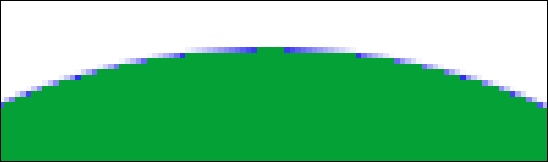 Well, darn… there's still some blue there. Undo your fill so it's blue again, then look at the bottom of your bucket fill tool. You'll see the setting for Threshold. The default is 15, I think, but turn it up to about 120, then fill again:  You still have a bit of blue, but it looks lots better. Undo again and set the threshold up a bit more and you can probably get rid of the majority of it. Eraser Suppose that in your project with GIMP, you erased some features of your creation, then went on to draw more. As it sometimes happens, you change your mind about erasing the features, but now you've done a lot to your project, and don't want to "Undo" everything back to the eraser. In this picture, I erased some trees in the center, and then I used the paintbrush to write "I love GIMP". I was planning to clone some sky into that blank. 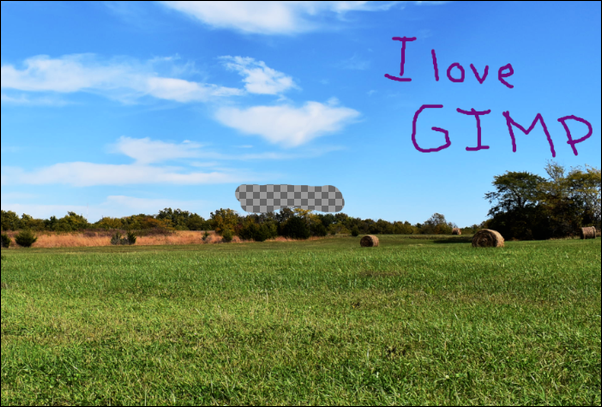 Now I've decided that I want to leave the trees. If you look at the bottom of the eraser tool settings, you will see a line that says "Anti erase (Alt)". Check that checkbox and go back to what you erased, and go over it again. (You can just hold down your Alt key and un-erase too.) Whatever you erased will be back where it belongs. NOTE: If you don't have an alpha channel in your project, none of this will work. Erasing a photo in .jpg format will result in the space filling with white (or whatever your background color is). Right-click the picture in the Layers dialog and choose Add alpha channel. 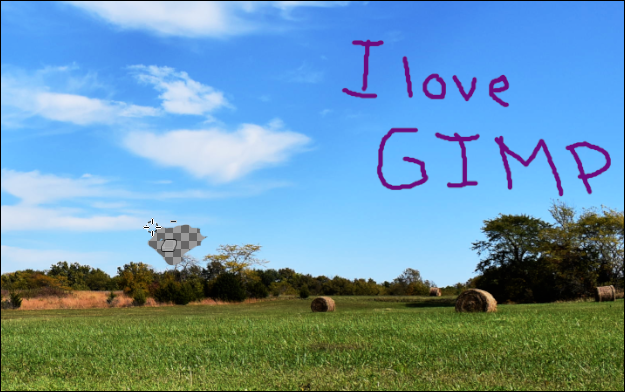 Clone You can also use the clone tool to delete something you don't want that is in the middle of your Undo dialog. We're always told that we need to work on a copy of a photo, so we'll have the original if something goes wrong. Davies also suggests doing our drawing on a different layer as well. However, I drew directly on my photo when I wrote "I love GIMP". Maybe I want to remove "love" and put in "Love" with a capital L. I can Undo, undo, undo, undo… until it's all gone, and start again, but I can also do something else. This depends on keeping your project open so the Undo History is still active. 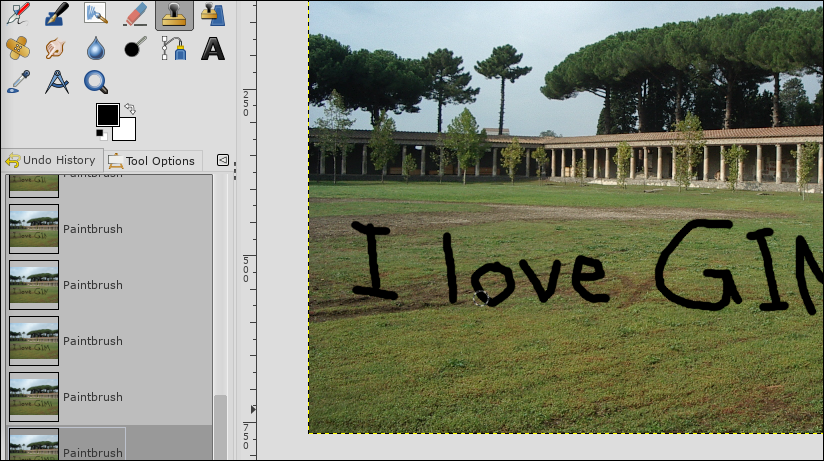 I've written "I love GIMP" on another background, but as I said above, I have decided to replace "love" with "Love". Leaving my original open, I exported it as an image (jpg or png), and opened it as well. Now I'm going to work on the png I created, using the undo history in my original (remember that once you save and close, the undo history is gone). I'll go back in the history until "love" is gone, then use my Clone tool to put the background back into the png (which basically clones it over the text I wrote). IMPORTANT NOTE: Make sure the setting at the bottom of the clone tool "Alignment" is set to "Registered". 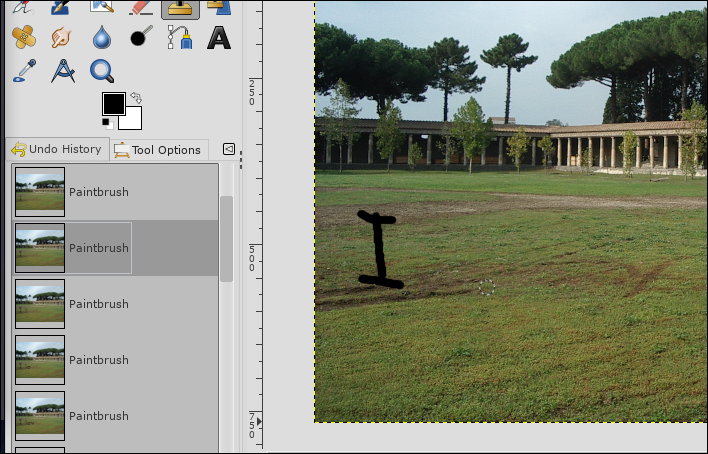 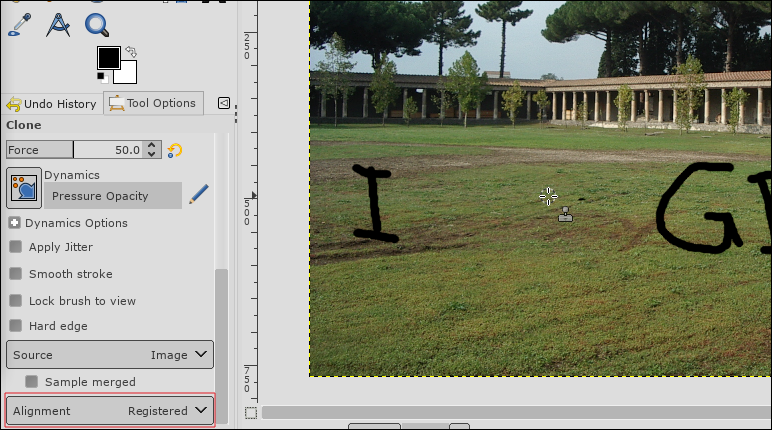 Now I can go back and put in "Love". This is just a sample. I can't write very well with a paintbrush! 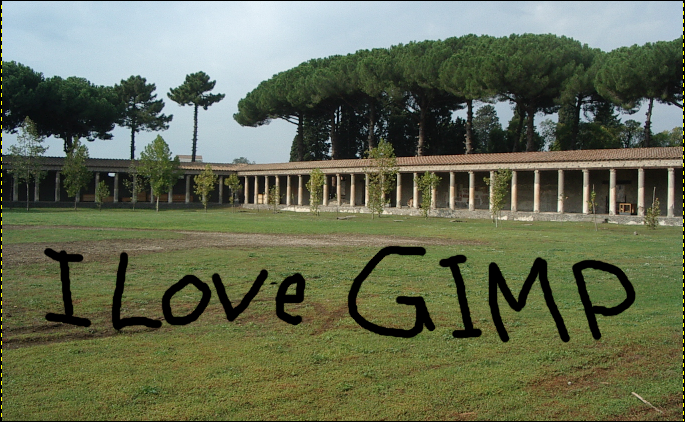
Unified Transform Tool Davies also illustrates the versatility of the Unified Transform Tool, which is several tools combined. GIMP makes it easier to really manipulate your object with that one tool rather than having to go from tool to tool. A few years ago (June 2015), I did a magazine cover that had a large television on the wall. I put a battle scene from Game of Thrones inside the television screen. As I remember, it took more than one tool. With the Unified Transform (which only showed up in GIMP 2.09 or 2.10), I could have done it all with the one tool. Load your images into GIMP. I have a photo of my TV and an image I want to use. I'm going to put the green background onto the TV screen that right now shows a commercial. 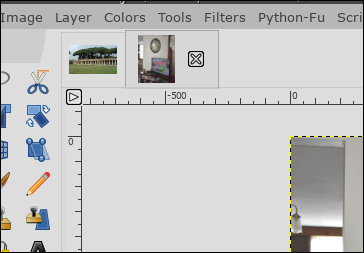 To add the background into the TV screen, copy the background photo, choose the TV photo and paste the image. Click on the Untified Transform tool, then click on the image. Several handles will appear, and also a small window that says Unified Transform. 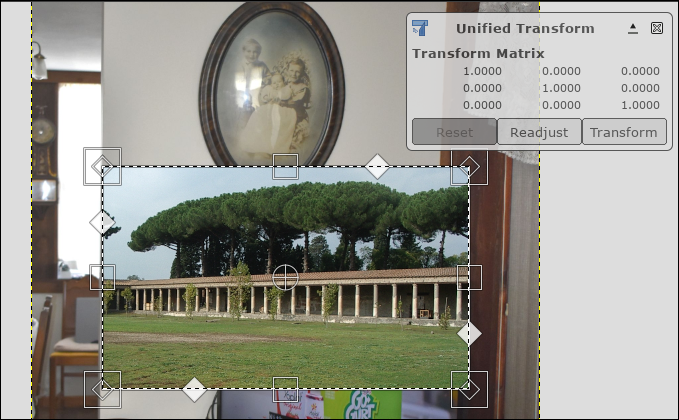 Just in case your window overlaps your work area, you can click on the up arrow in the top right part of the window. That will change the window so it is moveable. Then you can move it wherever it's more convenient. 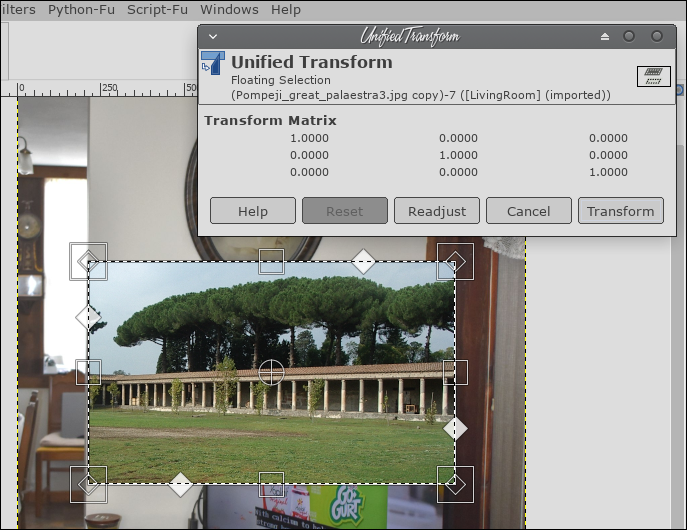 Now, look at all the handles. Each set does something different. The square handles resize, the diamonds set in the corners will affect the perspective of the image, and the diamonds on the edges control shear. If you hover your mouse over the handle, you can tell which one you're using (or find the one you want to use). There's also a rotation center tool in the middle, and if you hover your mouse over the image, you'll see the move tool. 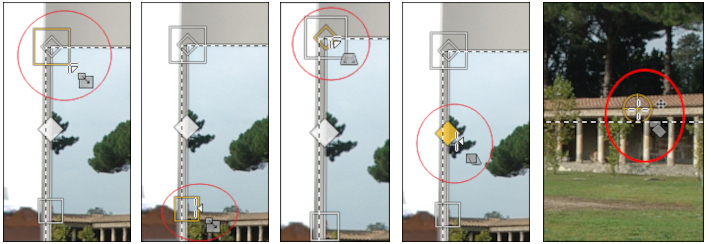 If your image is a lot bigger than the TV screen you want to put it in, you should probably resize it a bit first. Then, the next thing you want to do is line up your image with one of the corners of the TV screen, maybe top left, and then you can transform the image from there. Using your perspective handles, move the corners of the image to fit the TV screen. I have one corner left. 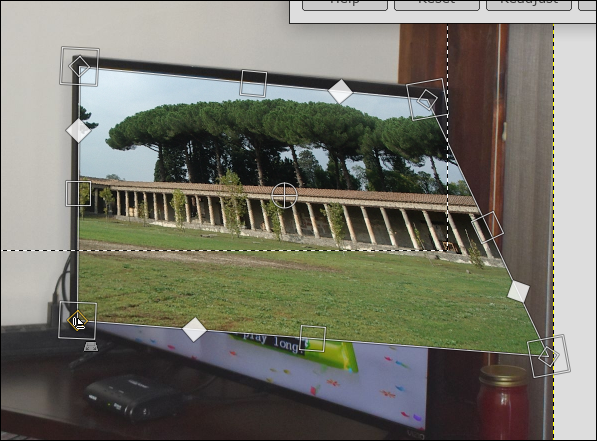 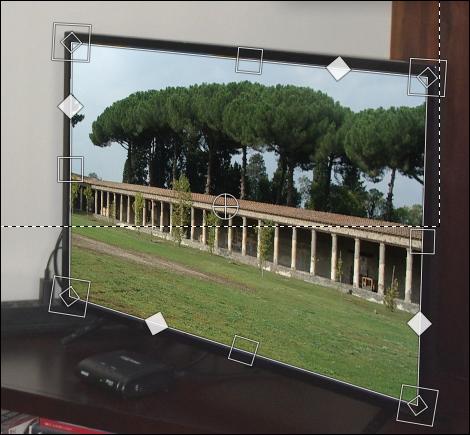 Oh, that dotted line across the center? That's the original location for the floating layer you pasted in and have been editing. When you are absolutely finished and anchor the layer to the living room image, it will disappear. Make sure you have everything lined up as you want it before you anchor the layer. I know you can undo all the time, but it's easier to make sure it's right first. If you have everything lined up and change to a different tool, it will appear this way: 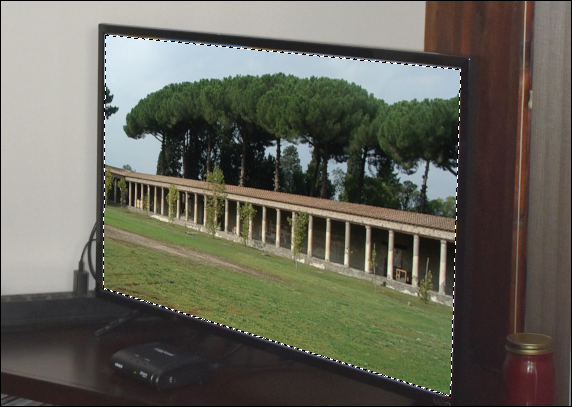 If you do that and notice that you don't have things correct after all, choose the Unified Transform again and correct it. I did that and now I'm finished to the point I can anchor the layer.  The good thing about this is that you can use this tool for everything, and not have to switch back & forth between tools. Transform Lock So, I'm creating a logo or something, and have items on three layers. In the course of my creation, I decide everything should be bigger, but each layer should be the same percentage bigger to preserve my design. Let's use the transform lock in the layers dialog. I know this sounds like the layer can't be changed after it's locked, but it can. I have three layers here and I have a shape drawn on each. The transform lock looks like chain links in the layers dialog. 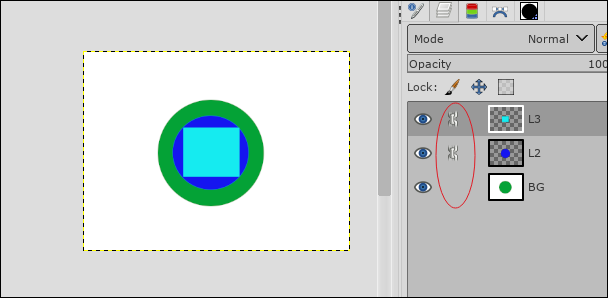 After I click the lock on the bottom layer, I decide to make each layer's shape larger, but I want to preserve the design so far. I'll use the top layer and choose the scale tool to resize the blue square and then re-center it. Notice that the resize tool is acting on the entire layer: 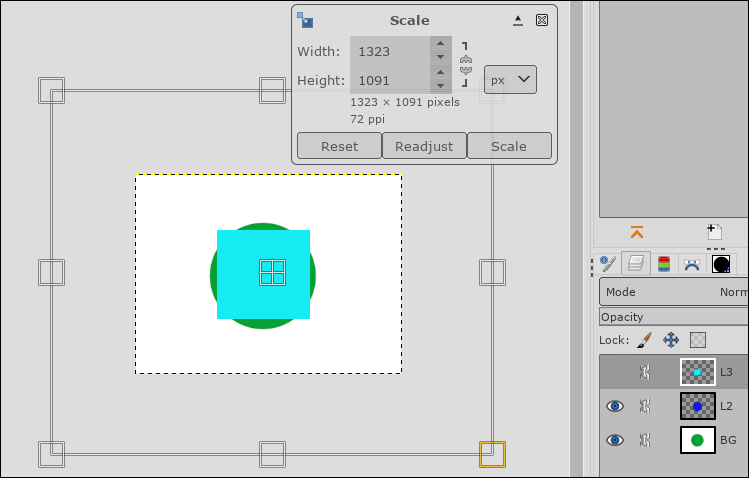 As soon as I click Scale in the Scale window, I get a "timer" because GIMP is acting on the other two layers to scale them the same. When it's finished I get a larger version of my creation. 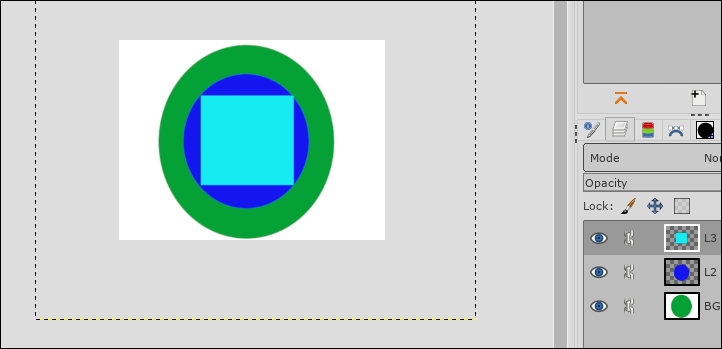 From here I can put more items and eventually, put the finishing touches on my creation. I hope that you found these tips helpful. I think it's always nice to find another useful tool setting. Davies has more in that tutorial, and many more tutorials as well. |