| Previous
Page |
PCLinuxOS
Magazine |
PCLinuxOS |
Article List |
Disclaimer |
Next Page |
PDF Part 3B: Manipulating PDF Files, Command Line Style |
|
by Paul Arnote (parnote) I began the series of articles about PDF files in the October 2022 issue. In that article, we talked about creating PDF files. Then, in the November 2022 issue, we talked about editing PDF files. In the January 2023 issue, we talked about how to use various GUI tools to manipulate PDF files. This article represents what I plan to be the last article in the series. In this one, we'll look at using some of the many command line tools available for manipulating PDF files. While I know that there are many users who avoid the command line like the proverbial plague, these command line tools are exceptionally easy to use. They are definitely the fastest way to manipulate PDF files, too. These tools follow the do-one-job-and-do-it-well philosophy that is so common for so many Linux utilities. Let's Install The Tools Your installation of PCLinuxOS does not come with all of these PDF tools already installed. Because of my involvement with The PCLinuxOS Magazine for all of these years, these tools have become "good friends" who have earned their rightful place in my PDF tool chest. But, you don't have to have intimate involvement with this magazine to find everyday uses for these tools, as you'll see in the examples that accompany the description of some of these tools. 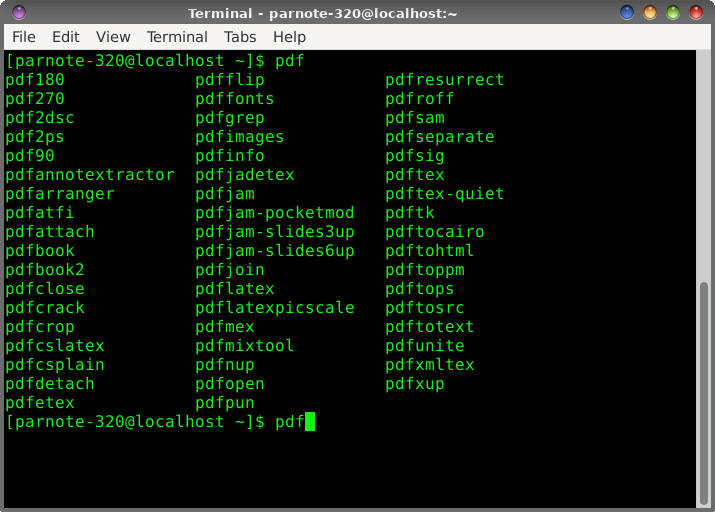 Many of the PDF tools available on one of my computers. The above image shows many of the command line PDF tools available on one of my computers. Users won't have to install each and every one of them, one by one. Instead, installation of pdftk and pdfjam will install most of these tools. Both of those packages are available in the PCLinuxOS repository, and installable via Synaptic. I will issue one caution, though. The pdfjam package lists TexLive as one of its dependencies, and the TexLive package is quite large. You might want to check to ensure you have adequate space in your root partition. Uninstalling programs you never use can help a lot, but be cognizant of what each program you want to remove will take with it. You might want to avoid uninstalling programs that want to remove other seemingly unrelated programs/packages. For example, on my "travel" laptop (where these tools are also installed), I had to get rid of things I never use, like Thunderbird and Bluetooth utilities (that particular laptop doesn't have Bluetooth capabilities, so they were completely unnecessary on that computer), or I'd have not had sufficient space to install the TexLive packages. If you have links in your PDF file, they may or may not be preserved in the manipulated PDF file. It would be a good idea to check to see if your links are preserved before sending out your manipulated PDF file. I can tell you right now that any files manipulated by pdfjam will NOT have their links preserved. The author admits this up front, on his GitHub page. I will not be covering all of these tools. Instead, I'm going to cover the tools that I perceive to have the broadest appeal to general users. Some of these tools are specific to either TexLive or LaTeX, and I have neither the interest in, need for, or knowledge of those particular publishing packages. Having previously looked at them, I came to the conclusion at that time that they are probably overkill for my needs. Your needs, however, may differ. If so, you will most likely have a better idea of how to use those particular LaTeX/TexLive tools than I do. So, let's take a look at some real world uses for some of these commands that allow us to manipulate PDF files. Some of them may seem whimsical, but most of them are quite useful. It would be a trivial task to "automate" the use of some of these commands in a bash script, even going as far as adding Zenity dialogs. But we'll focus on just using them from the command line. Let's Join Multiple PDFs Into One: pdfjoin & pdfunite This is one that I use fairly regularly. My kids school publishes the school cafeteria menus online in some funky online viewer that only allows you to view either the breakfast, lunch or the menus, one at a time. It's much easier to create a PDF file of each menu, and then combine them into one unified PDF. My kids aren't super picky eaters, but there are some NASTY food choices periodically. On those days, they prefer to take their lunch to school, instead of eating the nasty menu item d'jour. As such, we help them track the menu items to make sure they have something they like. Otherwise, they will go hungry and their education may suffer. After all, it's hard to learn on an empty, growling, hungry stomach. To do this, I open the funky online viewer and choose to print the menus. As the output, I choose "Save to PDF..." as my printer from Firefox's printer selection dialog box. I then give each menu a unique name. For example, when downloading January's cafeteria menus, I named them Jan2023Breakfast.pdf, Jan2023Lunch.pdf, and Jan2023Snack.pdf. Then, I cd to the directory where I stored them, and enter the pdfjoin command as such (all on one line): pdfjoin Jan2023Breakfast.pdf Jan2023Lunch.pdf Jan2023Snack.pdf -o Jan2023-Menu.pdf Here is the output of the entire operation: 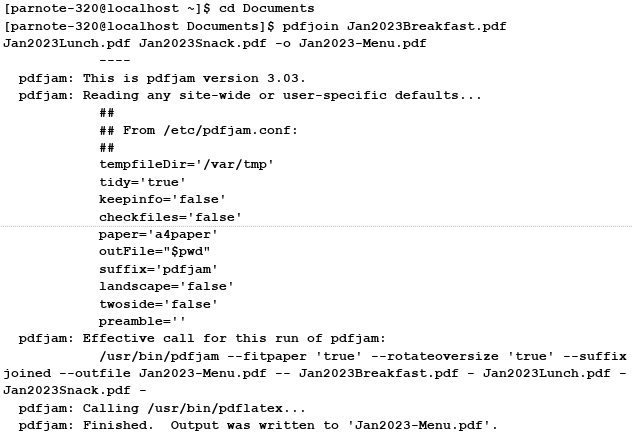 Just list the PDF files in the order you want them to appear in the new, unified PDF file. That new PDF file is designated by the -o command line switch, with the name of the new PDF file specified as its parameter. In my example above, it's called Jan2023-Menu.pdf. I then copy that new PDF to my desktop, where I can pull it up quickly as the kids are getting ready for school. And, it's all there, all together, in one easy to read PDF file. Now, I could just enter the full path to each file, instead of issuing the cd command to change to the directory where I saved the files. I choose to use the cd command to move to the directory where I saved the files, because providing the full path for each file gets unwieldy and introduces too many chances for errors. The pdfunite command line tool is offered up by the Poppler developers, and works pretty much the same as pdfjoin. There are some subtle differences. For example, you don't need to preface the output file with the "-o" parameter. Instead, you just list the PDF files you want to "unite" into one PDF file, and list the output PDF filename as the very last parameter. There are no other command line switches, aside from -v to display the version of pdfunite, or --help to display the help contents for the tool. I also approach the use of pdfunite the exact same way as I do with pdfjoin (which is made by the author of pdfjam), using the cd command to move to the directory holding the files I want to "unite" into one PDF file, and run the command from that directory. Just as with pdfjoin, you can use fully qualified path and filenames, but it's much easier to just have everything in that one directory, and join them all together from within that directory. Let's Put A Spin On Things: Rotating PDF Pages So let's look at another situation. We keep copies of all of my son's IEP (Individualized Education Plan), his quarterly IEP updates, his progress reports (grade cards), the results of district-wide testing ... basically, anything that helps us track his academic progress are things we keep digital copies of. And yes, we do the same for my daughter. She doesn't have an IEP, but we keep records of all of the rest of her documents to be able to track her academic progress, as well. The local school district has been informed of our independent record keeping at home, and have agreed to forward these documents to us, via email, as a PDF file. Despite their agreement to do so, they do not always follow through. Thus, when they bring home paper copies of these documents, I have two choices. First, I can contact their current teacher, and have them send a digital copy of the document. My other (second) choice is to digitize it myself. While I **do** have a flatbed scanner, it's much easier to scan the paper copies of the documents sent home with the kids using Adobe Scan on my smartphone (available on the Google Play store for Android, in the iOS App store for iOS devices, or you can view the Adobe product page for Adobe Scan here). It's faster and easier to do than to go to the computer connected to the scanner, fire that computer up, make the scans, yada, yada, yada. I then email the resulting PDF from my phone to my personal email. For all of my dislike of Adobe as a company, their Adobe Scan app works exceptionally well, producing the PDF files I need, far easier than even using a flatbed scanner. And, it's free. HOWEVER -- and this is where the next command line PDF tools come into play -- sometimes the PDF files appear in the wrong rotation. Now, I could just rescan the documents, but that is frustrating. Rescanning the documents also takes longer than just using the command line tools to "fix" the improper rotation or page orientation.  Text orientation from original scan While I could just print the document scan out on my printer and just rotate the paper after it's printed, it's a bit difficult to read as a PDF file in its current state. So, we need to rotate the text. The pdfjam utility includes three special tools that allow rotation of the text. They are called pdf90, pdf180, and pdf270. The numbers at the end of each command indicate the number of degrees the text is rotated, going counterclockwise. So, if you think of the rotation as the position of the hour hand on a clock, then pdf90 is at the nine o'clock position, pdf180 is at the six o'clock position, and pdf270 is at the three o'clock position. Since the document is presented 180 degrees out of its intended rotation, we'll use the pdf180 command to "fix" the document. Below is the command execution and output from the pdf180 command: 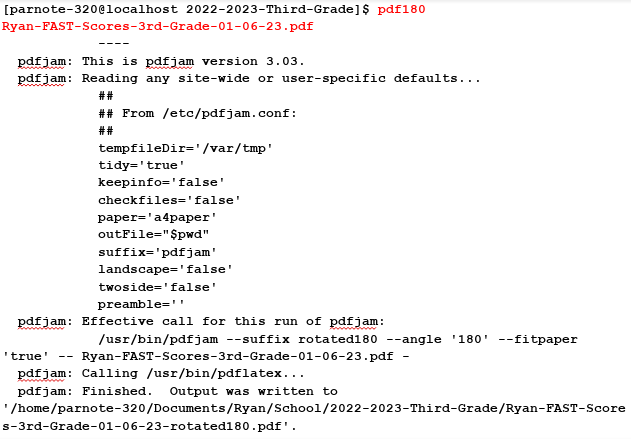 I've highlighted the actual command (entered all on one line) used to accomplish the rotation of the PDF file in the terminal output above in red text. Notice that there is no need to specify an output file. That is because the original filename is preserved, with "-rotated180" appended to the end. This allows you to perform the rotation without fear of overwriting the original.  Tada! Now, the text is rotated for proper reading in a PDF file. The conversion is fast (faster than rescanning) and easy (easier than firing up a separate computer that has a scanner attached). Let's Gain More Info/Knowledge: pdfinfo 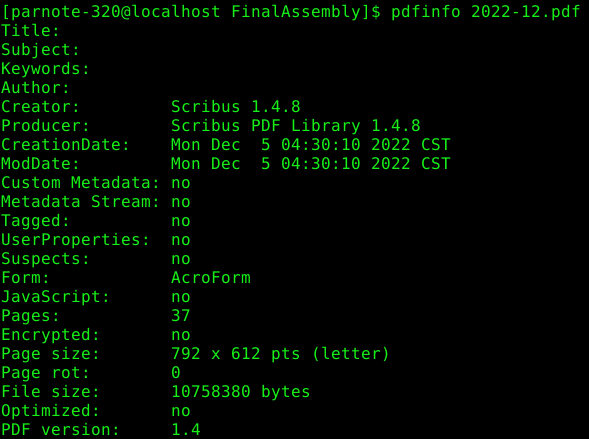 Believe it or not, the pdfinfo tool isn't a part of pdfjam or pdftk. Rather, it appears to be a component of the poppler PDF library files. That, however, doesn't diminish its value. Unbeknownst to most users, there is a lot more information embedded in a PDF file than just what you can see in a PDF viewer. And, this tool won't actually manipulate PDF files, as it's geared towards revealing some of that information that is embedded in a PDF file that you never really get to see. The information it reveals is merely informational in nature. Let's say you receive a PDF from ... somewhere/someone ... and you want to see what program the PDF creator used to create the PDF file. Simply run pdfinfo <filename> and you should be presented with output similar to what you see above. That information includes what program was used to create the PDF file, the page size, the size of the PDF in bytes, its creation and modification dates, and the PDF version employed. In the screenshot example above, you can see that the December 2022 issue of The PCLinuxOS Magazine was created with Scribus, along with all of the other information we listed. Below are some other examples, displayed in screenshot snippets.  This PDF file was created by pdfTex, by using the pdfjoin command.  This PDF file was created by GPL Ghostscript, used by the CUPS-PDF print driver.  This PDF file was created by LibreOffice Writer.  This PDF file was created by Adobe Scan, on my smartphone. Looking at the version numbers used (not shown here), most of the PDF files are created with either PDF version 1.4 or 1.5. I was a bit surprised to see that Adobe Scan used the older PDF version 1.3. I'm not sure why one of the later PDF versions wasn't used. I'll just chalk that up to the "things that make you go hmmmm" category. I'm sure there is a reason that I'm not privy to, and that Adobe isn't saying. Let's Put It On The Web: pdftohtml The pdftohtml tool is another that is supplied by the Poppler developers. Just as its namesake suggests, it converts the PDF file to a basic HTML file, suitable for displaying in a web browser. With minimal editing of the HTML file(s), you can make the HTML file look a lot like the original PDF. Personally, I wouldn't spend a lot of time trying to make it look exactly like the PDF. In my humble opinion, you're fighting a battle you can't win, and for one basic reason: you're dealing with different mediums. Unless you're just a glutton for punishment, it's unlikely that you will get them looking identical to one another. You might succeed every once in a while, but mostly you'll miss the mark. In its simplest form, the command is exceptionally easy to use. Just use pdftohtml, followed by the filename of the PDF file you want to convert to HTML, e.g., pdftohtml <filename.pdf>. There are command line options available, but I'll leave you to explore those on your own, by typing pdftohtml --help at a command prompt. However, the simple form of the command will get the job done. When you run the command, three HTML files will be created. One is for the index frame of the HTML, one is for the contents frame of the HTML, and the other one ties them all together. That last one will have the same name as the PDF file, and is the file you select to open the HTML file in your web browser. The index frame will have the same name as the PDF, but with "_ind" appended to the end of the base filename. The contents frame will have the same name as the PDF, but with "s" appended to the end of the base filename. For relatively simple PDF documents, pdftohtml does an admirable job at creating a basic HTML file. It even does a decent (but not perfect) job of exporting images in the PDF to the HTML. But it does have limitations. The biggest limitation I found is that pdftohtml does NOT handle data in tables well ... as in, not at all in my experience. It will recognize the text in a table, but its output is not in a table format. Rather, all of the text is "dumped" into the HTML, and it's very difficult to discern what data belongs with any of the other data. Let's Extract The PDF Text: pdftotext Similar to pdftohtml, the pdftotext tool extracts the text data from a PDF to a plain ASCII text file. You can specify the text file filename as an option, but if you don't, the text file will be given the same name as the PDF. In its simplest form, the command goes like this: pdftotext <PDF-filename.pdf> <optional-text-file-filename> So, using my "From The Chief Editor's Desk..." article from the November 2022 issue, I issued the command like this: pdftotext Nov2022-Welcome.pdf The text of that PDF was output to a plain ASCII text file, and given the same name as the input PDF. There are command line options available (such as the first and last pages to extract text from), but they aren't required. Without specifying the first and last pages of text to extract, all of the text from the PDF will be extracted to a plain ASCII text file. I'll leave you to explore the various other command line options. To see a list of them, type pdftotext --help at the command line prompt. Let's Extract Those Images: pdfimages There may be times when you need access to an image file, but the only copy of an image you have access to is in a PDF file. You could do a screenshot of the image as it appears in a PDF file, but there is another way. The pdfimages tool, courtesy of the Poppler developers, will extract the images from a PDF file. And although it's rather picky about its command line parameters (particularly the path statements), once you get the hang of it, it's quite easy to extract those images. In the example below, I used the PDF of my November 2022 "From The Chief Editor's Desk..." article. I created a special subdirectory to extract the images to, called TestImages. Then, I used the cd command to change the working directory to where the PDF file is stored. Finally, I executed the command as follows: pdfimages -png Nov2022-Welcome.pdf ./TestImages/Image So, the -png parameter tells pdfimages to save the images as PNG files. If you want to save the images as JPG files, use -j in place of -png. You can also save images as TIFF files, just by replacing -png with -tiff. If you omit the -j, -png, or -tiff command line switch, monochrome images will be saved as PBM files, and color images will be saved as PPM files. Those are fine, even if they aren't necessarily the most common graphic format on the planet. I prefer to work with either PNG or JPG files. Similarly, if you use the -all command line switch, pdfimages will save the images from the PDF in every graphic format it is capable of saving them in. If you just want a list of images available, use the -list parameter, and you can omit the base filename for the images, e.g. pdfimages -list <;pdf-filename>. Next, we specify the PDF file we want to extract images from. Finally, we provide the path and base filename for the images. In the example above, the images will be saved in the TestImages subdirectory, with the base filename of "Image". If you omit the path part of the statement (and just specify a base filename, which is required to extract the images), the images will be saved to the same directory as the PDF file. I prefer to use the subdirectory, just to keep things neat and tidy. Let's Make An Image Of Each Page Of A PDF: pdftoppm If you want to make an image copy of a PDF (or pages of a PDF), you can use the pdftoppm tool, also provided courtesy of the Poppler developers. While pdfimages allows you to extract images from the PDF, pdftoppm allows you to make image copies of entire pages in a PDF.  The format for the pdftoppm command is similar to that used by pdfimages. Here's an example: pdftoppm -jpeg Nov2022-Welcome.pdf Image Just as we've done with other commands, first use the cd command to switch to the directory that holds the PDF you want to make images of. The -jpeg command switch tells pdftoppm to create JPG files. The -png switch makes PNG files, and the -tiff switch makes TIFF image files. Without any switch, pdftoppm will create PPM graphic files. The "Image" parameter forms the base filename of the images created by pdftoppm. Like with many of the other PDF command line tools, you can optionally specify a range of pages to make images of. Type pdftoppm --help at the command prompt to see all of the optional command line options. Let's Embed & Extract Files From The PDF: pdfattach & pdfdetach Now here is something I didn't know you could do with PDF files. Ok ... that's not entirely true. I knew the capability existed, but I never explored how to use or leverage the capability, until now. Did you know that you can embed files into a PDF file, and then later extract those files? It's actually WAY easier than you might have thought. When I figured it out, I was like "What!? That's all there is to it?" The possible uses for this are endless. I can't tell you how many times I've shared a custom bash script in the magazine, only to direct users to download a copy of the script from the magazine website. Several times I had wished that there was a way to deliver that bash script to the end user with the PDF. It appears that capability has been available all along. You can embed plain, easily readable files into the PDF, or they can be encrypted files (i.e., a password protected tar.gz or zip file). If it's the latter, just be sure your intended recipient knows how to decrypt those files. The obvious advantage to using encrypted files is that should someone stumble across your files embedded into a PDF, they won't be able to access that data unless they know how to decrypt those files. I know this all sounds a bit clandestine, but it is one possible scenario that could be played out. Conversely, embedding unencrypted, easily readable files carries the promise of sharing your files with as many people as possible. You can easily embed encrypted and unencrypted files into the same PDF to allow extraction of all of the files, but only some of the files will be accessible by all, and the rest of the files will only be accessible by those who possess the decryption key. So, with all of that out of the way, let's take a look at how simple it is to attach files to a PDF, and how simple it is to detach files from a PDF. Obviously, we need to attach files to a PDF first, so we can have something to detach. These commands come courtesy of the Poppler developers. To attach files to a PDF, you will need to use the pdfattach command. The format for the command couldn't possibly be easier. As far as I can tell in my trials, you can attach one file at a time to any given PDF file. So, if you have multiple files to attach, just do them one at a time, incrementally. Don't worry, because it's really fast and easy. I find it's easiest to cd to the directory that contains all of the files (the PDF and any attachments), and perform the feat there. You could use fully qualified path names for all of the files, but you also introduce a greater chance for errors. Putting all the files in one directory makes this so much easier. I give each iteration of the command a unique output filename, as well. That way, **just in case** something gets messed up, you don't have to redo everything. Plus, it's never a good idea to overwrite your original file. You can always rename it later, if you choose. Surprisingly, attaching files to a PDF comes with quite a small overhead. To estimate the final file size, add the number of bytes in the PDF file to the number of bytes in the file you're attaching, plus approximately 800 more bytes. The 800 bytes is probably due to internal pointers within the new PDF file that point to the extra attached file(s). When you stop and think about it, 800 bytes really isn't too much overhead at all. Now that we have our file attached to the PDF, we need a way to detach them. This is where the pdfdetach command comes into play. While there are other options (type pdfdetach --help at a command prompt to view all of the options, or search for pdfdetach man page on the web), there is one really good way to detach them with maximum ease. pdfdetach -saveall <name-of-PDF-file-with-attachments> When run this way, all of the attached files will be detached from the PDF, and written to the same directory as the PDF file. If you want to be a little neater about it, you can specify a path for the attached file(s). Here's an example using a relative path: pdfdetach -o ./Files -saveall <name-of-PDF-file-with-attachments> Be forewarned that this directory MUST already exist, because pdfdetach will NOT create the directory for you. If you try to detach a file (or files) to a directory that doesn't already exist, the command will end with an error, and none of your files will be detached. If successful, all of your files will be written to your drive, complete with their original filenames. Let's Output Multiple Pages On A Single Sheet: pdfxup Sometimes, it's advantageous to be able to output multiple pages of a PDF on a single sheet. I know I've been to seminars where the speaker will hand out "miniaturized" printouts of their presentation, often with three, four, or even six of their "slides" on a single page. It allows you to follow along, and gives you an opportunity to take notes throughout the presentation. There are "other" programs that accomplish the output of multiple pages on a single page (namely, pdfjam-slides3up and pdfjam-slides6up), but pdfxup gives you the greatest flexibility, and is still very easy to use. Keep in mind that the use of ANY of these three programs will strip out all links that might be in your original PDF file, so don't count on them working after the conversion. By default, pdfxup creates the multi-page layout in a portrait page orientation. Here's the command and its output:  I've used the January 2023 issue of The PCLinuxOS Magazine for my example here. As I've done throughout this article, I use the cd command to move to the directory where the PDF file resides to run the command. You could use a fully qualified path statement, but that can get awkward and unwieldy, and is more prone to typing errors. The -nup 2x3 parameter tells pdfxup to make the new PDF two columns wide and three rows deep for each page. The -o parameter is the filename for the output of the new PDF file. Give it a new, unique filename, to avoid overwriting your original file. In our case here, I've appended "-6up" to the original filename. The third parameter is the original PDF file to use to create the new multi-page PDF file. And here is the result it produces, as seen in a PDF file viewer:  If you want to produce a document in the landscape page orientation, we'll have to slightly alter the command. Here's that command and the output, using the same input file of the January 2023 issue of The PCLinuxOS Magazine: 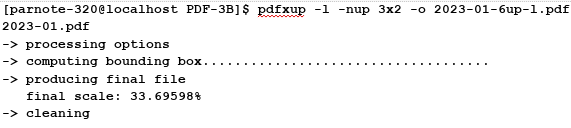 First, change the -nup parameter from 2x3 to 3x2. This will produce three columns on the page, two rows deep. Also, add in the -l (that's a small case "L") parameter, which tells pdfxup to produce the new pages in the landscape page orientation. Here is the result of that command: 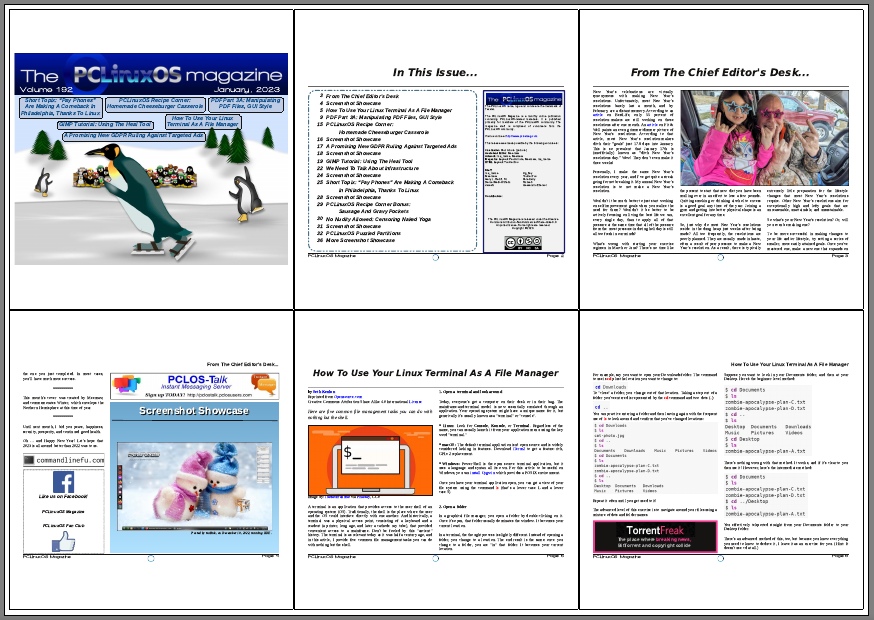 Believe it or not, the pages of the multi-page layout are actually readable. On my PDF viewer, I can zoom in to 500% and read them comfortably. Not only that, but they look as good as the full-size pages. Don't go for the multi-page layout option because you think it will result in a smaller PDF file. Nothing could be farther from the truth. The resulting files will be quite big. The January 2023 issue of The PCLinuxOS Magazine that was used for this demo is only 7.1MiB in file size. Both of the multi-page PDF layouts are about 6X the size of the original PDF, coming in at 43.3MiB in file size ... each. There's nothing restricting you to a 2x3 or 3x2 layout, either. If you only want two page views per page, then make your layout 1x2 or 2x1, depending on whether you're using portrait or landscape page orientation. Or, you could use 3x3, 4x3 or 3x4 ... whatever arrangement you want. Let's Search Through PDF Files: pdfgrep If you read enough PDF files (and I hope you are, at least with The PCLinuxOS Magazine), there's going to come a time when you will remember reading something, but have trouble finding exactly which PDF file the information it is in. The pdfgrep command can help you find what you're looking for. Here's an example of using the command: pdfgrep -i pclinuxos 2023-01.pdf As usual, use the cd command to go to the directory containing the PDF files you want to search through. The -i parameter tells pdfgrep to ignore the case of the search term. Our search term is "pclinuxos" in this example. Thus, pdfgrep will report a "hit" on all occurrences of "pclinuxos" regardless of the case of the letters. Finally, we searched through the January 2023 issue of The PCLinuxOS Magazine. You could just as easily use a wildcard when specifying the file you want to search. So, if you have a directory full of PDF files, you could replace the "2023-01.pdf" filename with "*.pdf" to search all of the PDF files in that current directory. You could also redirect the output from pdfgrep to a text file, if you receive too many "hits" on your search term. That might help make it easier to find what you're looking for. Most of us can't read as fast as the data streams across our screen in a terminal session. There are other command line switches you could employ. You can view them by typing pdfgrep ---help at the command prompt. For an even more detailed list of options, try typing man pdfgrep at the command prompt. I'll leave it up to you to explore those other options. As presented here, pdfgrep provides a really decent way to search through your collection of PDF files to find the information you are looking for. Let's Get Whimsical: pdfflip I honestly have NO IDEA why anyone would want to do this, other than the fact that it's a bit fun to see the results. Imagine you're standing behind a semi-transparent projection screen, and you're looking at a document being projected upon that screen. That view is what you get with pdfflip. Here's the command: pdfflip --suffix 'flip'pdfflip --suffix 'flip' Nov2022-Welcome.pdf And here is the result of that command: 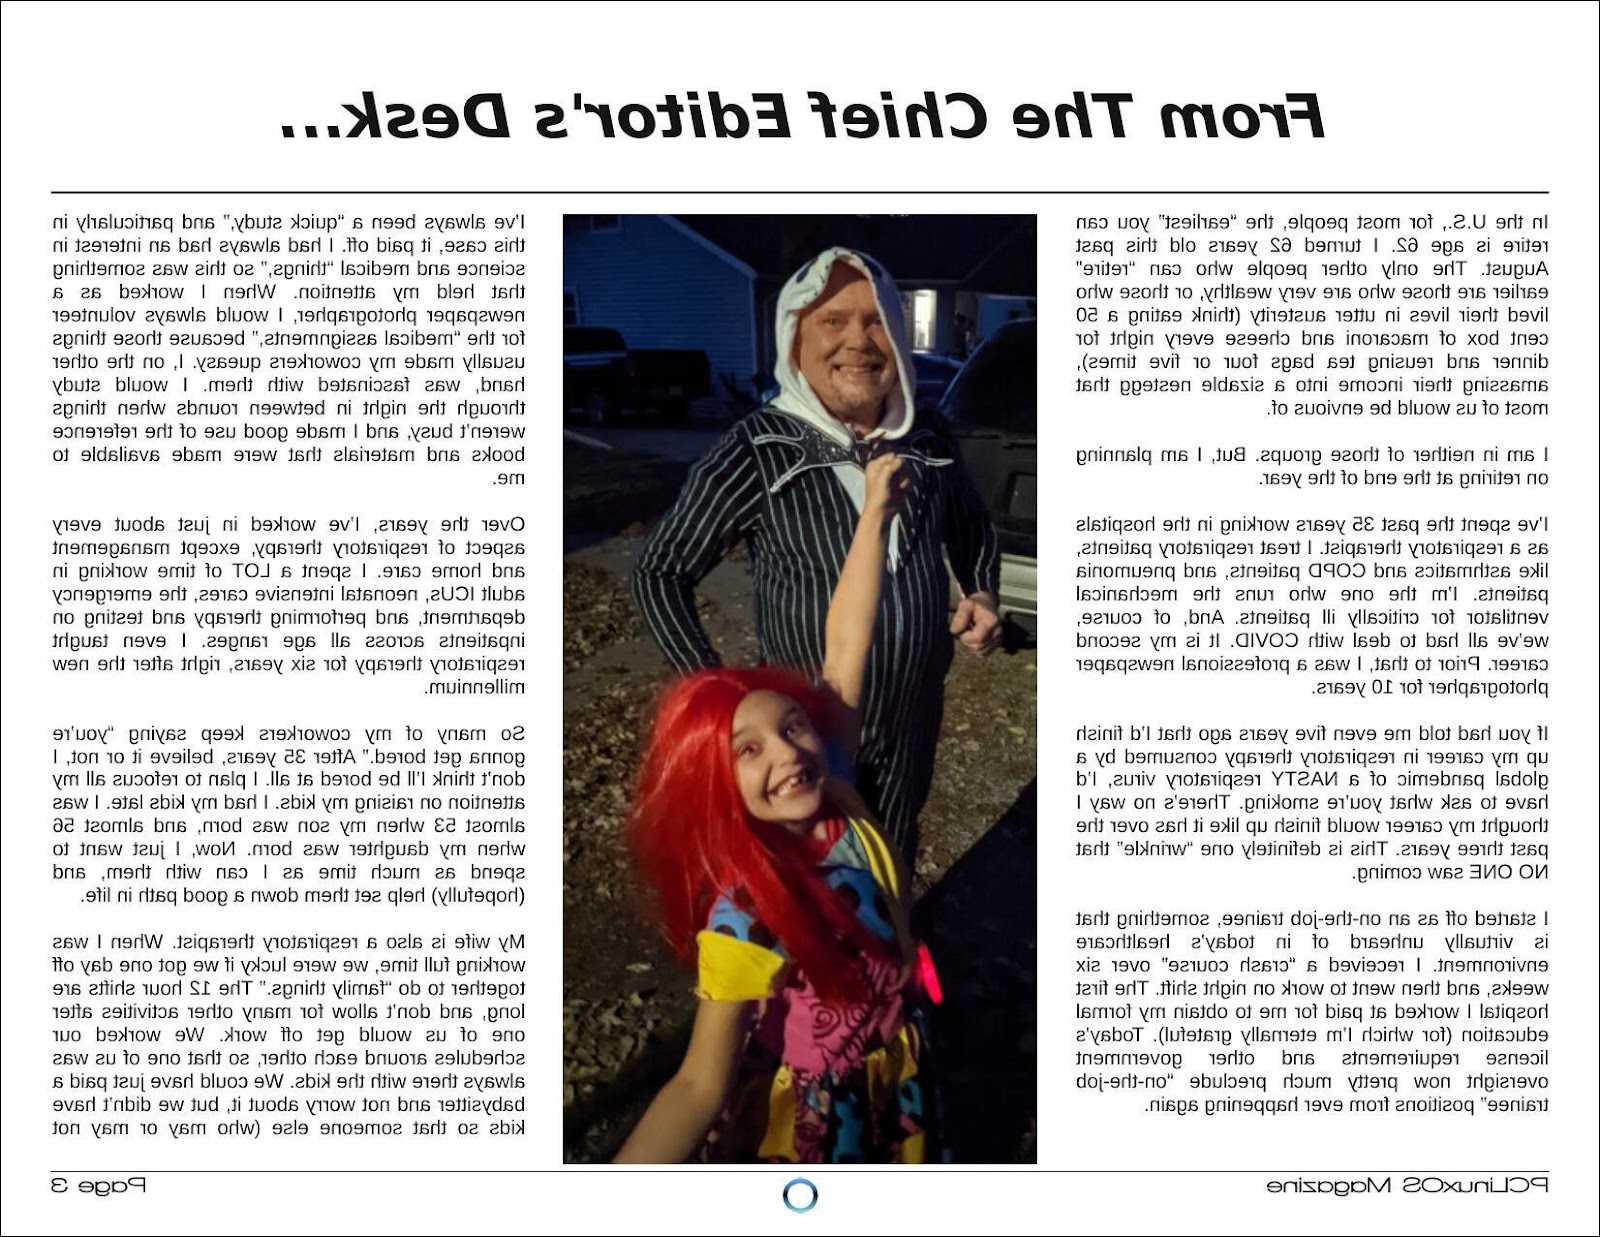 Like I said earlier, I have NO IDEA why anyone would ever want to do this, other than to view the results and/or to say that you can. Keep in mind that, as with all pdfjam tools, any links you have will not make the transition to the new flipped PDF file. The pdfflip tool also does not work on encrypted PDF files. Summary As you can see, there are a LOT of tools available for manipulating PDF files from the command line. And, they're not at all difficult to use. There's also no argument that they perform their jobs fast. There are more tools that we didn't cover, but I consider those to be "special use" tools or duplicates of the ones we've already covered. For most users, the commands presented here will be more than adequate to cover their PDF file manipulation needs. |