| Previous Page |
PCLinuxOS Magazine |
PCLinuxOS |
Article List |
Disclaimer |
Next Page |
Making Quality Music Easily & Cheaply On PCLinuxOS, Part 2 |
|
by Alessandro Ebersol (Agent Smith) 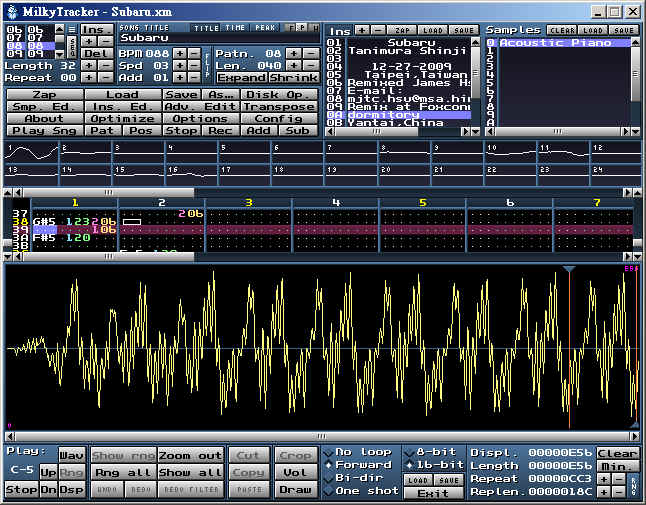 So friends, continuing our series of articles on digital music production in PCLinuxOS, with module trackers, let's delve deeper into some aspects that will be important when we get to the subject of track editing programs, trackers. Why did I decide to continue with the theory? Well, this subject has many concepts that can be somewhat challenging. But I will try to approach these concepts in a way that makes understanding how modular music and trackers are viewed as natural as possible. So, let's continue discussing these concepts, which will be the cornerstone for our work when we get to the module music editors. And let's also look at resources for working with module music and trackers, such as places to download samples and auxiliary programs.
There are several elements common to any tracker program: samples, notes, effects, tracks (or channels), patterns, and orders. Let's take a look at what each of these elements is.
 The image above is a screenshot of a tracker, a module music editor, and we can see the elements that make up this interface:
Sound production is based on samples, which can be simple small recordings made with a microphone or line input. The sound quality will depend on the sample rate at which it was recorded. This sampling frequency is usually between 8 kHz (telephone sound quality) and 48 kHz (movie sound quality). If a sound is represented as a wave on a coordinate axis, the y-axis represents the intensity and the x-axis represents the frequency of the sound. Sound can be altered in the following ways: Volume: It will increase by stretching the y-axis and decrease by compressing the same axis. Pitch: Stretching the wave along the x-axis produces a lower sound, while compressing the wave makes the resulting sound higher. In this way, starting from a sound that corresponds to a musical tone, all other tones in the scale can be obtained. Two other common effects are looping and panning. Looping is when a sound, when it reaches the end, continues from the beginning. This way, you can create a continuous tone over time or a rhythmic sound. Panning is the independent volume change of the left and right channels. It is used to move a sound from one side to the other in stereo. The Commodore Amiga sound chip had 4 channels, so it could play four tracks by adjusting the pitch and volume independently of each other. Therefore, the tracker software did not need to mix the tracks, but send them directly to the sound chip. The panning effect, which mixes sound across two channels by moving it from one to the other, did not yet exist. Channels 1 and 4 formed the left channel, and channels 2 and 3 formed the right channel. With the arrival of the Gravis Ultrasound sound card, it became possible to mix up to 32 channels independently of each other, allowing for panning. Other sound hardware (from Sound Blaster to PC Speaker), which offered no more than 2 channels (right and left if stereo), meant that the different channels were mixed by software, consuming much more processor resources, but with the improvement in their power, the composition of several high-quality tracks became possible on personal computers: normal PCs. An important advantage of software mixing is the precise and perfectly synchronized handling of samples. In the Amiga era, due to the scarcity of channels, more than one instrument could be played on a channel, meaning you could have more samples being played on one of the channels, not simultaneously, but sequentially. Obviously, the sample for each instrument had to be specified. But how does this happen? Let's analyze how the magic of music occurs in modules.
We can get a little discouraged when someone talks about “programming” a track, as it sounds a bit complicated. In fact, you are closer to coding a track here than by other means, but there are some advantages to this method of music composition and several resources available to help you learn it. Let's see what's inside: 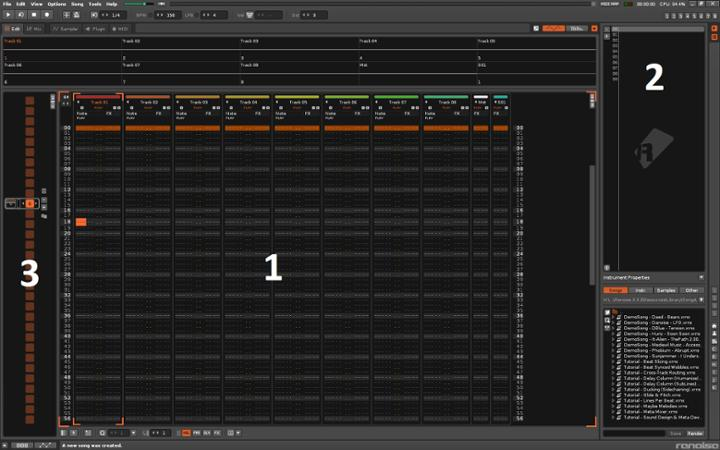 The main screen we have is the Music Screen (1), where all the tracks reside and you will see the data flying gloriously during playback. The Instrument Panel (2) houses all the samples and instruments within your song—these are your sound sources, so you can think of it as a kind of “project pool” in modern terms. Trackers use Patterns (3) to form sections of a song, rather than specifying line by line—these patterns form groups of tracks together, simplifying the arrangement of chorus, breakdown, and intro sections. Some trackers, such as LSDJ and NerdSeq, have the ability to chain patterns together to form larger sequences of patterns, if you want, for example, a longer chord progression. Nowadays, we mainly use the mouse to do most of the navigation within a DAW, but trackers started when the keyboard was king! Therefore, they are known for their extensive use of keyboard shortcuts for quick and repeated actions. Find the shortcuts you need for your tracker and you won't regret it!
Trackers share a basic set of features with their counterparts in any other DAW (Digital Audio Workstation):
All instruments and samples are sequenced in a track and displayed in lines composed of notes, instruments, and effects together. As the music plays, each line is triggered from top to bottom. A track line might look like this: 0027 C4 12 0A 04
The last two digits are connected:
You can change any of these values as you wish, to control the individual volume of the notes, the panning, the offset, or even change the instrument from one note to another! In a later line, we could write: 031 F#4 11 0A F0 So, four steps later, he would play an F# in octave 4, changing the instrument/sample to something else and altering the effect parameter to a higher number, perhaps to pan to the right. The song data will define the tempo of the track, as well as the number of lines we have per beat for alternate tempos and various other settings, depending on the tracker.
This column tells the tracker which effects (if any) to apply and to what degree—a simple example would be changing the volume or panning position. Next to each note, you can place a parameter and a value in the corresponding row to change them. The effects vary depending on the file format you choose (MOD has some effects, but other formats, such as XM or S3M, have effects that the MOD format does not have, so when choosing the format, be aware of which effects you will be able to use). To illustrate, below are some from the Renoise tracker, which are useful because they use the full character set: 0A - Arpeggio 0G - Glide 0V - Vibrato 0T - Tremolo 0R – Retrigger As I wrote above, effects are defined differently between trackers and between file formats, and are most commonly referenced in hexadecimal numbers (see below). They can include note slides, offsets, pattern breaks, sample start point, vibrato, arpeggio, and many other parameters. In some cases, the effect value is split, for example, with tremolo—the first digit being the rate and the second being the depth. 0T 28 - A slow, deep tremolo 0T F2 - A fast, light tremolo Many modern trackers also have master track effects to process the entire mix, most relevant for use with VSTs (Virtual Studio Technology, virtual effects and instrument technology).
Trackers tend to use hexadecimal numbers to count. The advantage of this is that we can count up to a high number (255) using only two characters - the disadvantage is that, initially, this can confuse your mind! It's not such a complicated concept: in the decimal system, we count in groups of ten (10, 20, 30, 40, 50...), while in hexadecimal we count in groups of sixteen using the additional characters A, B, C, D, E, F: 0, 1, 2, 3, 4, 5, 6, 7, 8, 9, A, B, C, D, E, F and then 10, 11, 12, 13, 14, 15, 16, 17, 18, 19, 1A, 1B, 1C, 1D, 1E, 1F Then 20, 21, 22, 23, 24, 25, 26, 27, 28, 29, 2A, 2B, 2C, 2D, 2E, 2F And so on until we reach FF, which is 255 in decimal. The Dirtywave M8, a hardware tracker, has a useful hexadecimal table to help with conversion—you'll find that it becomes second nature. In fact, this manual is very comprehensive and provides excellent information on the theory of music trackers, so I recommend downloading this file as study material. If you want to automate something like a sample loop point from 0 to 255, it's useful to know some important hexadecimal points: 0% = 00 25% = 40 50% = 80 75% = C0 100% =FF
Getting started with LSDJ Protracker tutorials Modarchive A collection of music modules Collection of Samples: https://www.woolyss.com/tracking-samples.php Well, I hope you enjoyed a little more theory and concepts. It may seem boring at first, but it's better to have a solid foundation before starting to work with the programs in our next article. Greetings, and see you then! |