| Previous Page |
PCLinuxOS Magazine |
PCLinuxOS |
Article List |
Disclaimer |
Next Page |
Making Music Easily and Cheaply on PCLinuxOS, Part 4 |
|
by Alessandro Ebersol (Agent Smith) 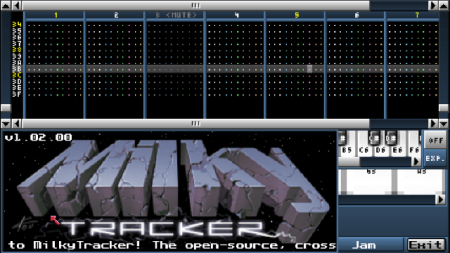 Continuing the series of articles on module music, I’ll be discussing one of the programs with the coolest features in the module music and retro composition scene. MilkyTracker is one of the most famous and active tracker programs (music sequencers) today, designed specifically to be compatible with the Amiga MOD file format, as well as supporting many other tracker music formats (such as XM, S3M, IT, and extended MODs).
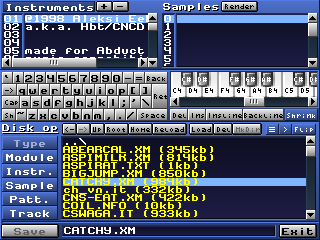 The origins of MilkyTracker can be traced back to Fast Tracker 2, a groundbreaking module music tracker created for MS-DOS. FastTracker 2 (FT2), released in 1995, was developed by Fredrik “Mr. H” Huss and Magnus “Vogue” Högdahl, members of the Triton demoscene group (which later founded Starbreeze Studios). FT2 became the de facto standard for creating music in the XM (Extended Module) format on Windows and DOS, surpassing the previous ProTracker (originally from the Amiga) in terms of features and usability. It introduced features such as support for more channels, advanced effects, and an interface that became iconic. MilkyTracker was born as a spiritual successor project to FastTracker 2, but with a different approach. Meanwhile, the MilkyTracker developers, led by Peter “pailes” Barth, explicitly stated that their goal was to recreate the FT2 playback and editing experience, but with open-source, cross-platform code. MilkyTracker is described as a “second-generation tracker,” focused on faithfully reproducing the sound and behavior of FT2. The origins of MilkyTracker trace back to an earlier project called MilkyPlay, which was a player for .MDL (Digitrakker) files, developed since the mid-1990s. About a decade later, the project evolved into a full-fledged editor, initially focused on Pocket PC devices but quickly expanded to the desktop. MilkyTracker thus becomes a version of FastTracker 2 for modern systems and computers, with a design philosophy centered on fidelity to classic trackers. The team emphasized that there were no plans to add modern features that would break compatibility with FastTracker 2. This ensures that music created in MilkyTracker plays exactly as it would in FT2, preserving the aesthetics and sound of the classic era. Because of these characteristics—innovating without losing its roots—MilkyTracker has become the standard tool for many artists in the demoscene and among chiptune music producers who wish to create music compatible with FT2 or the Amiga (ProTracker), all in a free and accessible software package.
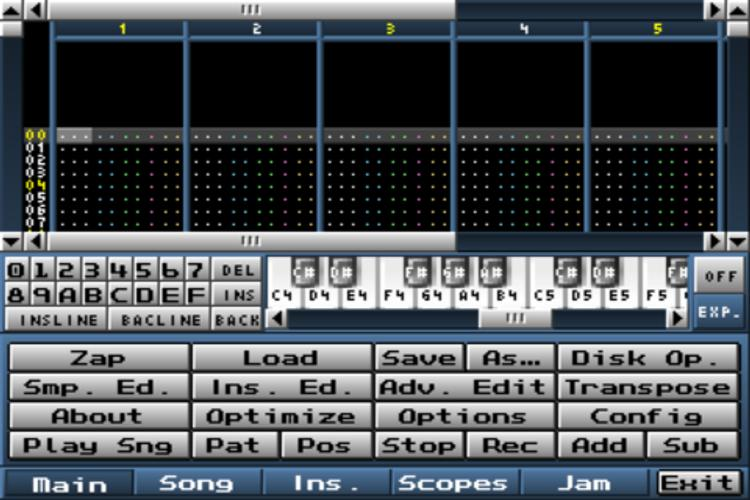 MilkyTracker is an open-source, cross-platform music application; more specifically, it belongs to the tracker family. It aims to recreate the module playback and user experience of the popular DOS application FastTracker II, with special playback modes available to improve compatibility with Amiga ProTracker 2.x/3.x. MilkyTracker is not “just another tracker for Windows,” which should already be clear from the wide variety of compatible desktop and portable platforms.
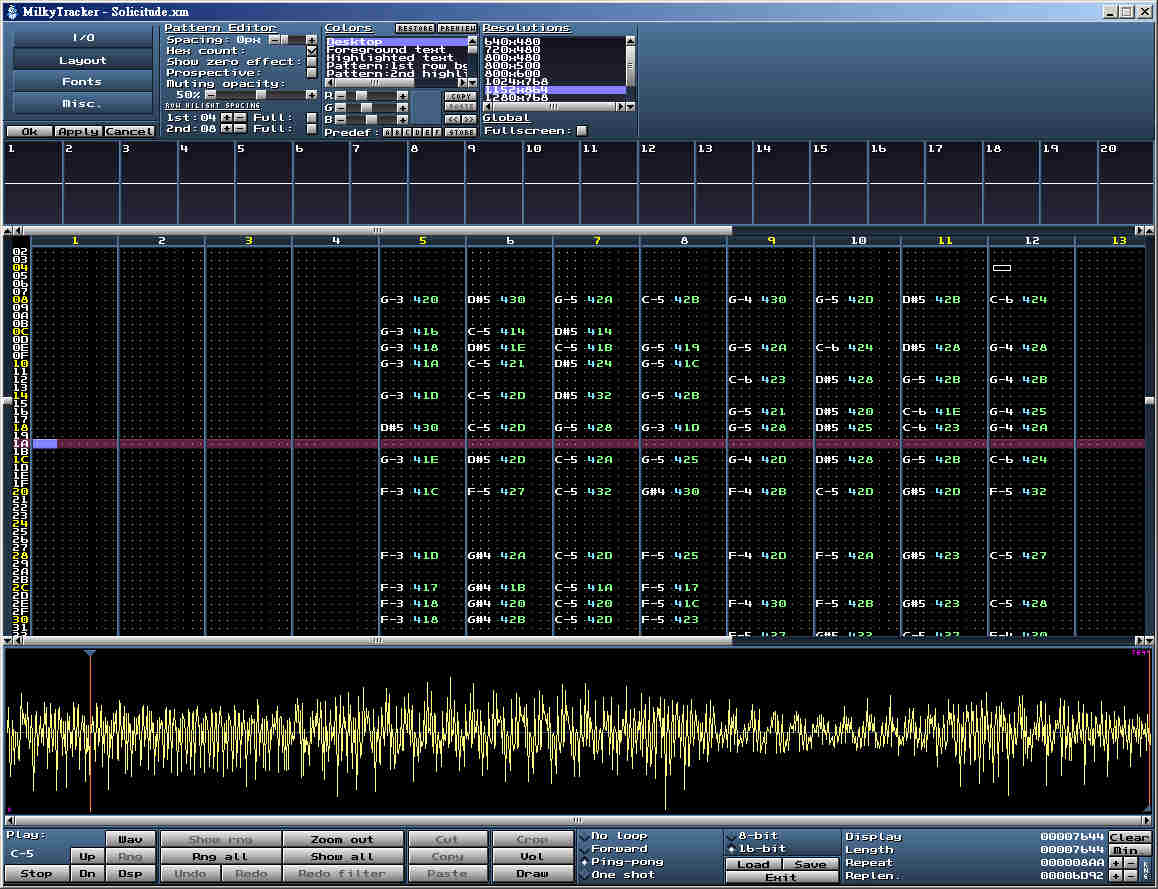 MilkyTracker includes the following components in its system:
Milkytracker also functions as a loop station for creating, editing, and mixing sample loops for use with external modules or equipment. It includes the ability to convert a pattern into a sample (loop):
The currently selected sample (in the sample editor) will be the target sample. Overdub mode works like a loop pedal: it records the pattern into the sample (while maintaining the duration of the target sample). This allows for complex loops and interesting grouping features. These interesting features can be found in the context menu of the pattern and sample editors.
MilkyTracker offers a simple synthesizer (in beta) for generating looping or single/multi-cycle waveforms. A synthesizer dialog box appears when you press the “synth” or “*” button on the sample screen. The first slider allows you to choose from various synthesis algorithms:
These rules apply to all summary options:
Milkytracker takes a revolutionary approach compared to most MIDI samplers:
MOD files are true works of art when it comes to combining elements across up to four channels. Scopes let you view the sample signal and VU meters, which can be controlled using the mouse and keyboard:
MilkyTracker offers several resampling options for module playback, rendering, and sample processing. These include:
Although the choice of resampler is a matter of personal preference, keep in mind that linear interpolation is the highest-quality option available in Fasttracker II, and it is likely the one used to create (or play back) most .XM files. Many chiptunes, however, will sound very muffled with interpolation due to their short samples and, therefore, the relatively greater impact of interpolation. The Amiga modes are intended for use only with 4-channel .MODs. Precise Sinc consumes a lot of CPU—great for resampling in the sample editor, but don’t expect very good real-time performance.
The purpose of the volume ramp in samplers is to prevent unwanted clicks in the music. Clicks occur when there is a sudden change in the direct current (DC) voltage, which usually happens:
Let’s talk about the last two cases. Ramping is useful in these cases because, otherwise, a click is simply unavoidable. When a sample is cut into a song, the songwriter has little choice regarding the phase/position of the sample at the start of a tick. In the first case, however, we can say that if the sample starts with a DC offset, then the sample actually contains a click. Is it an intentional click or a recording error? In old mod files, there are certainly many instances where some sampling error occurred, and the tools of the time couldn’t easily handle removing DC offset, etc., so it’s fine if we apply ramping, even if that might not be “authentic” (many old mod players didn’t have ramping). This basically falls into the same category as “the listener correcting the music,” such as surround sound, reverb, and EQ on the player.
MilkyTracker allows you to open and play up to 32 modules simultaneously, as well as exchange data between them. Initially, the tabs are hidden, but they can be activated using the keyboard shortcuts described below. There are also some configurable options for the tabs, such as automatically opening modules in new tabs and controlling how playback behaves in the background. You can choose to never pause playback in background tabs, to pause automatically when switching tabs, or to pause when playback starts in another tab. Playback can also be resumed when returning to a tab. Imported and exported file formats Modules MilkyTracker can import a wide variety of tracker module formats, but since Milky is an FT2 clone, the modules are rendered in an FT2 environment, which means that not all features of the different formats are supported. MilkyTracker also offers basic support for compressed files, allowing you to load ZIP, PowerPack, and UMX compressed modules directly.
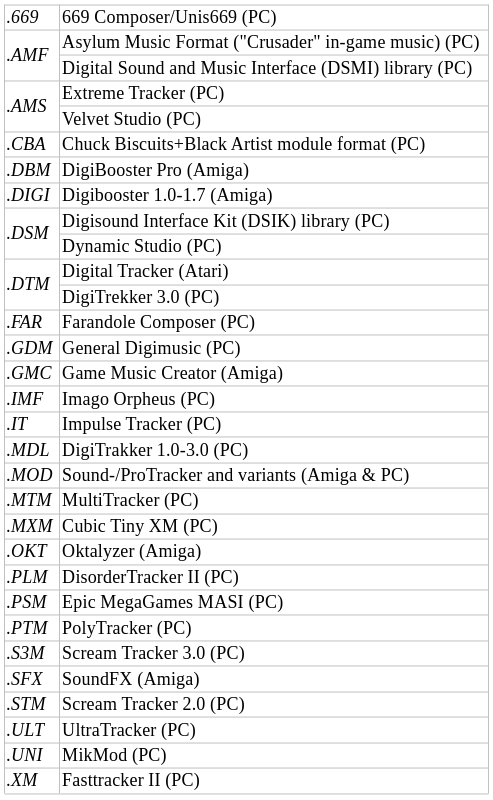 Exported Formats:  Samples MilkyTracker can load practically anything as RAW PCM audio samples; one of FT2's famous features. Import: 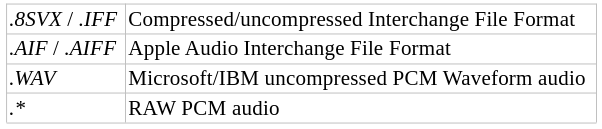 Export:  Getting Started with MilkyTracker After dnf install milkytracker, start the app and be greeted by a somewhat overwhelming screen. 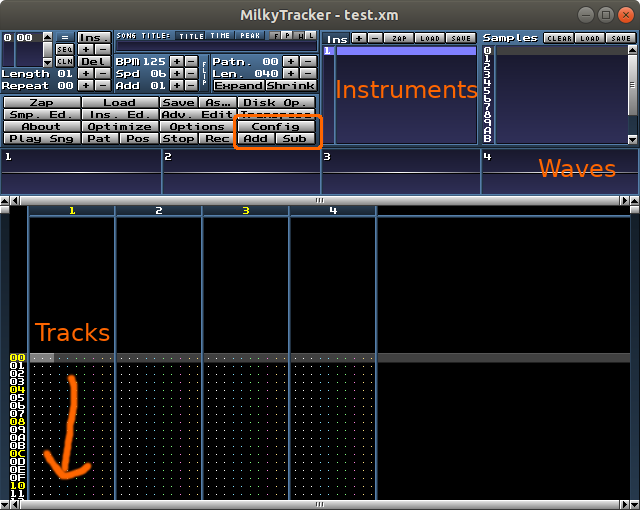 Apart from the command section top left, we have instruments/Sub two times to get from 8 to 4 channels, then hit Config→ and set Edit mode to MilkyTracker because all hotkeys will depend on it. Also use Config→ and to the right, choose a Custom pixel resolution of your liking.
Ok, so how do we make sound? We load a wav sample (e.g. say "wow" into a recorder app) by going top-right to Samples→ and naming instrument 1 in the panel left to it accordingly. Or we add another instrument with Ins→+ and, left in the command section, press Smp. Ed. (Ctrl+Alt+S) aka sample editor, which opens at the bottom. 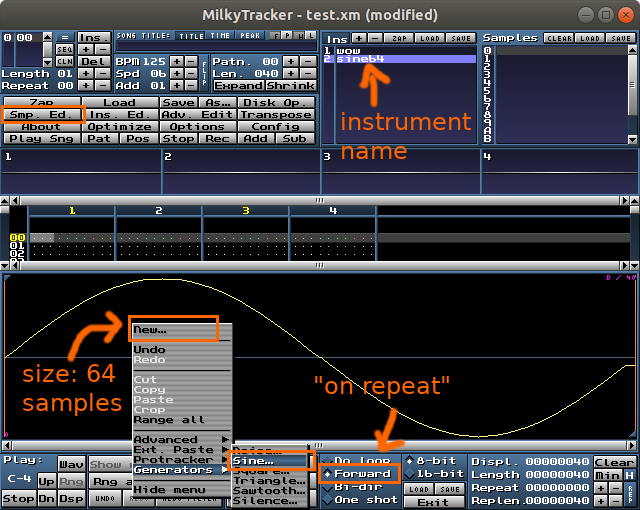 RMB (right mouse button) into the empty space, and choose New with 64 samples to create our "sound canvas" with time (x-axis) and volume (y-axis). More samples will stretch the wave and thus make the sound lower. Then RMB again to Generators→ with 1 period. Lastly, in the bottom middle, choose Forward to repeat the tone from the beginning. To actually play a tone, press one of Y or the keys right from it, until M: This, our cdefgab, and the halftones are on SD and GHJ in the row above, mirroring what a piano does. Note: German keyboard. 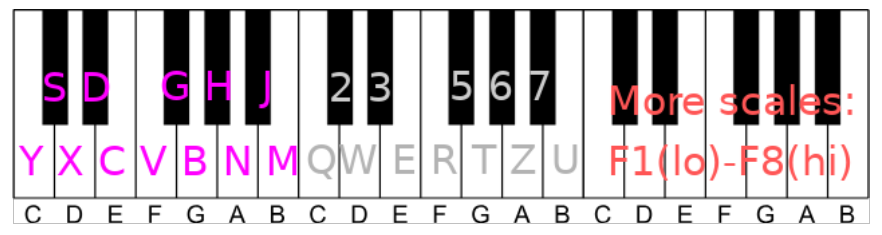 Also try Bi-dir instead of Forward, to go back and forth instead of repeat, and notice how the sound becomes "dirtier". And for a third instrument, instead of RMB→, you could try Generators→ for a more percussive sound, maybe with 1024 samples and 10 periods. Then press the Rng all button aka select all, plus RMB→ from 100 to 10. To further refine the sound, you could press the Ins. Ed. (Ctrl+Alt+I) button for the instrument editor. Activate checkbox On, then button Add for more control points to the left, then move them by mouse for fine-grained volume shaping. And Ctrl+Alt+X to get back to the main screen.
Now that we can make a tone, next up is composing. At the top, hit Shrink two times to get a manageable first recording time. Pressing Rec (Space) makes the gray cursor bar turn red, and from now on every tone should go into the first track. Key 1 records as "stop tone", and cursor keys navigate elsewhere for larger pauses. Shift+cursor selects tones for delete (Del), copy (Ctrl+C) and paste (Ctrl+V), with Shift+Alt+cursor to extend the selection. 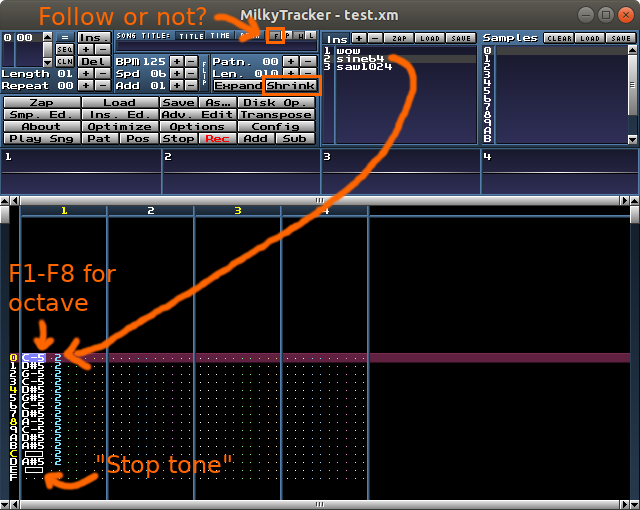 Hit Space again to get out of editing, Play Sng (Enter) to start replay, and Stop (Esc) to stop; alternatively Shift+Space for tone-by-tone debugging. The middle bar shows waveforms, and you can LMB on any of them to (un)mute, useful for listening to track decomposition. While editing, you can also Tab through the tracks and Shift+M (un)mute them. Now to the notes: Something like "C-5 2" means C on octave 5 (on 0..7, reachable by F1-F8), with instrument 2 (cyan), here "sine64" in the instrument panel top-middle. Each detail can be edited: Note down (Shift+F1) or up (Shift+F2) by a halftone, as well as instrument down (Ctrl+Shift+ß, right of 0) or up (Ctrl+Shift+', two right of 0). Combined with copy&paste, you can duplicate the first track, then change the instrument or octave (12x note up or down), or transpose to the fifth like in a power chord (7x note up/down). Tricks like these can make the sound appear "fuller" in our ears.
You might have noticed the columns are not quite full: We are missing volume and effects yet. Volume (green) goes into the column after instrument and effect (pink+yellow) in the column after that. 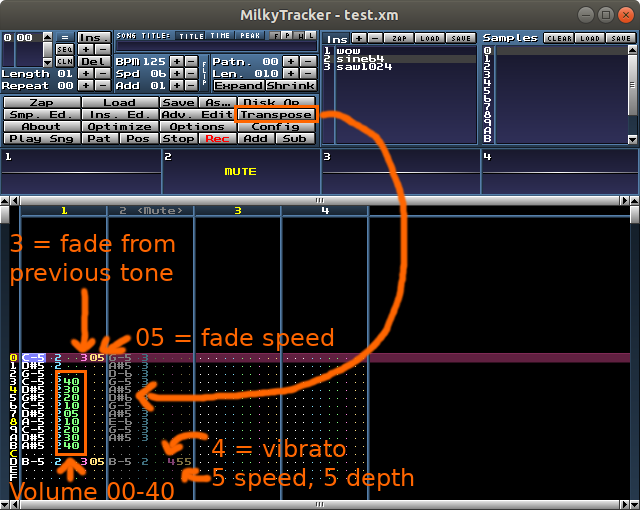 Effects are e.g. 3 for "fade from previous tone" and have parameters, e.g. 05 for fade speed. Note that I removed the stop tone, so there is actually a tone to fade from. Volume is a number from 0 to 40, with default 40, and can be set either as absolute number or +/-, with +F the maximum increase; also usable as volume effect. The (muted) track 2 shows a copy of most of track 1, but with different instrument and transposed by +7 halftones. At the end, a second effect is 4 for vibrato, with the parameters 55 defining weak or strong vibrato.
A musical piece contains a lot of sheets (patterns), and so far we have had only one sheet of 0x10 or 16 notes, with the default 0x40 notes. At the top left is the sheet management, where you see sheet 0 with id 00. Use Ins to add another entry 1 and +/- to define which sheet will be played there. 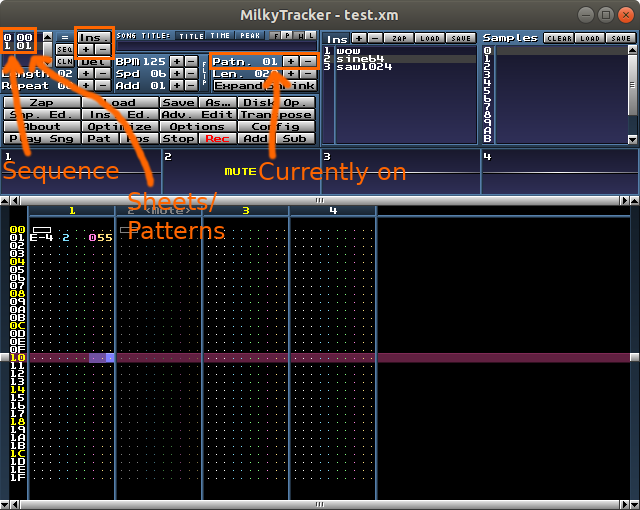 For editing, use the top middle Patn. +/- buttons to change which sheet you are on. Within the sheet in edit mode, press F9-F12 to jump from the first to fourth quarter of a sheet, and Shift+F9-F12 to play from that quarter. Also, the CLN (clone) button is a nice alternative to Ins: It copies the current sheet to a newly created one. Just like SEQ (sequence), the id of the new sheet is the next free one. And if you are this far, consult the docs and faq to see what else is possible…
|