| Previous
Page |
PCLinuxOS
Magazine |
PCLinuxOS |
Article List |
Disclaimer |
Next Page |
Xfce Power User Tips, Tricks & Tweaks: File Utilities (Part Two)
|
|
by Paul Arnote (parnote) Last month, we took a look at a solitary file utility, and discussed why it should be a necessary part of every Xfce user's arsenal of tools. This month, we'll look at a collection of file utilities that make your life under Xfce easy and simple, and without having to remember a small collection of command line commands. It only stands to reason that since Thunar is a file manager, there are a lot of file utilities that can make your interaction and work with files easier. As such, I'm going to break up the Xfce Power User Tips, Tricks & Tweaks: File Utilities article into three parts, just because of the sheer volume of useful file utilities that are available for use. We'll wrap up the discussion of file utilities that you can use from Thunar Custom Actions in next month's Xfce Power User Tips, Tricks & Tweaks column. Open Root Terminal How many times have you been poking around in Thunar, only to discover that you need to elevate your "privileges" to root to accomplish what you need to do? If you're anything like me, it happens on a fairly regular basis. Thanks to this Thunar Custom Action, a root terminal is only two quick clicks of the mouse away. 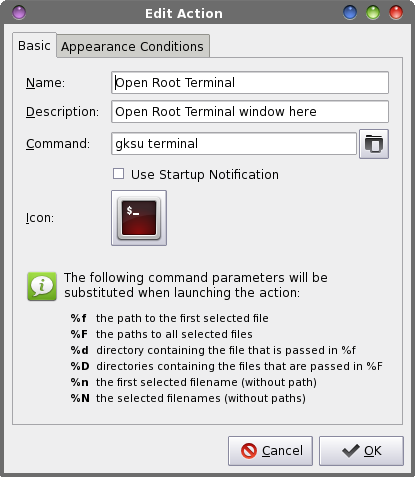 Give your new Thunar Custom Action a name and description. Enter "Open Root Terminal" as the name, and "Open root terminal window here" as the description. On the third line, enter the following command: gksu terminal Select an icon for your new custom action. Under the "Appearance Conditions" tab, leave the "File Pattern" set to the default * value, and place a checkmark in front of Directories. Now, simply right click your mouse on an empty space in Thunar (e.g., not on a file). Select "Open Root Terminal" from Thunar's right click context menu. You will then be prompted to enter the root password. Once you do, you will be presented with a terminal opened up on your desktop, opened to the directory that you were in when you selected the option in Thunar, as the root user. Edit As Root Sometimes, you simply need to edit a file on your system as the root user. For example, someone thought it would be cute to name GIMP as Gnu Image Manipulation Program in GIMP's *.desktop file. While the longer form is the full name of GIMP, my mind is looking for GIMP when selecting it to open a graphics file. To change the name in the *.desktop file (stored at /usr/share/applications), you need root privileges. The easiest way to do this is to travel to the directory where the "GNU Image Manipulation Program" *.desktop file is stored (/usr/share/applications), and edit the file where it sits. (Hint: simply change the Name: line in the desktop file from GNU Image Manipulation Program to GIMP). This Thunar Custom Action allows you the opportunity to edit any text file on your system that needs root privileges to edit or change. 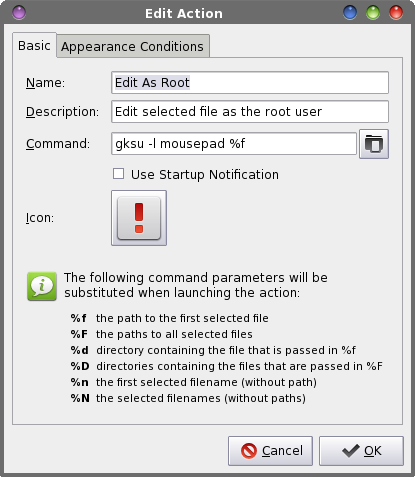 Enter a name and description for your new custom action. On the first line, enter "Edit As Root" as the name, and "Edit selected file as the root user" as the description on the second line. Enter the following command on the third line: gksu -l mousepad %f Select an icon for your new custom action. Under the "Appearance Conditions" tab, keep the "File Pattern" set to the * default value, and place a checkmark in front of Text files and Other files. Now, selecting a file, then selecting "Edit As Root" from Thunar's right click context menu will prompt you for the root password. Once supplied, Mousepad will open with root privileges, allowing you to edit the contents of the selected text file. This custom action is useful for any text file you might need to edit on your system that requires root privileges. There are plenty around, since Linux's configuration files are typically text files of one kind or another. Copy To and Move To Two of the "installed" Thunar Custom Actions that came preinstalled on the old Phoenix Live CD (the former PCLinuxOS version of Xfce) are called "Copy To" and "Move To." These two custom actions allow you to copy or move selected files and/or directories to new locations on your computer's hard drive. 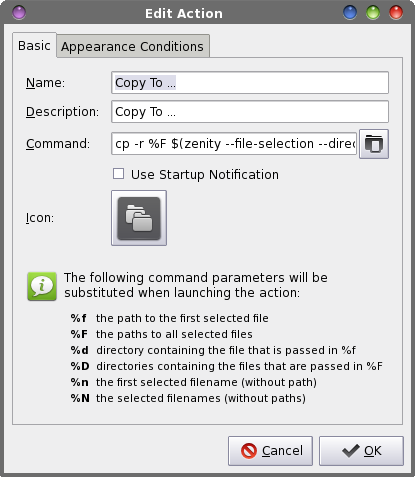 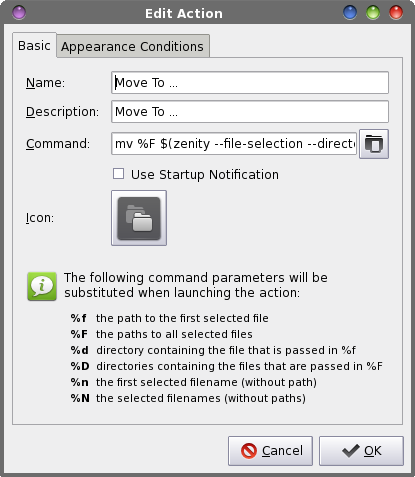 With both custom actions, a Zenity file selection dialog box is displayed to give you (the user) the chance to choose the destination folder where to copy or move the selection of files. The command for the Copy To... custom action is as follows: cp -r %F $(zenity --file-selection --directory) I've slightly modified the original command from the Phoenix Live CD to include the -r command line switch, which tells the copy command (cp) to recurse any selected directories. The command for the Move To... custom action is as follows: mv %F $(zenity --file-selection --directory) Under the "Appearance Conditions" tab, leave the File Pattern set to the default * value, and place a check in front of every file type. Now, whenever you want to copy or move a single file or directory - or a group of files or directories - simply select the file(s) and/or directory(ies) you want to act upon, and select the appropriate custom action to carry out your desired activity. Copy To with a pulsating progress bar One of the problems with the original Copy To... and Move To... Thunar Custom Actions is that there is no indication for when the actions have been completed. One way to improve on this is to add a pulsating progress bar to the command. 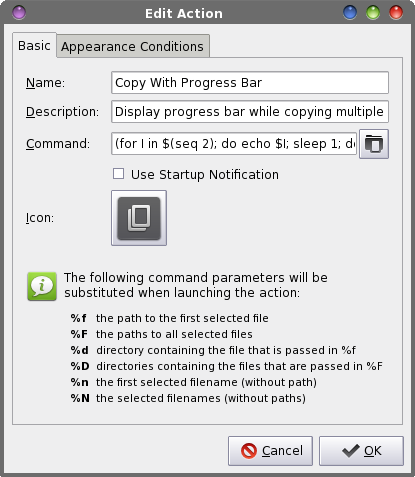 Using the copy (cp) command as our example, enter the following on the command line of the Thunar Custom Action Edit Action dialog box: (for I in $(seq 2); do echo $I; sleep 1; done; cp -r %F "$(zenity --file-selection --directory)") | zenity --progress --pulsate --auto-close You can do the same for the move (mv) command simply by replacing the cp -r part of the command with mv. Set up the "Appearance Conditions" tab of the Edit Action dialog box the same as we did previously, with the File Pattern set to the default value of * and a checkmark in front of every file type. 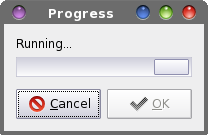 Now, you will have a visual indicator that looks like the dialog box above to indicate when the copy or move action has completed. Copy Move There is another way for us to copy or move a selection of files and/or directories using a real progress bar to indicate the progress of our selected action. First, copy/enter the following in a simple text editor (such as Xfce's Mousepad), and save it to the /Scripts directory in your /home directory. I call my copy of this script copy-move.sh. Don't forget to make the script file executable.
#! /bin/sh

n=1

corm=$(zenity --list --radiolist --column="Select" --column="Action"
--title="Copy Or Move" --width=200 --height=175 --text=
"Select which activity you\nwould like to perform:" TRUE Copy FALSE Move)
   if [ $? == 1 ]; then
      exit
   fi

dest="$(zenity --file-selection --directory)"

if [ $corm == "Copy" ]; then

  for file in "$@"; do
    if [ ! -e "$file" ]; then
        continue
    fi
       cp -r "$file" "$dest"
       echo $(($n * 100 / $#))
       echo "# Copying file: $file"
       let "n = n+1"

    done | (zenity  --progress --title "Copying Files..."
--percentage=0 --auto-close --auto-kill)

elif [ $corm == "Move" ]; then

  for file in "$@"; do
    if [ ! -e "$file" ]; then
        continue
    fi
       mv "$file" "$dest"
       echo $(($n * 100 / $#))
       echo "# Moving file: $file"
       let "n = n+1"

    done | (zenity  --progress --title "Moving Files..."
--percentage=0 --auto-close --auto-kill)

fi

exit 0
 Enter $HOME/Scripts/copy-move.sh %N on the command line for this Thunar Custom Action, provided that you saved the copy-move.sh bash file in the /Scripts folder, within your /home folder. Otherwise, be sure to provide the appropriate path information to where you stored your copy of the copy-move.sh bash file. Under the "Appearance Conditions" tab, leave the File Pattern set to the default value of *, and place a checkmark in front of every file type. 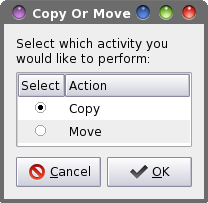 When you select this custom action, you will see a dialog box similar to the one displayed above. Select whether you want to copy or move the selected file(s) or directory(ies), then select the OK button. You will then be displayed a Zenity file selection dialog box to allow you to decide upon the destination directory. 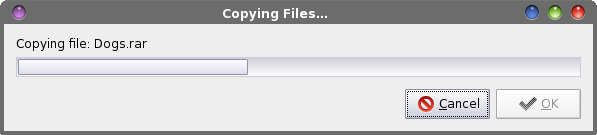 Once you've decided upon and selected the destination directory, a dialog box similar to the one above will be displayed, with a fully qualified progress bar to indicate the actual progress through the file copy or move action. Create Soft Link Sometimes, you might want to simply create a "soft link" to another file located somewhere on your computer, rather than making a second copy of the file. You could do this rather easily from the command line, but why drop out to a command line terminal when we can create the soft link from within Thunar even more easily? 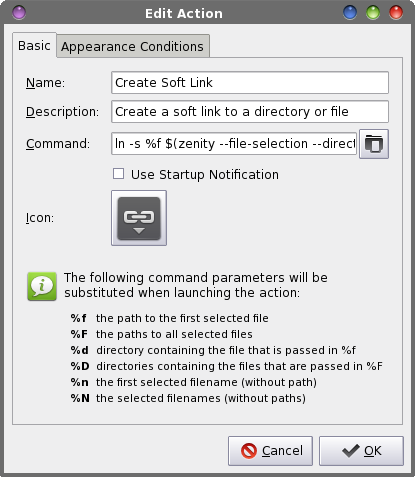 Enter ln -s %f $(zenity --file-selection --directory) as the command in the Edit Action dialog box. (That's a small L, small N). In the "Appearance Conditions" tab, leave the File Pattern set to the default value of *, and place a checkmark in front of every file type. Now, select the file you want to create a soft link for. When you select this custom action from Thunar's right-click context menu, a Zenity file selection dialog box will open, allowing you to dictate where the new soft link is created. Copy Filename & Path Let's see a show of hands - how many of you have wanted or needed to copy the full path information for a specific file into a document? I would be surprised if everyone's hand didn't go up. At some time in their computing history, everyone has had the need to do this. With this Thunar Custom Action, copying the full path and filename to the clipboard is only a two step process. To accomplish this, you will need to install xclip from the PCLinuxOS repository, if you don't already have it installed. 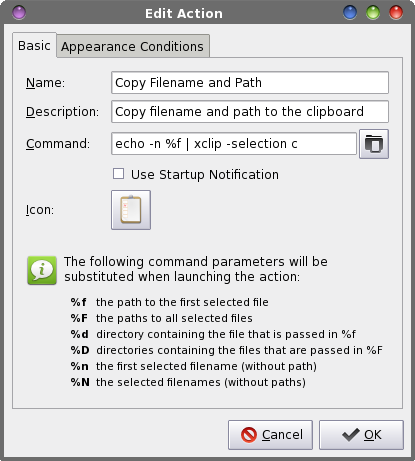 Enter echo -n %f | xclip -selection c on the command line of the Edit Action dialog box. Under the "Appearance Conditions" tab, keep the File Pattern set to the default value of *, and place a checkmark in front of every file type. Now, when you right click on a file and select Copy Filename and Path from Thunar's right-click context menu, the full path and filename of the selected file will be copied to the clipboard. 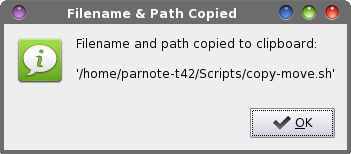 We can very easily add a confirmation dialog box to this custom action, if you so choose. Just alter the command to include a Zenity information dialog box, as such: zenity --info --title="Filename & Path Copied" --text="Filename and path copied to clipboard:\n\n%f"; echo -n %f | xclip -selection c. If you wish to replace the word "and" with an ampersand (&) in the text field, you will need to enter it as & or it will cause an error in the Zenity dialog output. And yes, all five characters are necessary. Strip Spaces From Filenames You've heard it before - over and over. It's bad form to include spaces in your filenames under Linux. It isn't that the Linux file systems can't handle spaces. Most every Linux file system handles spaces in filenames quite well. It's that spaces in filenames pose special problems when working with files using command line utilities. Typically, a space in a command line is a delimiter that signifies another command line switch is coming up. I can attest to the difficulties that spaces in filenames pose. In writing the scripts that I've shared here in this article series, handling filenames with spaces in them has been especially problematic. If you're like me, you avoid the use of spaces in filenames altogether. I'd rather avoid any unnecessary hassles in having to deal with the pesky spaces. Since filenames under Linux are case sensitive, I prefer to separate "words" in filenames by capitalizing the first letter of each "word." When that doesn't work, I prefer to use a dash as separator between "words." Even as much as I might try to avoid having files with spaces in the filenames, invariably someone will send me a file whose filename is riddled with spaces. Until now, my sole option has been to manually edit the filename to eliminate those spaces. That is, until this Thunar Custom Action came along. 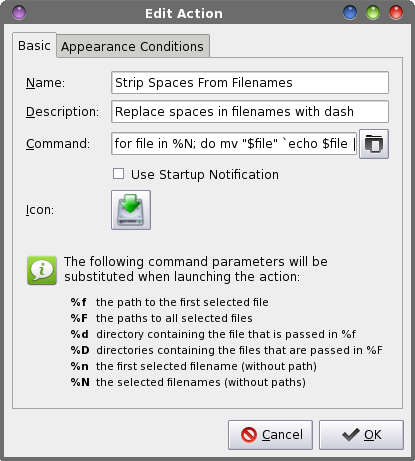 Enter for file in %N; do mv "$file" `echo $file | sed -e 's/ */-/g' -e 's/_-_/-/g'`; done in the command line of the Edit Action dialog box. Under the "Appearance Conditions" tab, leave the File Pattern set to the default value of *, and check every file type. When you select a file or a group of files and select "Strip Spaces From Filenames" from the Thunar right-click context menu, any spaces in the filename(s) will be converted to dashes. Thus, a file named "this is a sample file.txt" will be renamed to be "this-is-a-sample-file.txt." Make File Executable There are times - like when you are entering/copying the bash files I've included in this article series - when you need to make a file executable. Fortunately, this Thunar Custom Action makes it easy as two clicks of the mouse.  Enter chmod +x %f as the command in the Edit Action dialog box. Under the "Appearance Conditions" tab, set the File Pattern to *.sh;*.py;*.pl and place a checkmark in front of Text Files and Other Files. If you have other types of files that you would like to make executable (e.g., files from other scripting languages), add them to the File Pattern list, separating each with a semi-colon. Now, whenever you right click on an eligible file, you will be given the chance to make the file executable by selecting "Make File Executable" from Thunar's right-click context menu. Disk Usage Utility Sometimes it's not enough to simply know the size of a file, directory, group of files, or group of directories. Sometimes, you need or want to know how much disk space they consume - which is usually more than the actual size of the files. With this Thunar Custom Action, you can easily see how much space a file, group of files, directory, or group of directories is taking up on your hard drive. 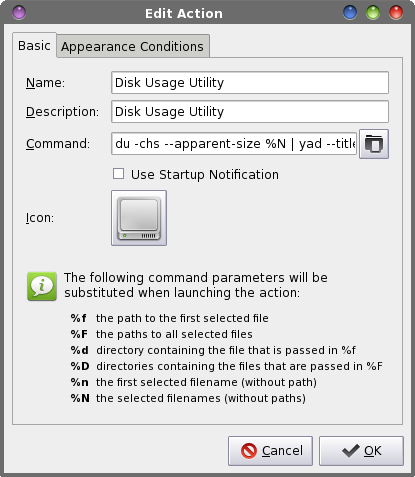 Enter du -chs --apparent-size %N | yad --title="Disk Usage Utility" --text-info --width=300 --height=200 --window-icon="application-vnd-oasis.opendocument. chart" --button="gtk-ok" in the "Command" field of the Edit Action dialog box. Under the "Appearance Conditions" tab, leave the "File Pattern" set to the default value of *, and make sure there's a checkmark in front of every file type.  Now, when you select a file, group of files, directory, or group of directories, a listing of each file or directory selected will appear, with the amount of disk space each file or directory occupies on your hard drive. Make Backup Copy Whenever you are editing a file, it's a smart move to always make a backup copy of the original file. It's great added insurance if things should "head south" at the speed of light. This Thunar Custom Action makes the creation of a backup file a simple, two-click process. 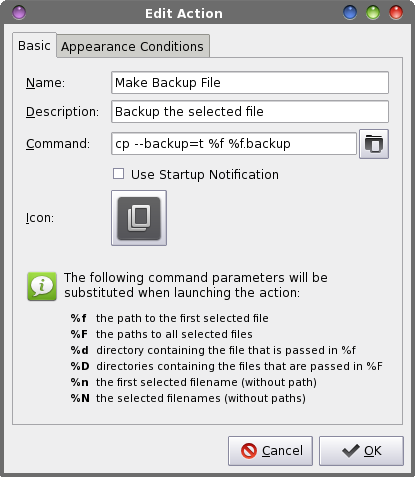 Enter cp --backup=t %f %f.backup into the "Command" field of the Edit Action dialog box. Under the "Appearance Conditions" tab, leave the "File Pattern" set to the default value of *, and place a checkmark in front of every file type. This custom action will make a copy of a single file or directory, and append ".backup" to the end of the filename, placing it in the same directory as the original. Summary As you can see, there are a lot of file utility tasks that can be handled via Thunar's Custom Actions. Next month, we'll look at a special set of file utilities that help deal with ISO, IMG and md5sum files. |