| Previous
Page |
PCLinuxOS
Magazine |
PCLinuxOS |
Article List |
Disclaimer |
Next Page |
Some Handy Terminal Tips |
|
by Paul Arnote (parnote) OK ... I know that the GUI Linux desktops have gotten really good. And, I know that there are many users who avoid using the Linux command line -- at all costs. But learning to use a terminal emulator, and the Linux command line, is not only fun, but it also gives you more power and control over your system. Below are some assorted tips and tricks that I use, and that will give you greater control over your terminal sessions. Close Terminal, Keep The Program If you start a program from the command line, closing the terminal session will typically also end the program you started -- unless you started the program to run in the background. Certainly, you can run any program in the background, simply by adding " &" to the end of the command, like this: gcalctool & But what if the program is already running, and you want/need to close the terminal, but want the program to keep running? Fortunately, Linux gives us a way to change whether a program launched from the command line is running in the foreground (default) or placing it in the background after it has already been launched. To specify for a running program to run in the background, do the following: On the keyboard, hold down the Ctrl + Z keys (will show up in the terminal as ^Z, with "Stopped [name of program] on the very next line). This will temporarily suspend the running program (the program you started from the command line). Next, enter the following at the command prompt:
disown -h %1 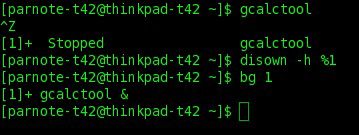 Now, the terminal will be "de-listed" as the parent process or owner of the program's process, and the program will be moved from being a foreground process to a background process. After it is moved to the background, the program will resume its execution, but as a background process. You can now close the terminal session without stopping the execution of the program. Also notice how, after the issuance of the "bg 1" line, gcalctool is listed as gcalctool &, signifying that the program is now running in the background. Open Terminal Where You Want On most desktops, your terminal will open at the upper left corner of your screen when you select to open it from either a launcher or the applications menu. Most of the time, this is fine. But what if you find it more convenient to your style of working to have the terminal open up at a different location? Fortunately, this is easy enough to do. Most of the popular terminal programs allow you to specify the width (in characters), height (in lines), along with the X and Y screen coordinates where the window will be placed. For most of the popular terminal programs -- except xterm -- the format is as follows: --geometry=[width]x[height]+[X-coordinate]+[Y-coordinate]  Simply add this command line switch to the end of the command that launches your favorite terminal program. If you typically launch your terminal program from a launcher, edit the command in the launcher. If you typically launch your terminal program from your application menu, you may have to edit either the menu (in the case of KDE), or the .desktop file (in /usr/share/applications as the root user) to include the command line switch. Now, remember that I said that xterm was the exception. If your favorite terminal program is xterm, the command line switch is slightly different ... yet very similar. Simply eliminate one of the leading dashes and the equal sign. For example, xterm -geometry 80x20+100+100 will open the xterm window, 80 characters wide, 20 lines tall, at X-coordinate 100, and at Y-coordinate 100. Exclaim it! It's not at all uncommon to issue multiple commands while working at the command line, but nothing is more cumbersome than having to retype the same command over and over. Fortunately, there is a shortcut. Just type ! followed by the name of the command and it will be recalled. Just press the Enter key to execute it again.  For example, let's say we were using the command line to open a specific configuration file in your favorite text editor. My favorite text editor is Xfce's Mousepad, so I'll use that in my examples. Typing !mousepad will recall the last command that launched Mousepad from the command line, and pressing the Enter key will launch it. REALLY Exclaim It!! While the previous shortcut depends on the name of the command you want to repeat following the single exclamation mark, the double exclamation mark allows you to recall the previous command, and doesn't require the name of a command to function.  Where this is especially useful is when you need to preface the last command with another command. For example, let's say that you opened a configuration file as a regular user for editing, but then realize that you need to open that file as the root user. Simply typing "gksu !!" (or "kdesu !!" under KDE) will execute the command after gaining root access with either the kdesu or gksu command. Get Historical One extremely powerful command to use while working on the command line is the history command. Executed by itself, it will list all of the commands you have used on the command line. If you use the command line regularly, you will have a lot of entries. Each command line entry is assigned its own unique number. On one of my computers, I have over 1,000 entries! Scrolling through all of those commands is not only tedious, but it increases the chance that I will miss the command that I'm looking for when scanning within the long list. Fortunately, you can improve your chances of finding the command you are looking for. Let's say that I'm looking for the times that I've used the convert command (part of the ImageMagick command line tools). Use the history command combined with the grep command, like this: history | grep convert  Since I already know what I'm looking for, I can weed out all of the other commands in the command line history. Now, all I have to do to re-execute the command is issue the command "!728", since 728 is the number assigned to the particular command I'm seeking in the history command's log. The last time ... Another way to access the last iteration of a command is to use the Crtl + R key in a terminal session. Keep in mind that this shortcut will ONLY recall the last use of the specified command.  Notice that the command prompt now changes to (reverse-i-search) and as you start typing (I typed in "mou" without the quotes), the last command that I used the mousepad command in is shown. Simply pressing the Enter key will re-execute that command. This is especially helpful if you just used the mv command to move a file to another directory, and you want to check the path where you moved the file to. It's also especially helpful if you can't remember the exact syntax of a command that you previously executed successfully. Moving between directories, the easy way It is tedious, to say the least, to use the cd command to move between directories, especially if the destination directory is several layers deep. The deeper the destination directory is, the longer the command to move there, and the greater the chance of making a typo. 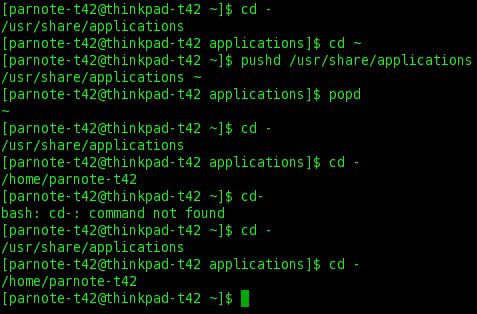 Fortunately, there are some shortcuts you can use. First, cd - will switch between two directories. Note the space between cd and the trailing dash. Second, cd ~ will automatically take you back to your /home directory, no matter where you are in the file structure. Just as with its cousin, note the space between cd and the trailing tilda. Using the pushd command, instead of cd, will cause the current directory to be written into the popd variable, then take you to the specified directory. To return to the previous directory, simply type popd. Unfortunately, this only works once. You can easily circumvent this restriction by simply using the cd - command. With it, you can switch between two directories ad nauseum, forever ... if you wish. Kill it dead Sometimes, you have a program hanging around and refusing to close. Fortunately, there are a quartet of Linux commands at your beck and call to show the stubborn program just who the boss is.  The kill command, issued from the command line, heads up these four commands. The only argument it takes is the PID (program ID) of the program that's misbehaving. What? You don't know where to find the PID? Well, you could issue the top command in your terminal. The first column lists the PID of the running programs. Or, you could just type pidof [program name] and the PID will be returned. Then, just use the PID as the command line argument for the kill command.  The killall command takes only the name of the program as a command line argument. So, if you have several windows on your desktop that are all under the control of one program -- let's pick on Firefox -- then issuing the killall firefox command will close out all of the windows under the control of Firefox. Similarly, if you have multiple copies of a program open, all of the instances of the specified program will be closed.   The pkill command is a shortcut way to close a program, and it takes only a portion of the program name (or the entire name) as its command line argument. In the example above, I used the entire name, but using pkill gcal, pkill tool or pkill lcto would have also closed the program gcalctool. Thus, pkill fire, pkill fox, pkill iref, pkill firefox would all close the Firefox browser. The xkill command only works on an X Window system, and isn't installed by default in PCLinuxOS (the other three are). However, you can install it via Synaptic. When executed, your cursor will change to an X. Simply click the X cursor on the window of the program you want to close. The program under the X cursor will close, and your cursor will revert back to normal. Heads & Tails If you're working in a terminal session, there's no reason to leave that environment to read a simple text file -- and on Linux, there are a ton of them. Most of the configuration files on Linux are nothing more than simple text files. Of course, I'm talking about the head and tail Linux commands. One (head) reads the first part of a text file, while the other (tail) reads the last part of a text file, all without opening or loading them into a text editor. 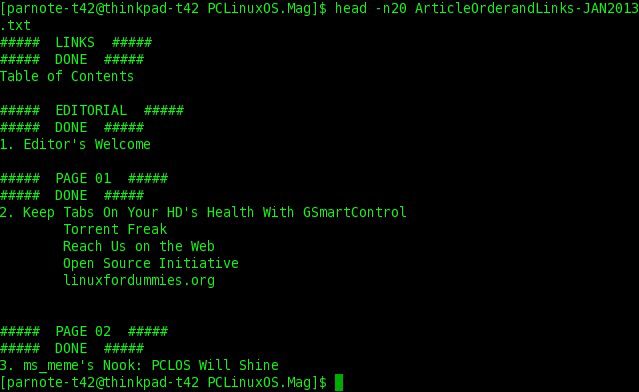 Their usage is very similar. You simply issue the command, followed by the name of the text file you want to view. Issuing either command, coupled with the name of a text file, will display the first 10 lines of a file (in the case of the head command), or the last 10 lines of a file (in the case of the tail command). You can also change the behavior of both commands to display more lines than just the paltry default 10 lines. Simply insert -n[number of lines] between the command and the name of the text file to display. So, if I wanted to view the first 20 lines of a text file, I'd issue the head command as head -n20 mylist.txt. Similarly, if I wanted to view the last 20 lines of a text file, I'd issue the tail command as tail -n20 mylist.txt. You can view however many lines of the file you want, simply by specifying the number of lines to display. If you want to view the entire file, just make the number larger than the number of lines in a file (100? 1000?). Summary Whatever you do, don't shy away from learning the Linux command line. A few years back, I viewed the Linux command line as something that I had to sometimes reluctantly use. To me, it was the great black hole. But after setting my mind to learning it, the veil of mystery lifted from the Linux command line, and I soon realized how valuable it could be. In a lot of instances, the command line is much faster than using the GUI version of a program. Plus, the Linux command line can be fun. |