| Previous
Page |
PCLinuxOS
Magazine |
PCLinuxOS |
Article List |
Disclaimer |
Next Page |
Programming With Gtkdialog, Part Three |
|
by Peter Kelly (critter) So far, we have looked at widgets that show text or offer a choice to the user, but often we need to get input from a user. The entry widget This is the simplest way to get user input, but is quite flexible. The user is presented with a box into which they may type a single line of text. You may provide some default text, hide the text as in a password prompt, restrict the length of the text, and set the focus to the input box so the user can immediately start to type, overwriting any default text. If the entered text is longer than the input box, then the text will scroll to keep the cursor position visible. The text may be supplied from or written to a file. You can supply icons, including Gtk stock icons, to appear to the left, right or both ends of the text. The icons may raise tooltips when hovered over, and the tool tip text may use markup tags to adjust font attributes, such as color or emphasis. Naturally, the appearance of the widget itself can be adjusted. It may be flat or framed, adjusted for width and height, and may be visible, invisible, active or inactive. The text can be refreshed, automatically if required, or cleared by another widget. An entry box widget is responsive to signals. Not too shabby for a 'simple' widget! Here it is in action.  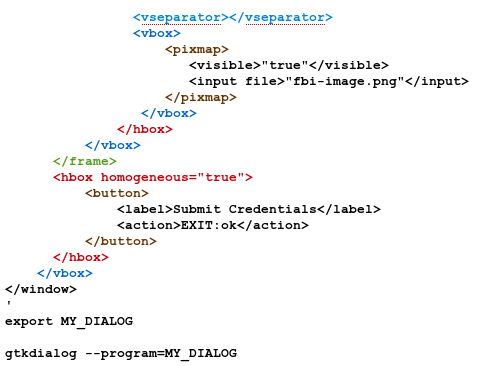 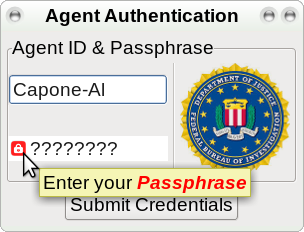 In the preceding code, some of the lines are quite long, so I have split them over several lines. This is allowable, but splitting text may insert line breaks that output the text differently than intended. You must also make sure that the starting and ending tags are matched, as Gtkdialog is not very forgiving about mistakes here. The first entry box has the 'activates-default' attribute set to 'true.' This gives it the focus on start up. The default text is taken from the system variable USER. The '$' tells the widget to show the contents of USER, not the word. This is where the system stores the name of the user logged into the operating system. This line could be omitted to present a blank user name field. The next entry box is more interesting. I have removed the frame so that it appears flat on the dialog. Next, I have told it to use ASCII character 63 (the question mark '?') to mask the typed characters in the password. The primary icon sits on the left, and is taken from the system set of icons. This will vary depending upon what icon set your system uses. The tooltip for this icon starts with plain text, then uses markup to change the font to red, bold, italic text for emphasis on what is required. I put some default text in here, the word password, so that you can see the masking effect. Normally, this would be left blank for the user to complete. The rest of the code is stuff that we have seen before and serves to decorate and format the dialog. The Edit widget This what to use when you need to work with multiline text. The text can be entered directly into the box from the keyboard, or loaded from an existing file. It may also be saved to a file of your choice. This widget can display both horizontal and vertical scroll bars to accommodate text. Also supported is insert/overwrite mode, text-wrapping and text justification. The following little example demonstrates the basic usage of the widget. 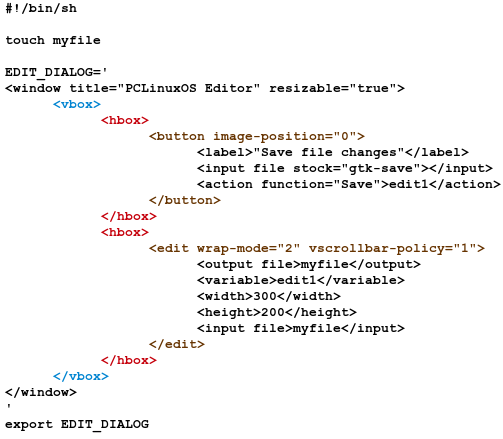  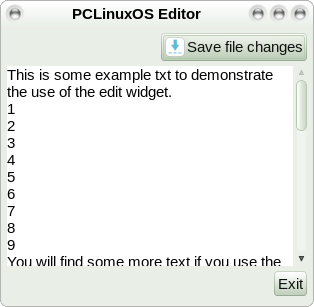 We have already covered most of the stuff here in previous examples, but the two attributes specified in the edit markup need a little explanation. You may specify one of four values to wrap-mode: 0 disables text wrapping, 1 wraps text at the edge of the visible text area breaking words if necessary, 2 wraps text only at a word boundary and 3 is a stronger version of 2 which considers graphemes, such as ligatures which may be present in some languages but is safe to use in English text. Similarly 0,1 and 2 have special meaning to vscrollbar-policy: 0 always displays a scrollbar, 1 automatically displays a scrollbar when required and 2 inhibits the display of a scrollbar. Horizontal scrollbars are controlled with hscrollbar-policy. Clicking the 'Save file changes' button executes the save function to save the current contents of the edit window to the file named in the 'output file' tags. The Terminal widget This next example reuses much of the code from the previous example enabling a useful little utility to be created quickly, without re-inventing the wheel. We have a terminal window and an edit window. If we type a command into the terminal window, it is executed as normal. However, if we redirect the commands output to the file 'results' using > (overwrite) or >> (append), then the edit window automatically recognises the file changes and updates its contents. We instantly have the results of the command in a window ready to be edited. Clicking the 'save file changes' button writes the edited file to the file 'results.new' to avoid overwriting the original 'results' file, to which you may wish to revert. 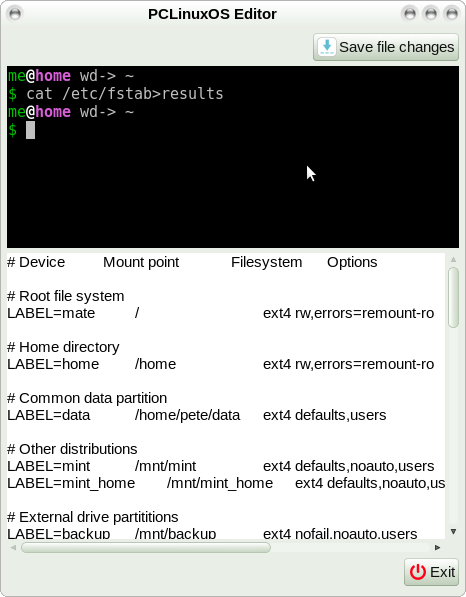  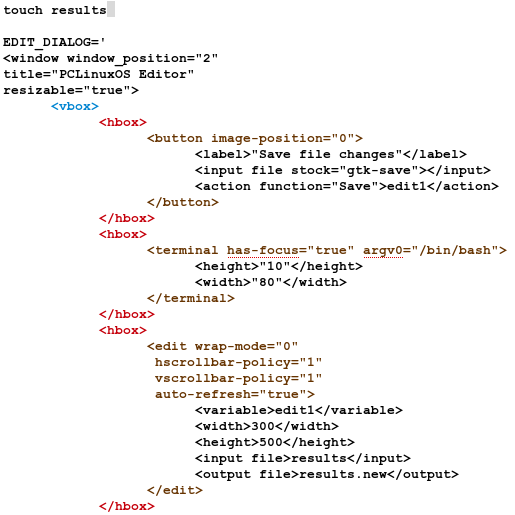 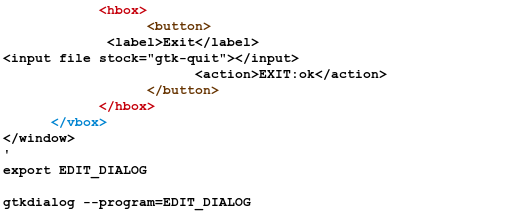 Menus Menus in gtkdialog are constructed by providing a menubar widget which contains one or more menu widgets. Each menu widget, in turn, holds menuitem widgets, menuitemseparator widgets and other, nested menuitem widgets. Our menu system will be a fairly simple affair. It will be a menubar with two menus: 'File' and 'Help.' The 'File' menu will have menuitems for 'Save' file separated from a final 'Quit' menuitem by a menuseparator widget. The 'Help' menu will have a single 'About' menuitem (where we will admit liability). Each menu will be assigned a shortcut key combination using the ALT key, and menuitems will have an accelerator key combination using the control key. The shortcut key will be represented by an underlined character for the menus, and text will show the accelerator key combination in the menuitems. All of the menuitems will display both text and icons. This may not sound fairly complicated but thanks to gtkdialog, using this example as a template, quite complex menu systems may be constructed with a minimum of programming knowledge. 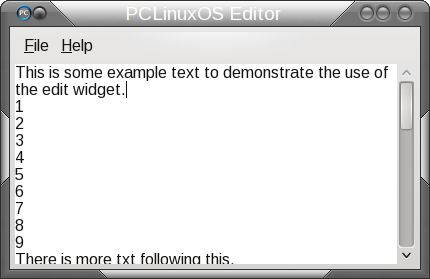 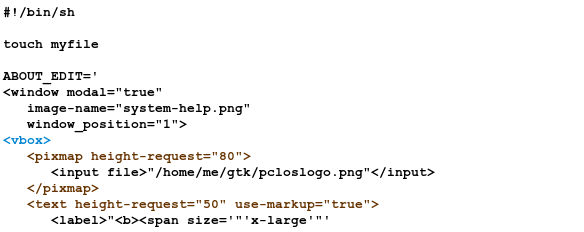 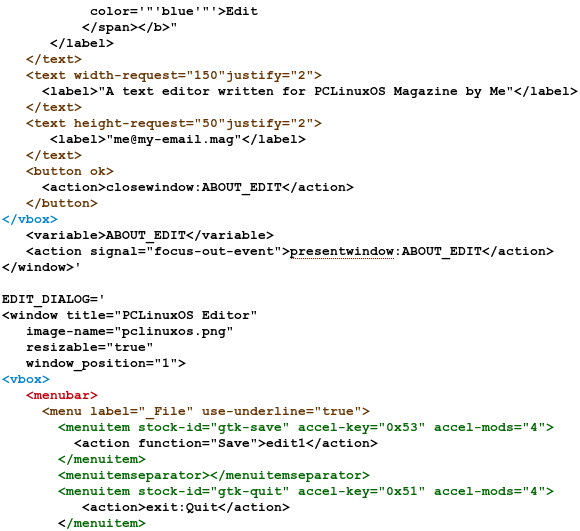 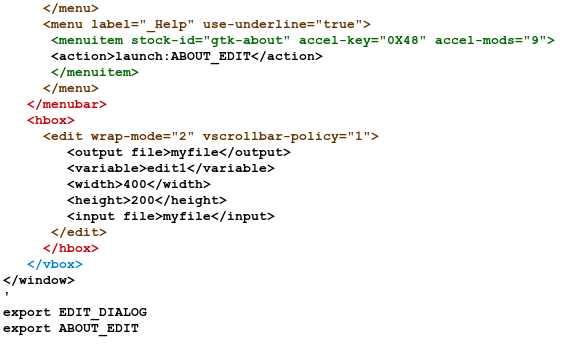  Now we have some new stuff here. We have two scripts describing the windows that we shall show. One is named EDIT_DIALOG, which is the main window, and the other one is named ABOUT_EDIT, which we shall only display when the Help - About menuitem is clicked. The main window is the editor we used previously, with the addition of a menubar and the 'save file changes' button removed, as it is longer required. The menu 'useunderline' tag sets up the shortcut key to use the character following the underscore in the 'label' tag. In the menuitem widgets, the accelerator key combination is set up using two tags: 'accel-key’ is given the hexadecimal ascii value of the upper-case character that we want to use, the 'accel-mods' is given a value constructed from 1 for The shift key, 4 for the control key and 8 for the alt key. These values may be added so the you would use 9 (1 + 8) for shift + alt. This automatically provides the correct text hint in the menuitem. The Save menuitem applies the save function to the edit widget named 'edit1.' The Quit menuitem simply exits the application, and the About menuitem launches the ABOUT_EDIT dialog window. 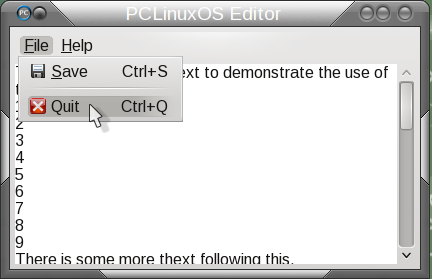 The ABOUT_EDIT window has the 'modal' tag set to true, which means that it must be closed before you can use the parent window. The signal 'focus-out-event' prevents the parent window getting focus. The rest of this window consists of a simple vbox containing various text and graphic elements with a single button dismiss the window.   Using the List and Progressbar widgets These two widgets are completely independent, but I use them together in the next example. The list widget takes a list of text items and displays them in a dialog box to allow the user to select one of them. You can specify how, or if, horizontal and vertical scroll bars appear and which item in the list should be highlighted on startup. In the example, I have chosen to show the first item (item 0) on startup, but have then selected a different file in the screenshot. In this example, I am going to get the list remotely from one of the PCLinuxOS repositories. The list will be of all of the currently downloadable Live CDs of this distribution. The code to do this is not, I'm afraid, beginner level stuff, but like all of the examples, you don't need to understand it to be able to use it. When the user has chosen one of the ISO files, the example script will download it showing the percentage complete in a progressbar widget. If the download gets interrupted for any reason, then it can be resumed from where the connection was broken without having to start again from the beginning. There is also a simple option to include the md5sum checksum files in the list so that they may also be downloaded. Here's the script. 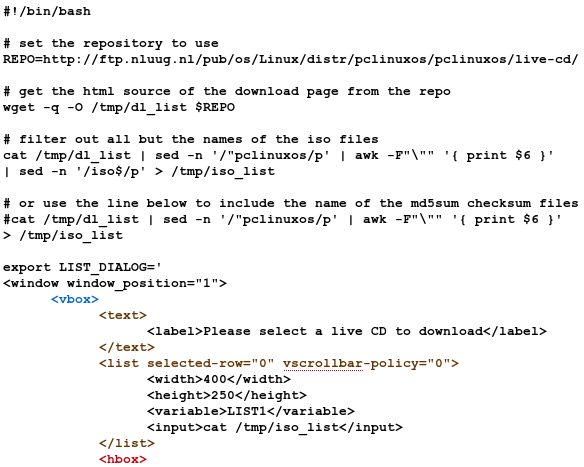 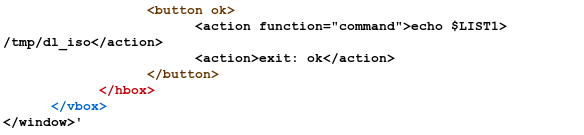  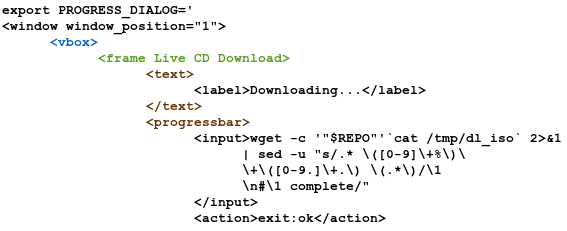 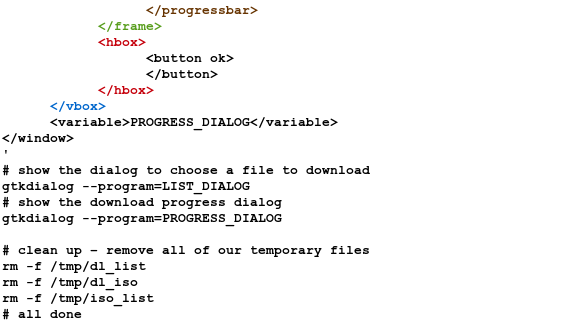  In the menu example, we used two dialog scripts, EDIT_DIALOG and ABOUT_EDIT. The EDIT_DIALOG code launched the ABOUT_EDIT dialog when required, and the two dialogs we both visible on screen as this seemed to be the most appropriate way to do things. In this example, once we have selected our file from the list, we have no further use for the LIST_DAILOG, so we exit it and jump to the code for the PROGRESS_DIALOG. This method has the advantages of making our code simpler, easier to read and re-usable in other applications. How it works: Apart from the first line, which tells the system to use the bash shell to interpret the following code, all lines starting with a hash symbol '#' are comments and are ignored. Unfortunately, comments are not allowed in the Gtkdialog code without some trickery, which would confuse things at this stage. First we assign the URL (web address in this case) of the repository that we want to use to the variable REPO. This helps to make the code a little less cluttered. Next, we use the wget command to download the html source code of the Live CD repository. This contains the filenames of all of the files available for download. The wget command is extremely useful in cases like this, with lots of options to enable you to customise the way it works. Here we use the -q option to tell it to work quietly, and output only the downloaded file without any confusing messages. The -o option tells wget to output the downloaded file to the temporary file /tmp/dl_list. Finally, we tell wget to use the contents of the variable REPO as the place from where to download our file. We now need to strip away a lot of the html code and leave only the parts that we want. The first line that starts with the cat command will leave only the filenames that end in '.iso.' The other line two lines down, which is commented out here, will include the md5sum files in the list. Add and remove the hash marks as required. The refined list is then saved to the temporary file /tmp/iso_list. If you understand how it works -- great. If not, just use it anyways. The LIST_DIALOG code uses the usual assembly of widgets we have become used to, but includes the new list widget. The list of items to display is read from the code in the <input> tag pair, which here is the command 'cat /tmp/iso_list,' which simply sends the contents of the file to the list widget. The list widget has been given the name LIST1, and so the variable LIST1 will contain the currently selected list item. Clicking the OK button saves the contents of the LIST1 variable to the temporary file /tmp/dl_iso, and then closes the LIST_DIALOG. The script next calls the gtkdialog application with the PROGRESS_DIALOG as its' script to run. Again, we have a simple dialog assembled from the usual widgets, with just the progressbar widget new to us. The progressbar widget needs input that continually changes from 0 to 100. For this input we again use the wget command. Now we use the rather clever -c option that tells wget to continue from wherever it was in downloading the file if this is another attempt to get a file that did not finish downloading. This is a very useful option when downloading large ISO files. We reuse our REPO variable as the source of the download, and the /tmp/dl_iso file as the name of the file to download. The rest of the code in this line serves to strip away all but the current percentage downloaded so that the progressbar slider position can be updated and the present situation displayed. When the file has finished downloading we remove the three temporary files that we created. If you decide to download the checksum file to accompany the large .iso file, and you really should, then this is how you use it. Both files must be in the current directory.  $ md5sum -c pclinuxos64-lxde-2014.04.md5sum pclinuxos64-lxde--2014.04.iso: OK If you get OK then the .iso file is safe to use, anything else and then something went wrong with the download.  $ md5sum -c pclinuxos64-lxde-2014.04.md5sum pclinuxos64-lxde-2014.04.iso: FAILED md5sum: WARNING: 1 computed checksum did NOT match These little example programs are far from perfect. They were never meant to be perfect, but they do work. This is what gtkdialog widgets are for. They provide a way of building graphical applications quickly and with minimal programming knowledge. I wrote and tested the download application in under two hours, but I could spend another two days refining it. The application can be useful, but since I will probably only use it two or three times a year, it suffices. The Gtkdialog widgets provide a means of constructing little utilities to perform the tasks that might otherwise require a much larger application that probably would not work in exactly the way that you would like. If you do persevere and build an application that is useful, does all of the necessary error checking and includes internationalisation for users of other languages (actually quite simple to do under Linux) then consider sharing it. There are several such items already available in the repositories. |