| Previous
Page |
PCLinuxOS
Magazine |
PCLinuxOS |
Article List |
Disclaimer |
Next Page |
Create Your Own Personal PCLinuxOS TShirt |
|
by Michael Duffy (tuxlink)
I have used PCLinuxOS on and off for quite a few years, but now consider it my home. With that in mind, I recently discovered old t-shirt transfer sheets on my desk that I thought would make a great new t-shirt statement about my favorite Linux OS. One of the things I have noticed at PCLinuxOS is the huge wealth of graphic art talent. The logos, the wallpapers, the themes, etc. It's not just the fact there's a lot of it, but it's the high quality that catches my eye and makes me wish I had even a small amount of that very special talent. Before we go any further, let me thank each and every user who has ever created and uploaded any graphic art for the rest of us lucky PCLinuxOS users to enjoy and use. You artists are the driving force behind the cutting edge look and the professional impression that faces the outside world and are to be commended for your great work. Well done.  So with that in mind I started to look for and gather logos and banners, for use in printing onto the t-shirt transfer sheets. I started with a basic light colored gray t-shirt, that cost around $6.99 at a local clothing store. So, I bought three of them in case I made a mess of it. From experience of using this type of transfer material, it's best to use brighter colored shirts. White is perfect, but light grays work too. Because the transfer material is transparent and you'll be printing colored ink onto it, dark backgrounds don't allow some of the darker ink to show very well. So avoid black and dark colored shirts. The first thing I recommended is to wash and dry the shirts first before attempting to iron anything onto them. Doing this gives a greater chance of making your transfers last as long as possible. 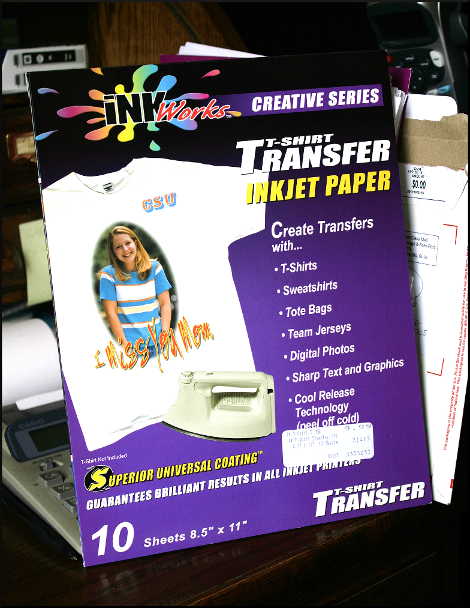 The t-shirt transfer packet that I had purchased cost $9.99 and can range up as high as $20.00. They are available at most art supply and office stores. Mine had a set of directions in it that advised and instructed you through the various steps of creating your first t-shirt transfer. This packet contained ten sheets. Before we look at that, let me first get some art samples that we want to print onto our shirt. One of the first samples I downloaded was the widely accepted logo of the Linux operating system, Tux the Penguin. This instantly recognizable piece of art was created by Larry Ewing. It is available everywhere on the Internet, but if you have trouble finding it, I have included a link to all the art files used here in the article. You can, of course, mix and match various pieces of art on the same shirt, i.e., large Tux on the back and a PCLinuxOS logo on the front. The possibilities are endless and only limited to your own imagination. Because I live in California and it's mostly very warm, I prefer not to place too much plastic based artwork on either my back or chest. But if you live somewhere cooler, you won't have that problem.  What we are going to create is a two-stage process. Gather and prepare the artwork, then iron the sample onto the shirt. Firstly, any piece of art that has to be ironed onto a t-shirt has to be reversed. When you have decided which piece of art you want to use, open the file in your favorite photo editor, or graphics program. I used Gimp. When you have your art on the screen in front of you, choose the option to flip it horizontally. If your artwork has text in it, it will instantly read backwards, i.e., TUX will be XUT. This is an important step as the side that you print on in your printer is the same surface that will end up on your shirt! Missing this step will have the immediate effect of bringing forth rather 'colorful' language as soon as you discover it. Trust me, I merrily skipped right on down that road and still have the useless piece of art to prove it! Note to self: Flip the artwork!! 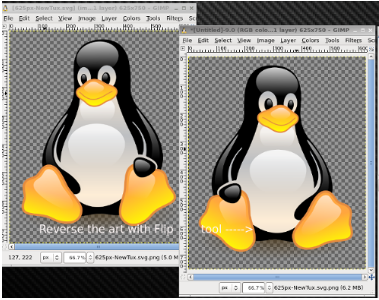 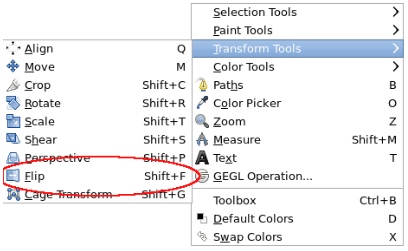 Just before you hit print, let me add a few helpful tips here. I have discovered that using .svg files tend to size well and print out just as they look on my monitor. You can of course use any graphics file format you want, JPG, PNG, etc. If you use too small a file and try to resize it larger, it will obviously look pixelated, and therefore, the output quality will not be as good. If you use the .svg format, you can size your art to be large on the printed page, or just small enough to fit maybe on the pocket of a t-shirt. Either way, avoid small file sizes. The bigger the file, the more information contained therein, therefore the better the quality. I used both .svg and .png files for this article. Lastly, this is just a personal tip that I have discovered from using my own hardware. I have an Epson Workforce 600 printer. I noticed when I print out my transfers using the default settings, they end up looking a little flat or faded. So, to add a little punch to them, I added some color 'saturation' to the art in my editor. I also chose to print using the 'best' or 'photo' quality setting on my printer and it has made a huge difference to my printouts. I'm guessing a little experimenting here with your own hardware will render the 'best' setting for you. So now, we're ready with our printed out artwork ready for transferring to the shirt. The next step is to decide how much of the transfer needs to be removed. You can of course create a rectangular or square, or even a round piece of art for the shirt, but I wanted only the bare shape of the logo to be transferred. So I chose to cut away with a scissors the excess transfer material. Simply cut slowly and accurately around the edge of what you only need to show. We can now move on to the second part of our process. Right now, you can follow the instructions that came with your set of transfer sheets, or you can use my general set of guidelines here. With your t-shirts cleaned and dried, your table cleared off and something laid across it to protect the surface from the iron , spread out the shirt on the table. (For the table protection, I used a sheet of thin cardboard the same size as the table with no seams or bumps in it. It must be smooth for the ironing process.) Set the iron to its hottest setting. (Do not put water into it, if it is a steam iron!) Place a piece of cardboard inside the shirt separating the front of the shirt from the back. Now iron the the front of the shirt until it is nice and smooth. This gets any wrinkles out and prepares the area for the transfer. Put down the iron, and with both hands place the transfer exactly where you want it to end up. This is where a second set of eyes will assure you have the transfer level and straight, so ask an assistant to verify. I only mention this because I have in the past, ironed on logos that looked like they were rolling off the horizon to the left or right! I promise you I was sober when attempting this! 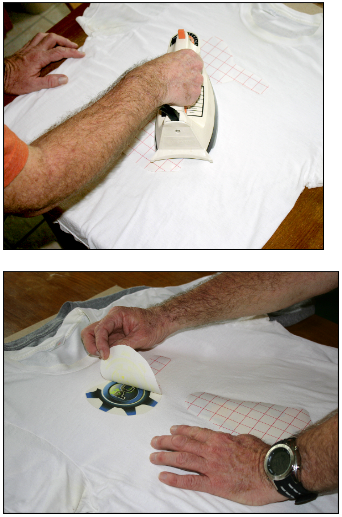 So, with the transfer placed art side down, paper side up, where you want it, place the hot iron straight down into the center and work your way outward with a constant downward pressure. It is very important that you keep the iron moving, and it is very important that you share the same amount of heat and pressure to the whole logo. Let's keep in mind the iron is at its hottest setting, so you most likely only need at most 50-60 seconds of application. Keep an eye on the surrounding fabric that it does not burn or start to yellow. This will mean that you have exceeded the amount of time it takes to safely transfer the art to the shirt fabric. In my experience, I have never exceeded 60 seconds, even for a large transfer. When your application time is up and you're confident that you have a good adhesion, set the iron down somewhere safe away from the shirt. This is the next important step. Allow the transfer time to cool. When I am making more than one shirt, I will carefully pick up the shirt and lay it down on another flat surface allowing me to work on the next shirt. Be careful here too, not to touch the transfer. It will still be very hot from the application effort. There is no minimum drying or cooling time. Let it cool off as long as you can. I have left shirts cool off for a long as an hour or so to aid in the next step. When you are confident that the transfer is now cool to the touch, place it back onto a flat surface. You now need to remove the backing paper covering the art. This is done by carefully peeling from one corner slowly and progressively until you remove it all. I find it best to try to start at a sharp corner with a fingernail. If you do not have fingernails (you know who you are!) and you have stubby fat fingers like me, gently use a flat tweezers to get a grip and work slowly. Make sure you only have a grip on the paper and not the shirt fabric. This should now reveal your new artwork on the shirt ready be worn with pride. One last tip I will add here is when you wash and dry the shirts for their first few washes, turn them inside out so the transfer gets a little bit of protection during the washing process. Enjoy your new PCLinuxOS t-shirt and I look forward to seeing lots of new photos of successful attempts at this fun project. 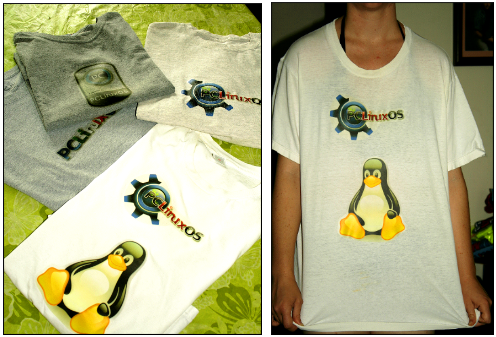 Here are links to all the artwork files used. http://myphotos.mypclinuxos.com/images/tuxlink/newtux.png http://myphotos.mypclinuxos.com/images/tuxlink/56410capsulapclinuxos.png http://myphotos.mypclinuxos.com/images/tuxlink/2ilkhfa.png "NewTux" by Larry Ewing. Licensed under Attribution via Wikimedia Commons - https://commons.wikimedia.org/wiki/File:NewTux.svg#/media/File:NewTux.svg |