| Previous
Page |
PCLinuxOS
Magazine |
PCLinuxOS |
Article List |
Disclaimer |
Next Page |
Casual Python, Part 2 |
|
by Peter Kelly (critter) A real application Now that we have our template working, we can start to make things that are actually useful. The first application is extremely simple to create from our template, and requires very little understanding of the python language, which is where we are right now. Sometimes, when you know what you want to say but can't think of the correct word to express it, then a thesaurus is the place to turn. A thesaurus will list similar words, similarly spelled words, words with similar meaning. In fact, any word that could be suggested by the word you pass to the thesaurus. In the repositories, you will find an application called 'aiksaurus,' which is a command line thesaurus program. This is a good candidate for us to build a graphical front end from our template. Install this and the aiksaurus-data dependency. The first version will look like the image shown, but in the final version we will do a few tweaks to the appearance, and add some additional code to enhance the applications behaviour. 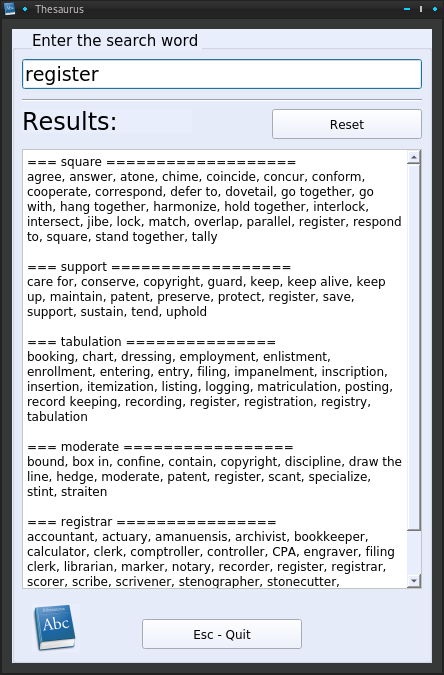 The design Create a new directory called thesaurus, and copy into it the following files renaming them as shown:
qt5_template.py ==> thesaurus.py Also, place a suitable icon in there (look in /usr/share/icons for the icons installed on your system). Edit update_res.sh, replacing both of the words 'template' with 'thesaurus' like this.
#!/usr/bin/env bash Start up Qt designer and open thesaurus.ui. Right click on the background, and select layout -- break layout. Drag the form to make it larger, something like the example image above. We will fix the size later. In fact we will manually set the size and position of everything in the object inspector Add a groupbox, a lineedit, 2 labels and a horizontal line. Move them around to look approximately like the image on the right and right click on the groupbox then select 'send to back'. 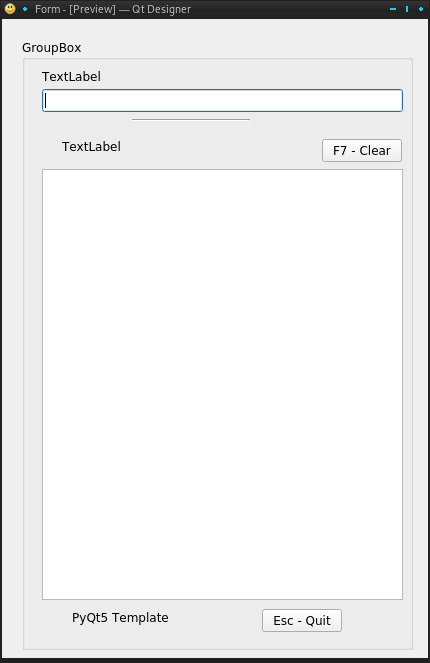 The Object inspector window should look like this image.  Now, in the property editor, for each of the 10 items that comprise the form locate and set the following properties: 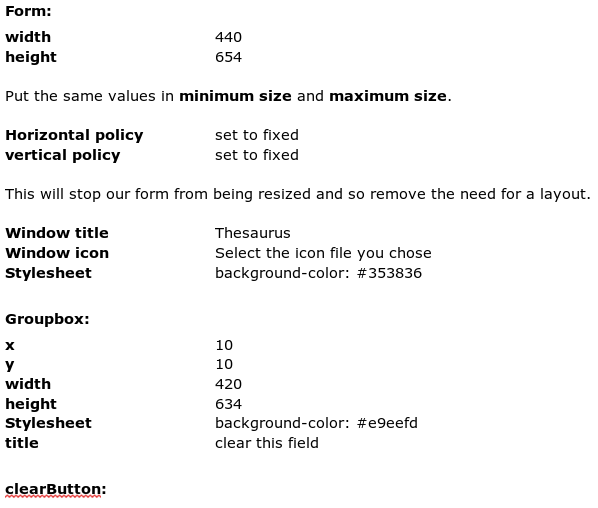 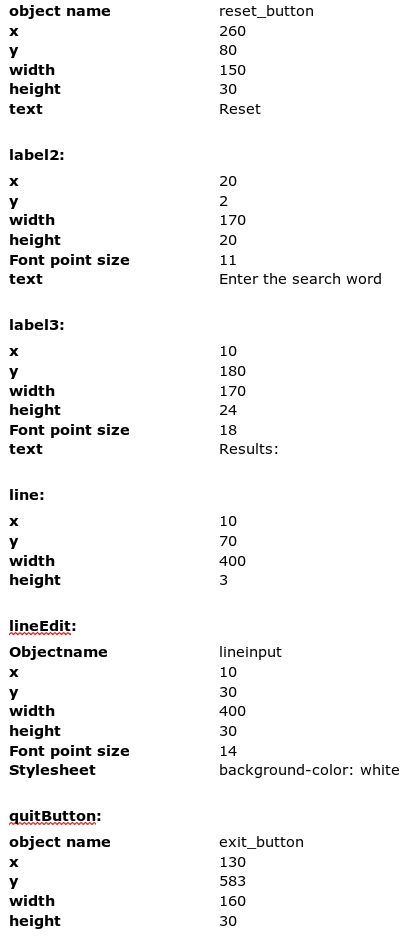 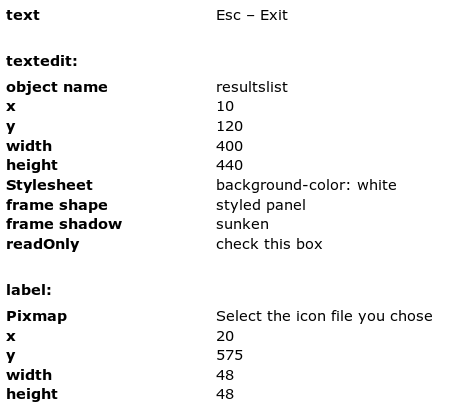 The form should now resemble the first image. This will get a lot easier as you become familiar with the designer. Most of the values are just my suggestions, so alter them as you think fit, but do make sure the the object names of the lineedit, textedit and the two buttons are spelled correctly. This is how we will refer to them in the final python code. Save the form, and then use the update_res.sh script to generate the new python file. Creating the executable application Aiksaurus is a command line utility that works by typing the the word aiksaurus, followed by the word you want to reference. In the example, I used the word 'register,' so: aiksaurus register Simple. But we want to do this in a graphical window. Here is the new code -- no line numbers this time and the changes have been highlighted: 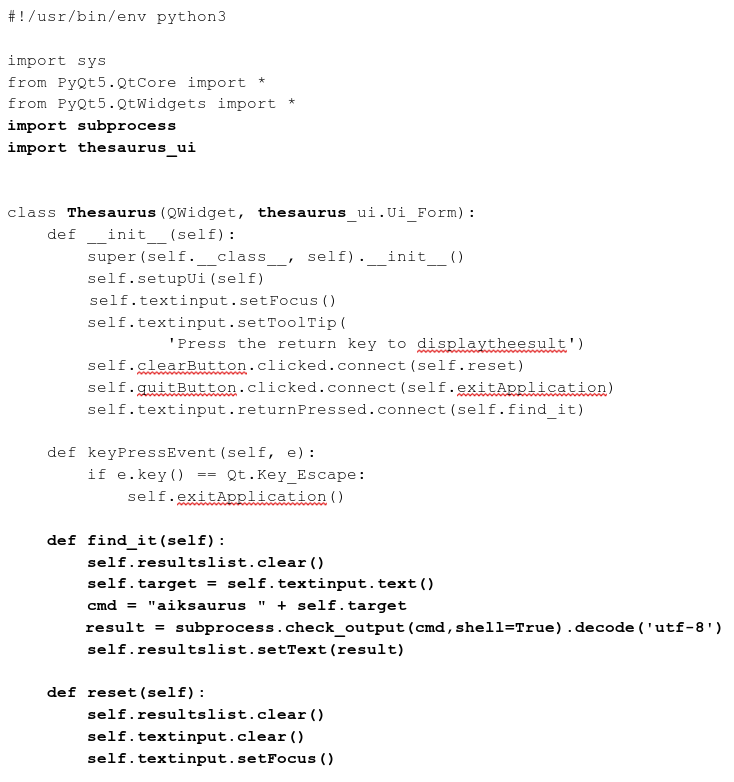 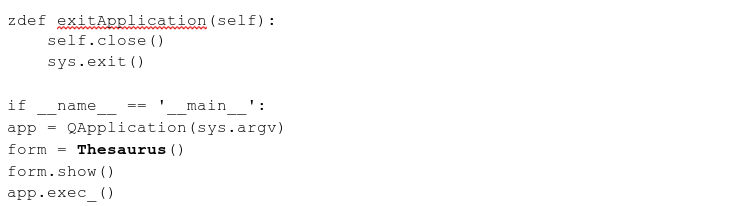 As you can see, very little has changed, and yet this is a completely different application. I have added another import statement. This one brings in the subprocess module from the standard library. The subprocess module is a part of python that gives us the code we need to execute processes on the system, just as you would if you were in a command line terminal. All of the references to 'template' have been changed to 'thesaurus' ( or 'Thesaurus'). The textedit widget has been renamed to resultslist. The lineedit widget we added now gets the focus instead of the textedit, and I have renamed this lineedit to 'textinput' to make its purpose more obvious. I have added a tooltip to textinput to advise the user of usage. This widget is also made sensitive to the return or enter key being pressed so that the application connects to a new method named find_it. The clearButton now connects to a method named reset which clears everything and gives the focus back to the textinput. The find_it method is new. It clears the textedit widget named resultslist of any previous results. Names the text in the textinputbox 'target' (we'll get to this 'self ' thing later), and then makes a terminal type of command, as required by aiksaurus, by adding the word aiksaurus plus a space and our 'target'. This next line is the one that does the work. It checks the output from executing the constructed command in a new process, just as bash would, and stores it in a variable named result. 'shell=True' is required by subprocess when passing an argument(s) to a command and the decode bit on the end is always required. Utf-8 encoding is a big subject, but one that you should, eventually, be aware of. If you are curious, then the best explanation I have found is at http://kunststube.net/encoding/ Finally, in this method, the text in result is placed into the resultslist textbox. And that's it. Done. Hover the mouse pointer over the input box of the running application to display the tooltip. The appearance At the moment, the applications appearance is a little flat. Also I like all of my own applications to have a similar look and feel. Things can be improved considerably by the use of style sheets, similar in use to those applied to web sites. With style sheets (we have already used them in the property editor to apply colors to some of the widgets) we can add radii to button corners, add borders, apply gradients -- horizontal, vertical, radial and conical and a whole bunch of other effects. In the property editor of designer add or change the following stylesheet entries:
textinput and results list This simply applies a mid gray border
groupbox Applies a vertical gradient
All three labels Without this, we would see the outline of the label widget. Try removing it and notice the difference. 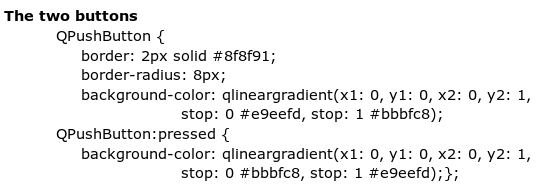 For the buttons, I have added a border and a corner radius. I have also added two gradients, one for the button in its normal state, and one when the button is pressed. The button pressed gradient is the reverse of the buttons normal gradient. That is, it changes from 'top-to-bottom' to 'bottom-to-top,' giving the illusion of movement. More information on customizing the style of qt widgets can be found at: http://doc.qt.io/archives/qt-4.8/stylesheet-examples.html When you have the appearance that you like, add the style sheets to the template to maintain a consistent look and feel to all of your home grown applications. Below is the thesaurus, in both light and dark themes. 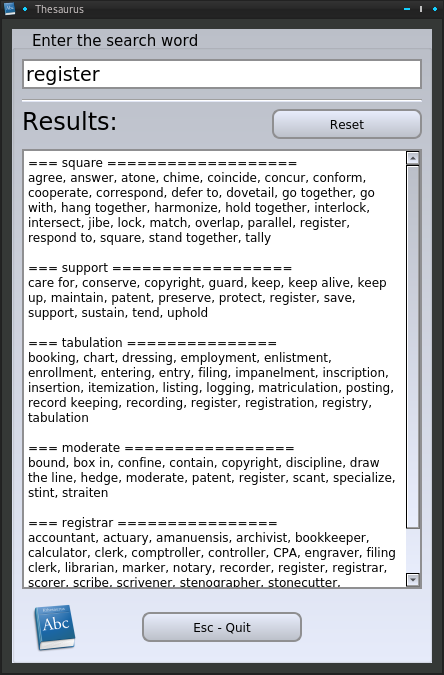 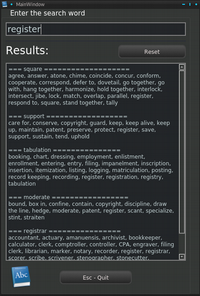 If there is a particular widget style that you prefer in your desktop environment such as Gtk+, Plastique or Cleanlooks you can force any widgets styles that you don't override to follow that style by including a line like this; QApplication.setStyle(QStyleFactory.create('Cleanlooks')) in the __init__ method at the top of your code between the super(... ) statement and the self.setupUi(self) statements. And there's more... Now you may think that we just created a graphical thesaurus. Well, we did, but we also created a generic command execution utility in python and Qt5. This can be easily converted to execute almost any simple command line utility. As an example, suppose that you had been hired to ghost write some documents for a famous celebrity, and that you frequently need to access these. You can now make a simple application that will list them for you in a nice, professional looking, graphical window. Using the top down method I have mentioned goes like this: Select one of your master works To do this you need a list of the documents List all available documentsThat is actually enough to give us some direction to start coding the changes to our application. We need a command that will bring us the list. All of the documents are in your Documents directory in a sub-directory named 'wills_plays,' and they are all in LibreOffice writer format. We also need them listing one per line. The command that does this is ls -1 /home/seth/Documents/wills_plays # That's a number one -1 Instead of using the template application, we can re-use the thesaurus app which saves us even more work. Make a new directory named 'docz'. Copy over thesaurus.py, thesaurus.ui and update_res.sh. Rename the thesaurus files to docz.py and docz.ui and in update_res.sh change 'thesaurus' to 'docz' in two places. Add an icon to the directory. Can you see a pattern here in what we are doing? This is part of the 'development cycle'. Also in our development cycle we regularly edit the user interface in designer, save the changes, run update_res.sh to incorporate those changes, edit the python code, and re-launch the application. This second part we must do each time we make some changes. In designer, remove the redundant reset button, line input box and 'Results:' label. Resize the results list box to use the freed up space and change the icons. Change the text in the other label from 'Enter the search word' to 'Select a document'. Save the changes and run update_res.sh. Change docz.py as below. I have highlighted the textual changes and removed some redundant lines, but overall, the changes required are trivial and will explained as soon as we have learned a little more of the python language. 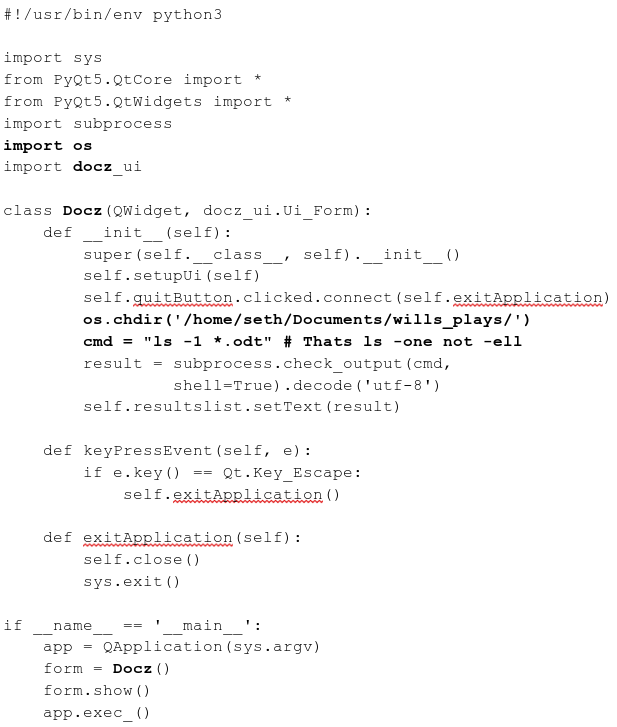 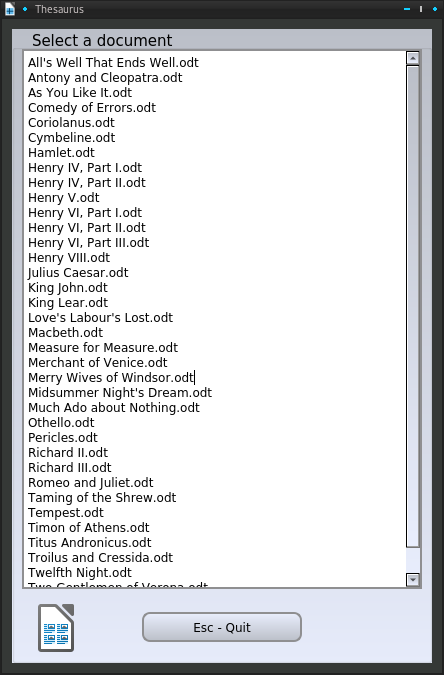 Oops! The bar at the top still says 'Thesaurus'. In designers property editor change form -- window title to Docz, save it, run update_res.sh and re-launch the application to correct it. Again this application is of no real use but does demonstrate the usefulness of code reuse. This only displays a list, but we could have made the items sensitive to a mouse click to open the document in writer and then close the docz application. This is an idea that I will expand in the next section, but first we will need to know just a little more of the python language. That's next up. |