| Previous
Page |
PCLinuxOS
Magazine |
PCLinuxOS |
Article List |
Disclaimer |
Next Page |
Network Manager: The Low-Down On Getting Up To Speed |
|
by Paul Arnote (parnote) Goodbye, net_applet. Hello, Network Manager. After using a combination of PCC (PCLinuxOS Control Center) and net_applet to manage internet connections under PCLinuxOS for YEARS (pretty much since its inception), PCLinuxOS made the switch to Network Manager in early June 2021. Network Manager also replaces the lesser used (but very capable) wicd program. Network Manager has become the default network management tool in most Linux distributions in recent years. It debuted in November 2004, first introduced by Red Hat, so it's definitely not a youngster. As a result, there is a LOT of information out there about Network Manager (henceforth referred to as NM). In fact, there's so much information available, it may become a daunting challenge to find the information you seek. Indeed, users could experience "information overload" when searching out information on NM, which could make it difficult to discern what information is needed for a particular issue. While I'll give you a list of some resources to explore as you get accustomed to NM (at the end of the article), let's spend more time explaining the best way to get your network up and running after this huge change to the PCLinuxOS landscape. Trust me. My first time through this on one of my computers was not a joyous affair. It took me about three hours to figure things out. I should have written things down from the forum before I started, but I didn't. So, I repeated the process on my "travel" laptop, leveraging what I learned in the first attempt, and after going back to the forum to figure out where I erred in my first attempt. What follows is the benefit of my trials and tribulations, coupled with information gleaned from the various threads about NM in the PCLinuxOS forum. Step One: Start With A Clean Slate Go ahead and run updates on your computer. NM will only be installed from the PCLinuxOS repository when you specifically select to install it. When you do decide to install it, you will also want to install networkmanager-applet (named nm-applet). For whatever reason, the networkmanager-applet is not installed automatically, and you will need to mark it for installation. The networkmanager-applet is for any desktop, and allows users easy control of their network connections. KDE users will also want to install plasma-nm-applet, plasma-nm-applet-openvpn, and its other associated plugins, which is specifically for KDE and LXQt users to control their NM connection. I've been told by tbschommer that the plasma NM applets will work on GTK desktops, such as Xfce. Since I run a GTK desktop, I prefer to run the GTK plugins. Once you install NM (and it's applets), your current net_applet and/or wicd tools WILL stop working. You will lose your internet connection, but DON'T FREAK OUT. Now would also be a good time to install any NM plugins that you think you might need from the PCLinuxOS repository. If you connect via a VPN, you will definitely want to install the NM plugin for OpenVPN. If you're in doubt, just go ahead and install all three of the NM plugins that are listed in Synaptic. That way, they are available for any future use. By all means, RESIST the urge to uninstall drakx-net. Even though it's "load" has been significantly lifted by NM, it IS still necessary for the proper functioning of your system. After installing NM, go back into Synaptic and uninstall net_applet and/or wicd. You won't need them any longer. If you have net_applet or wicd set to autostart on your computer, remove it from the programs you've queued up to automatically start when you login to your computer. So, up until now, PCC and net_applet (or wicd) have been doing an admirable job of managing your network connections. But now, with NM being the "new kid on the block," that all changes. As counterintuitive as it might seem, you will need to clear out all of the saved networks that were previously managed by PCC and net_applet (or wicd). But, DON'T do this before you've run updates and installed all of the Network Manager programs! 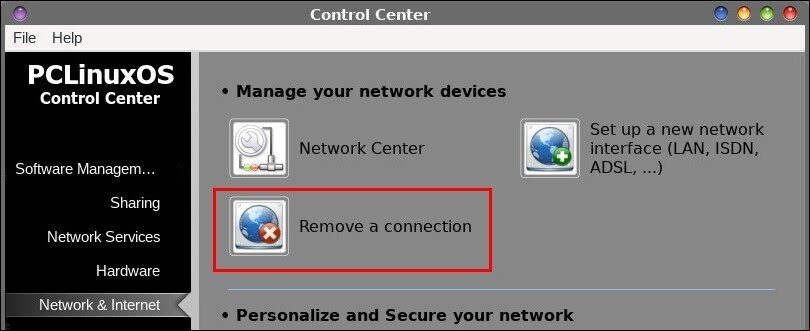 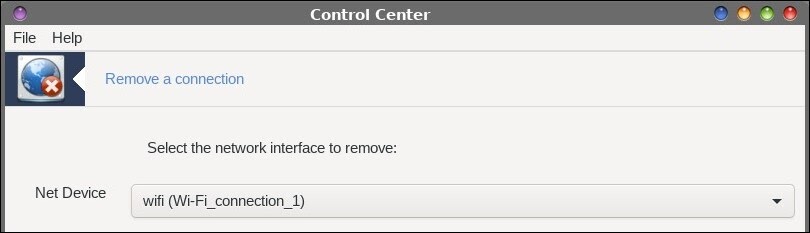 We need to get rid of all of the existing network connection information, and let NM start afresh. One way to get rid of existing network connections is to go into PCC > Network & Internet > Remove a connection. Use the dropdown box listing all of your saved connections, and delete them, one by one. However, there have been reports in the PCLinuxOS forum of that being a hit-or-miss endeavor. The other, more certain way, is what Texstar calls the "nuclear option." Open a terminal session, and su to the root user. Then, enter the three following commands:
rm -f /etc/sysconfig/network-scripts/ifcfg-eth0 PLEASE ... remember that you are executing these commands as the root user, so exercise care and precision when performing these actions. The "nuclear option" really is the express lane to getting NM properly set up. If you don't want to enter these commands yourself manually (or aren't comfortable working at a root prompt in a terminal session), don't despair. Texstar has created a new package, called "netnuke" that performs these actions for you. Here's the description from Synaptic: A command line program to nuke your network connections. Run netnuke as root in a terminal then reboot and set up your network connection through the networkmanager applet. Also, once you've got NM, the applet, and any/all the plugins installed, add nm-applet to automatically start when you boot your computer. This way, you won't have to manually start it. Just. In. Case. If you end up with it in there unnecessarily, or find it in your list of startup applications multiple times, you can always delete it/one of them later on. Then, reboot. When your computer has rebooted, use NM to set up your network connections, which is what we'll discuss next. Step Two: Set Up Your Network Connections Using NM Believe it or not, now comes the easy part. 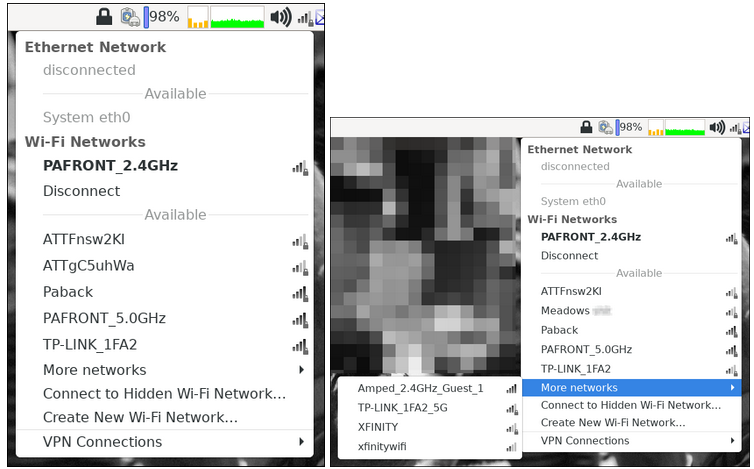 Left-click your mouse pointer on the NM applet icon in your system tray. You may need to wait for a few seconds, but NM will locate and list all of the networks it finds. Select the network you want to connect to. The network you are currently connected to is shown in bold type, as displayed in the above images of the NM left-click menu (if you've already connected to a network). NM will list the five networks with the highest signal strength, or so it seems (left image). All of the others are listed under the "More networks" menu entry (right image). Networks marked with a signal strength indicator and a small padlock require a password to be able to connect to them. 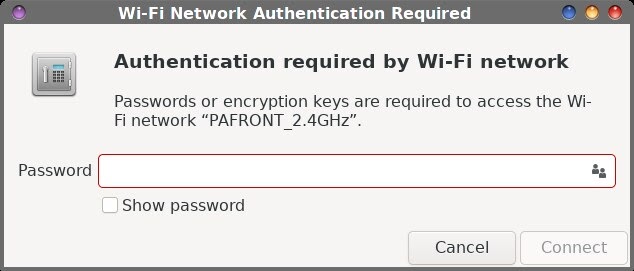 If the network you select is password protected (and many are), you will see the dialog box above. Enter the password for the network in the "Password" text entry box. If you want to see the password (to ensure that you've typed it in correctly), check the "Show password" checkbox. Then, click the "Connect" button at the bottom right of the dialog box. Don't worry. NM will automatically remember all the connection details for the networks you've connected to, including the passwords. That way, the network is readily available for you to connect to again, in the future. 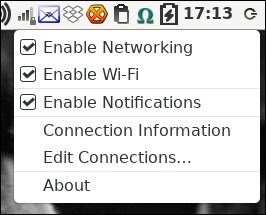 If you right-click your mouse pointer over the NM icon in the system tray, you get some additional choices. The first three items, represented by checkboxes in the menu, should be self explanatory, so we'll skip over these, as they require no explanation. The same applies to the last item in the right-click menu. 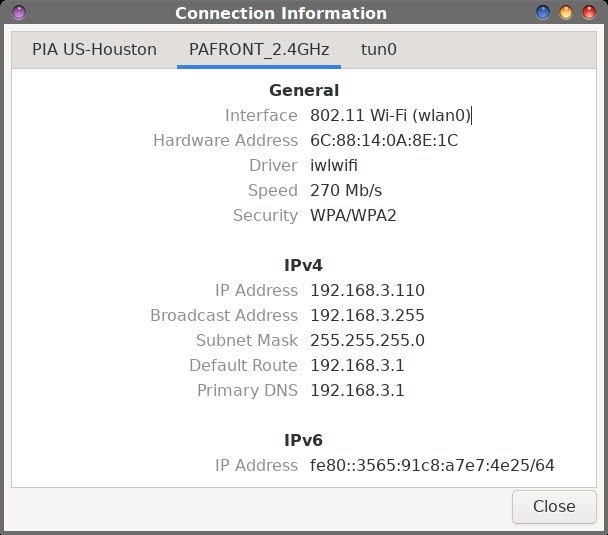 Selecting the fourth item, "Connection information," will give you a dialog similar to the image above. That dialog box will provide all sorts of information about your connection. Tweaking Your Connection 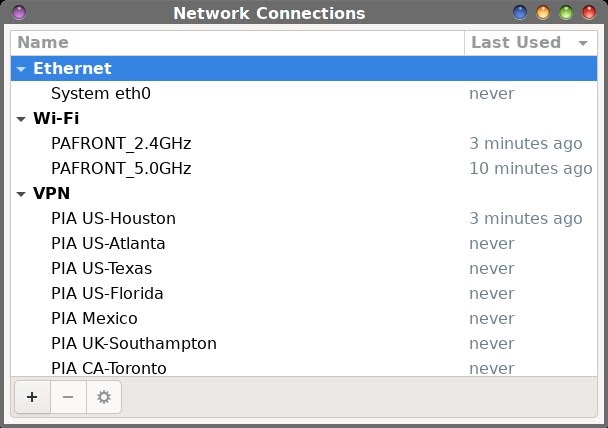 Selecting the "Edit Connections..." menu item from the right-click menu brings up a dialog box similar to that pictured above. Selecting the category of connection and then the "+" button at the lower left of the dialog box will allow you to set up a new connection. Similarly, double clicking an existing connection (or single clicking it, then hitting the "*" button at the bottom left of the window) will allow you to edit the information for that connection. 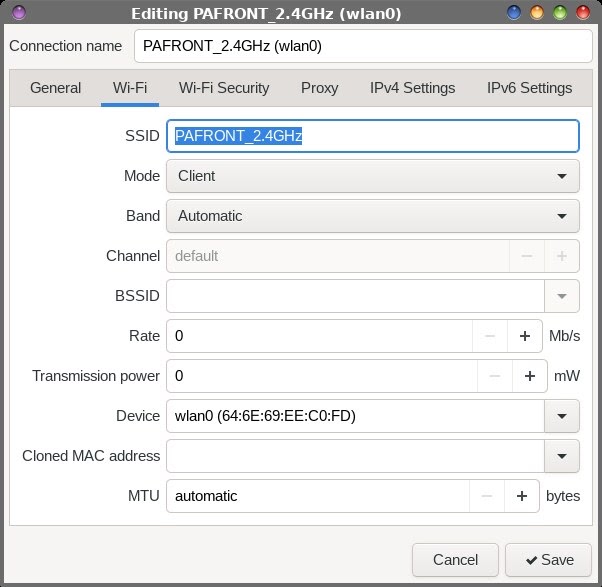 When you select to edit an already established connection, this is the dialog box and view you initially see. It always opens to the second tab, at least in the case of a wifi connection. The top text entry box allows you to name the connection whatever you want to call it. It defaults to the SSID of the network you are connecting to. Generally, you will be just fine accepting the defaults under this tab. 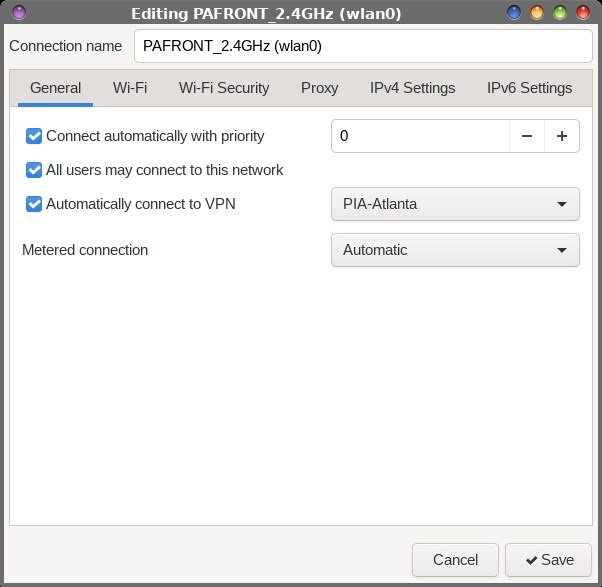 Under the "General" tab, you can adjust the priority of automatically connecting to the specific network. Higher numbers give higher priority. Place a checkmark in the box if you want the network to be available to all users. If you use a VPN, you might want to check the box to automatically connect to the selected VPN (via the dropdown selection box) when the connection is established.  "Wi-Fi Security," the third tab, is exactly what you think it is. It's where you can change/set the encryption type and password for the selected wifi network. Place a checkmark in the checkbox if you want to view the entered password. 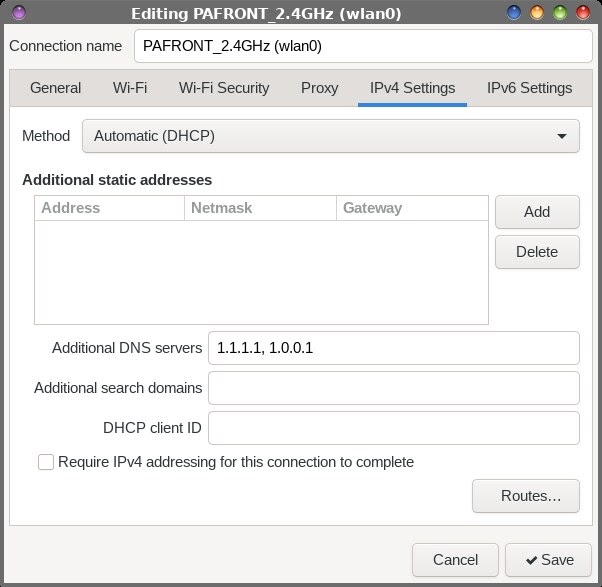 If you typically use a different DNS service than the one provided by your ISP, such as Google or Cloudflare, the "IPv4 Settings" tab is where you will specify the address(es) for your DNS service. I use Cloudflare to help prevent a DNS leak (you can test for a DNS leak at https://dnsleaktest.com/), which can expose more information about your travels around the web than you might like, as well as expose you to malware and malicious sites. Enter the primary and secondary DNS addresses, separated by a comma and space, as I have them entered above. Other popular DNS services include OpenDNS (208.67.222.222 (primary) and 208.67.220.220 (secondary)), and Google (8.8.8.8 (primary) and 8.8.4.4 (secondary)). Troubleshooting Some users have expressed some "issues" with NM not connecting on a reboot. For whatever reason (that yodelu is working on in the NM package), NM reports that it is not running and is locked. At a root terminal prompt (signified by a # prompt, as opposed to the $ prompt as a normal user), enter service networkmanager status. The response comes back networkmanager dead but subsys locked.
However, while still at a root prompt, enter service networkmanager restart. You should see the following in the terminal window:
# service networkmanager restart Once you "manually" restart NM, your connection should come up fairly quickly. One user in the PCLinuxOS forum, fred84, found a workaround. From a root prompt in a terminal session, enter chkconfig networkmanager off. Then, edit (again, as root, and in a plain text editor) /etc/rc.local and add service networkmanager start to the end of the file, on a line of its own. If you find that the nm-applet is not automatically starting on a reboot (you're missing the icon in your system tray), go check the programs you have set to automatically start when you boot your computer. I run Xfce, and that list of programs is under "Settings Manager," then "Session and Startup," and then the "Application Autostart" tab. If you don't see nm-applet listed, you might want to add it to the list of programs to automatically start when you boot/reboot your computer. Nearly all of the Linux desktops have similar features that allow users to specify programs to automatically start when their computer starts or reboots. The list of programs to start automatically just may be in different locations. But, they are there, from what I've found. The other thing you might want to do is just be patient. On my "main" laptop, I have some kind of a weird timing issue where the wireless network isn't brought up right away. It was this way under net_applet, and the same behavior exists with NM. If I just walk away for a few minutes, the network will usually be up and working as it should when I come back to the computer several minutes later. Fortunately for me, I don't have to deal with this issue very often, since my "main" laptop stays on 24/7, and I only reboot when I run updates or when the system begins to "feel" sluggish. Setting Up Your VPN I hate to admit it, but setting up a VPN under net_applet and PCC's Network & Internet never made any sense to me. I did manage to sort of get it setup once, with tbschommer's assistance. But even then, the VPN connection didn't work all that reliably for me. Probably the only ones that whole mess made sense to was the person/team who originally wrote it. I could never figure out what went where. I like to use a VPN with my internet connection. My ISP (Comcast/Xfinity) has no business knowing my business. VPNs encrypt the data between my computer and my VPN's server. All my ISP can see is traffic, but because it's encrypted, they can't tell what it is I'm doing. For example, Comcast is notorious for sending out DMCA notices for anyone downloading torrents, whether that data is free or copyrighted. One recent thread in the PCLinuxOS forum illustrated this blanket policy with Comcast when it was pointed out that someone downloading an ISO of Ubuntu received a DMCA "Cease & Desist" order for downloading the ISO via a torrent file. Never mind that the Ubuntu ISO is FOSS, and freely available to all and anyone who wants it. I use Private Internet Access (PIA) as my VPN provider. I'd rather avoid such nonsense. It's not that I'm doing anything "illegal." Rather, I prefer the privacy and "lack of hassle" that a VPN provides. Well, NM makes setting up your various VPN servers child's play, a literal walk in the park. Kudos to tbschommer for steering me in the right direction, via a private message on the forum. I was a little "gun shy" of trying to tackle setting up an OpenVPN connection to my VPN provider, after having tried many, many times in PCC ... and failing nearly every single time. 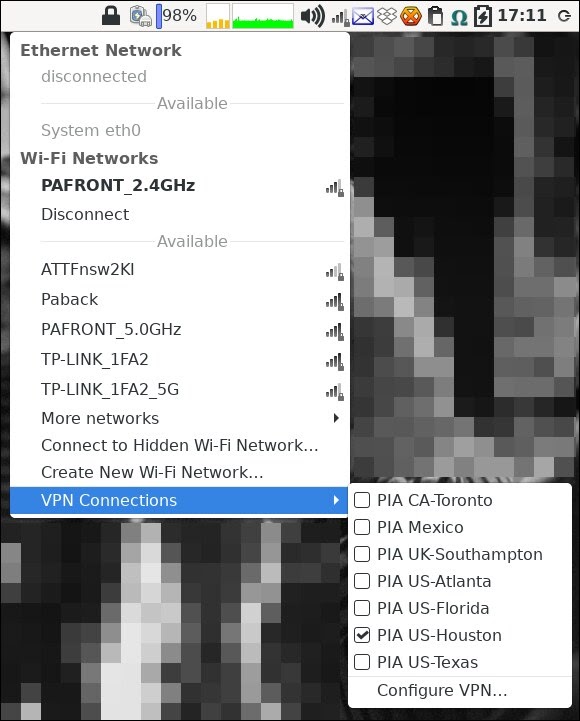 All the way at the bottom of the left-click NM menu, you'll find the "VPN Connections" menu entry. If you've not configured any VPN connections up to this point, the only thing populating the submenu is the "Configure VPN..." menu selection. In either case -- whether you're setting up your first or fifteenth VPN connection -- select "Configure VPN..." from the menu. If you already have at least one VPN connection configured, NM will bring up the "Edit Connections" dialog box. Select the "+" button at the lower left corner of the window. If this is your first VPN connection that you're configuring, you'll see the dialog box shown below. 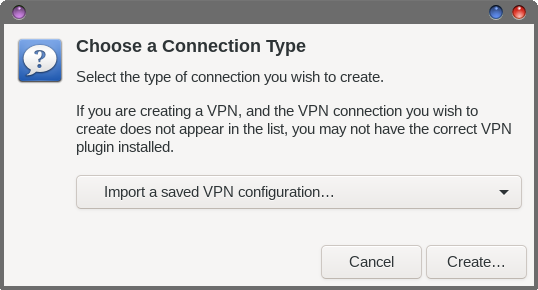 From the dropdown selection in the dialog box, go all the way to the bottom of the selections and select "Import a saved VPN configuration..." from the choices. For what it's worth, the default selection in the dropdown selector is "Ethernet." Once you've selected to import your VPN configuration file, select the "Create..." button. 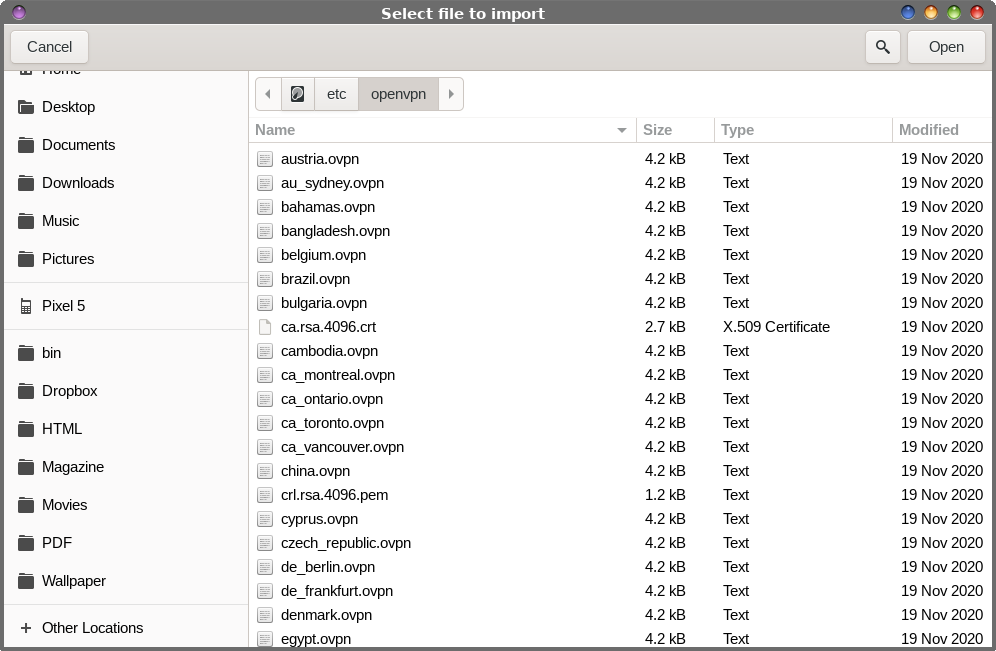 Now, go to the directory where you have all of your OpenVPN files stored. I store mine, as the root user, in the /etc/openvpn directory. This way, they are available to all users on my system (even though I'm really the only user on my computer). Either double-click the *.ovpn file representing the VPN server you want to connect to, or single click it and then select "Open" from the file selection dialog box. 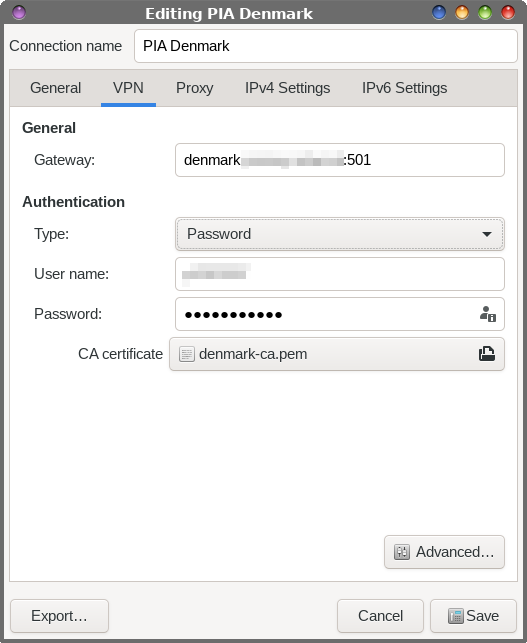 In the top text edit field, you can call your VPN connection whatever you like. It will usually default to the same name as the VPN configuration file for the server you selected. In my case, the name defaulted to "denmark." I changed it to "PIA Denmark" to make it more readily identifiable as PIA's VPN server located in Denmark. Just like with the wifi connections, the VPN dialog box opens with the second tab preselected. Under this tab, you will simply need to enter your username (obscured for privacy reasons in the image above), and your password (already obscured). Click on the symbol at the right side of the password field, and select the "Store the password for all users" option. 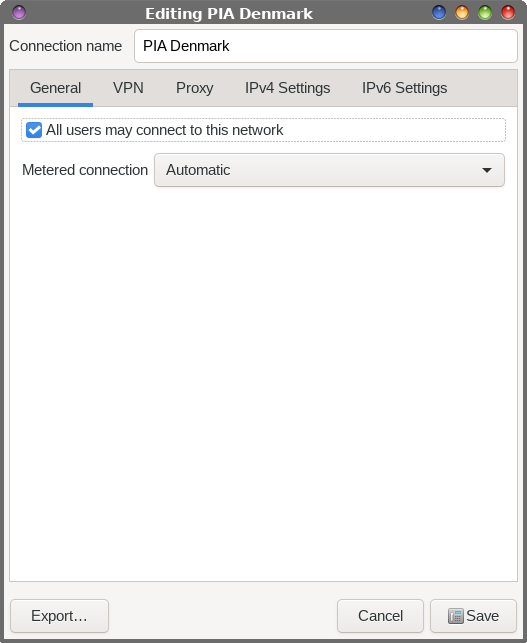 Under the "General" tab, you can decide if you want VPN access to be shared with all users by checking the checkbox (which is the default). 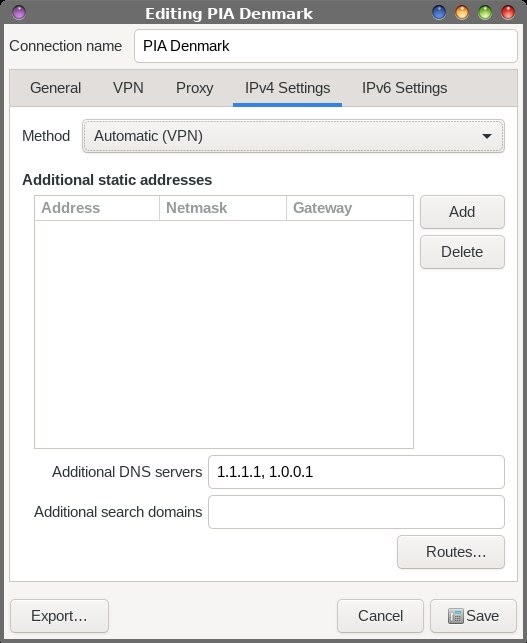 Just like we did with the wifi settings dialog, go to the "IPv4 Settings" tab and enter the custom DNS server settings you want to use with your VPN connection. The format is the same. Enter the primary and secondary DNS addresses, separated by a comma and space. Repeat this process for each of your VPN's servers you want to add to your VPN Connections collection. Doing so goes quickly, and you will soon end up with multiple VPN servers listed among your available VPN connections, as I have done in the first image above in this section of the article on setting up your VPN connection(s). In that image, I have a choice of seven different servers for my PIA VPN service to choose to connect to (out of about 90 choices overall). It's a trivial task to add more, if I feel like I need them. Back under the wifi connection settings, under the "General" tab, you can select a VPN server you want to automatically connect to when the network connection is made. So, if you have a favorite VPN server you like to use, and if you don't want to risk "forgetting" to sign into your VPN (and allowing your ISP to log all of your activity that they have no business knowing), making this selection will help insure that you are always protected. I have to attest that setting up VPN connections under NM is way, way, way easier than it ever was under PCC. It's pretty much painless ... and it works! NM does a lot of the "heavy lifting" for you, so all you have to do is point it to your VPN's valid *.ovpn file, and it pretty much fills in the blanks for you. Well, other than your username and password, anyways. Additional Resources Like I mentioned at the outset, NM has been around for quite a while. Most other Linux distros already rely on NM to manage network connections. In a way, they paved the way for the ease of adoption by PCLinuxOS. They've already guinea pigged it to death. So, what we get is the tried and true version, pretty much free from the niggles that nearly always accompany "new" software. As a result, there are a lot of resources and information about NM out there. Do an internet search for "network manager" and you'll retrieve a literal ton of links. Below are five links that may be useful for those wishing to dig a little deeper into NM and its associated programs (like nmcli, the command line version of NM), as well as many configuration settings and options that we couldn't possibly cover here. Our goal here was to merely help you get NM up and running on your PCLinuxOS computer. Linux Man Pages networkmanager.conf: https://linux.die.net/man/5/networkmanager.conf NetworkManager daemon: https://linux.die.net/man/8/networkmanager Manuals & Wikis nmcli Reference Manual: https://developer.gnome.org/NetworkManager/stable/nmcli.html networkmanager.conf Reference Manual: https://developer.gnome.org/NetworkManager/stable/NetworkManager.conf.html Arch Linux Wiki: https://wiki.archlinux.org/title/NetworkManager Freedesktop.org: https://people.freedesktop.org/~lkundrak/nm-docs/nm-settings.html Gentoo Linux Wiki: https://wiki.gentoo.org/wiki/NetworkManager There are many, many, many more reference sites for NM out there. These, though, should get you well on your way to digging deeper into the inner workings of NM, if you choose to do so. Summary Yes, change is very scary for a lot of people. But trust me when I tell you that this change to PCLinuxOS will pay dividends for years to come. First of all, it provides a familiar interface for users who might migrate to PCLinuxOS from other Linux distros. We already have an ace-in-the-hole as one of the few systemd-free Linux systems around. Second, it puts PCLinuxOS on par with the rest of the Linux community, with most Linux distros already relying on NM for network management. Third, it makes network management -- especially the use of VPNs -- infinitely easier than we've ever had it. Keep in mind that there are many different iterations of even the same "model" of networking cards. Compound that with many different models and manufacturers, different chipsets, and other nuances, and you have the "wild wild west" of networking. Tuning a program like NM to work with all those different network cards is a monumental task. Whatever you do, don't give up. There will be a solution, because NM is very flexible in dealing with those differences in networking cards. Even though NM isn't new, it is new to PCLinuxOS. As with most "new" things, there will be growing pains and "glitches" to figure out and iron out as we get used to it and its little niggles. Every program has them. But the positives far outweigh the negatives, so don't let a few little bumps in the road deter you. So, NM is a win-win for everyone. You shouldn't shy away from this change. Embrace it. You will be glad you did. |