| Previous
Page |
PCLinuxOS
Magazine |
PCLinuxOS |
Article List |
Disclaimer |
Next Page |
Audio CD Rippers: A Roundup |
|
by Paul Arnote (parnote)
I've purposefully restricted the programs featured here to ONLY include ripper programs where the ripping of audio files is its primary/only feature. That means I won't be covering K3b, which is also capable of ripping audio files from CDs. For K3b, it not only rips audio files from CDs, but is also a burner program for all types of optical media. Those “extra” features and abilities disqualify it from being featured in this article. There are also other programs that can access/rip audio files from your audio CDs, like Dolphin and Konqueror, but those are also file managers, so their primary use as file managers disqualifies them from being included in this article, as well. Even with that “restriction,” there are three GUI programs (that I found) in the PCLinuxOS repository whose sole purpose is to rip audio files from your audio CDs.
Only one program (of the three) comes “out of the box” ready to retrieve data from the CD Database (CDDB) about the artist and tracks on an audio CD (I'll reveal which one is properly configured as we go through the description of features of the three programs). So, if you use another program than the one that comes properly configured to retrieve that data, you will have to alter the CDDB server information in order to properly retrieve the information. The only CDDB configuration I found that worked has gnudb.gnudb.org as the server, and ~cddb/cddb.cgi listed as the CGI path. The two programs that didn't have CDDB properly configured both used freedb.org as the default CDDB server. Unfortunately, that database was shut down in 2020, and all traffic rerouted to gnudb.org. You can read about it here. Attempting to go to the freedb.org site redirects to gnudb.org in a web browser, but that redirection isn't allowed with the programs that specify freedb.org as the CDDB. At least, that has been my experience. I didn't spend a lot of time finding additional CDDB servers, since I already had one that worked. So, I merely replaced the non-working CDDB server address and CGI path in the other two programs with the one that I knew was working. If you are aware of another working CDDB server and CGI path than what I list here, feel free to use it. But, to keep things simple (and for economy of time), you can just use the CDDB server and CGI path listed at the beginning of this paragraph in the two programs that don't have a proper configuration for the CDDB. Meanwhile, I'd appreciate you letting me know of any other functioning, free, open CDDB servers that may exist. I find it a little disconcerting to only have ONE functioning CDDB available. So what happens if that server goes down? I think you get my point. Out of curiosity, I did perform a short search, and I discovered another CDDB. I just wasn't comfortable with only having ONE source for CDDB information. And, to be honest, it wasn't a trivial task to extract the server address and relevant port information (the latter was discovered merely by trial and error). The “new” CDDB server address is freedb.dbpoweramp.com/~cddb/cddb.cgi, and the correct port is 80.
  Grip uses a tabbed window interface. Some of the tabs have tabs of their own. And some of those tabs have tabs of their own. The first tab lists the tracks of the audio CD. Before I dig too deep into Grip, let me start off by telling you that Grip was the *only* ripping program that has CDDB set up correctly, “out of the box.” Because Grip was properly configured, it's also the one we used to rip John's CDs to his hard drive. As you can see in the image above, the album name, the artist, the track numbers, and all of the titles of the tracks are properly displayed. I just opened up Grip, and then placed the audio CD into my external USB optical drive. In a manner of less than 10 seconds, all of that information was properly displayed in the default window of Grip. In the window above, you can individually select which tracks you want to rip by clicking on the checkbox at the far right of the window, under the “Rip” column. Or, if you prefer, just click on the word “Rip” in the column headers, and all of the tracks on the CD will be selected. (Note: any data tracks on the disc will be skipped, automatically). 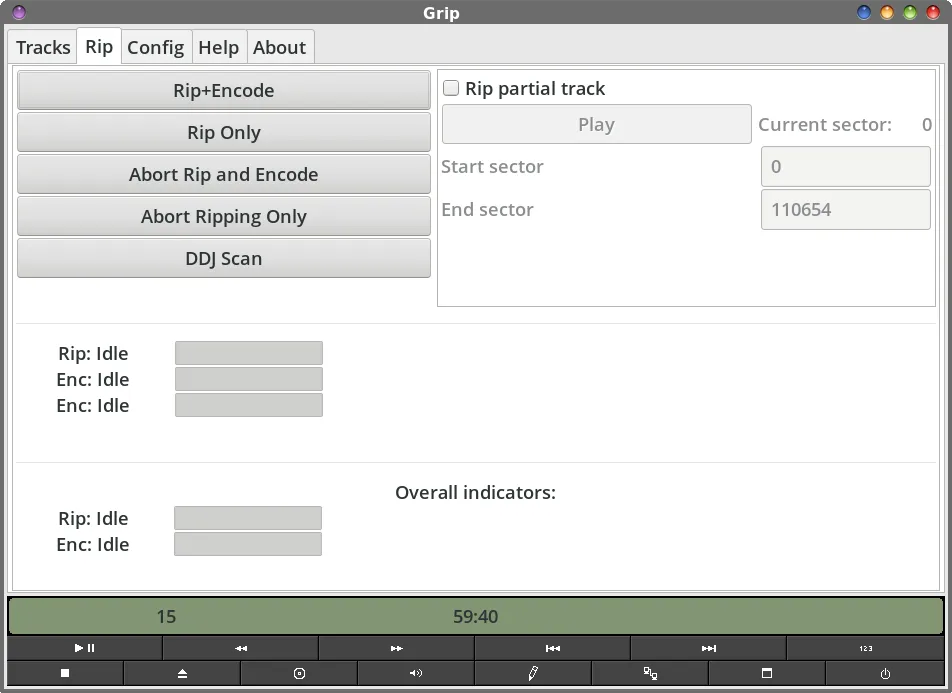 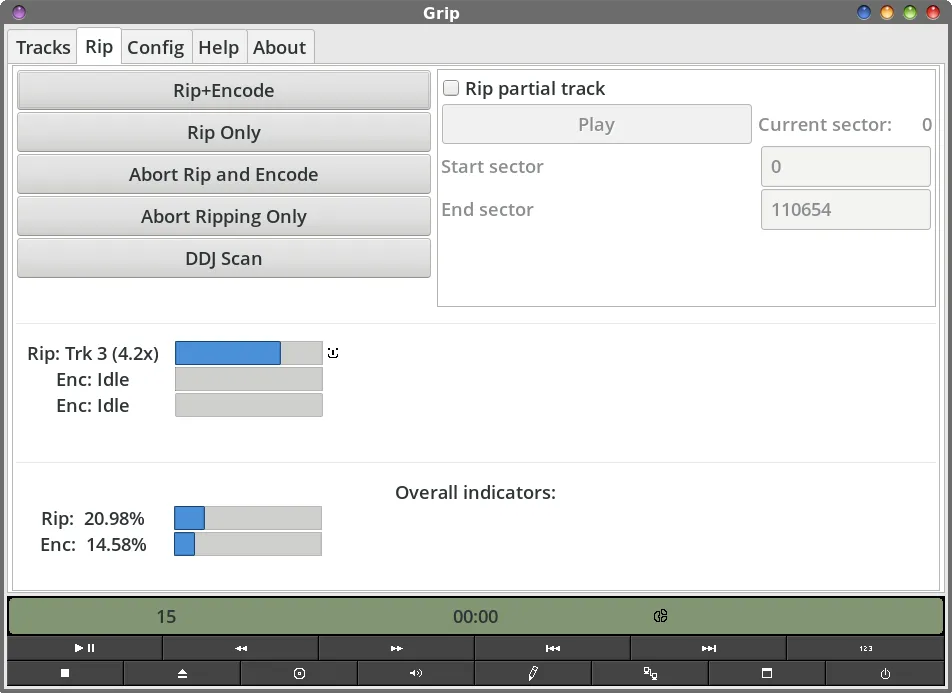 The second tab of the Grip window is where you will go to start ripping the audio tracks you selected. I'll caution you to NOT start that process at this point, until and unless you have already configured Grip to work the way you want. You can always come back to this tab after you've configured Grip. I only place it here as the second item to be discussed because it is the second tab in Grip's tabbed window layout. The top window shows Grip before starting the ripping process, and the second window shows Grip ripping (and encoding) of the selected audio tracks. Most of the time, you will want to select the “Rip+Encode” button. This will rip the selected audio tracks to a WAV file, and then encode them to your selected audio file format. If you want only to rip the audio tracks to WAV files, then you'll select the “Rip Only” button. 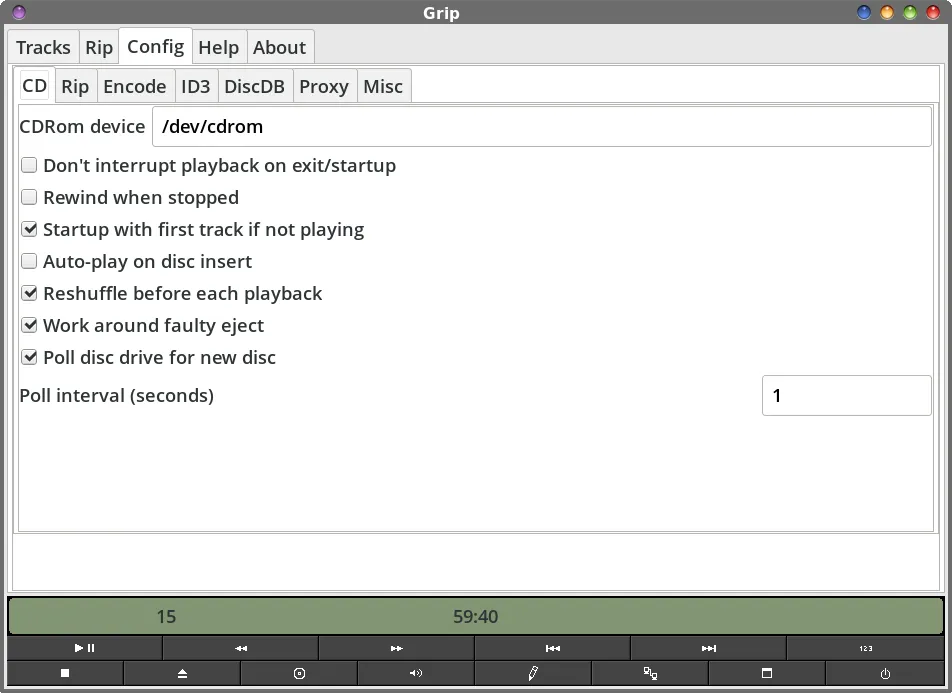 “Config” is the third tab in Grip's tabbed window, and is where you will make all of the settings that govern how your CD's files will be ripped, among other things. Grip *can* be used for playback of your audio CDs, if you want (but there are better programs for that). You will need to check these configuration settings the first time you run Grip, unless you just want/need to go into the configuration settings to make a change. Under the “CD” tab, you can set any of these features as defaults for the next time you launch Grip. Most of them should make sense on their own, without explanation. Some, though, leave me scratching my head, like “Rewind when stopped.” As far as I've ever known, CDs don't require “rewinding.” I mean, we're ripping files from a CD, not a cassette tape. 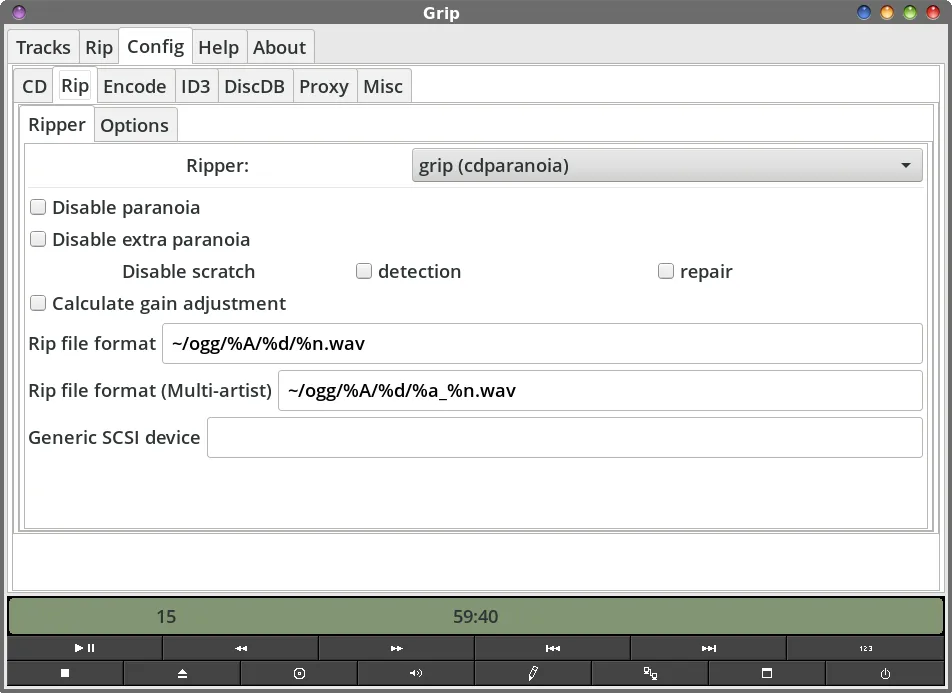 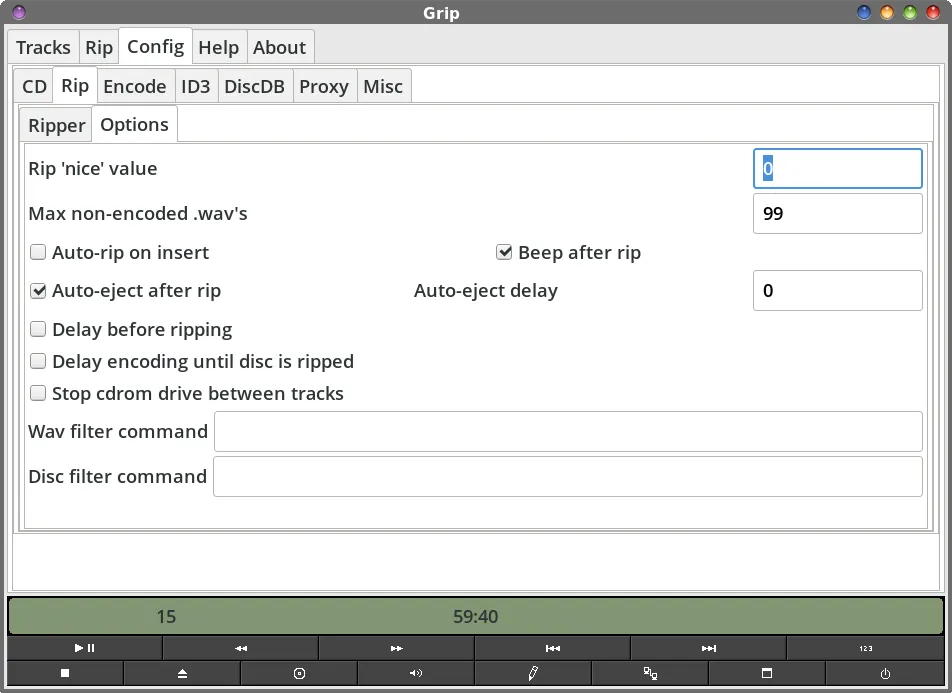 Under the “Rip” tab, you set up the variables you want to use when ripping the audio files from your audio CD. The “Ripper” tab (first image) allows you to set up how your audio files are ripped to files. You can select which ripper Grip uses. I've always just kept things at their default value, which is “grip (cdparanoia)” and I've never had an issue. Grip will default to creating your ripped files in a directory in your /home directory, named “ogg”. If you want your files stored elsewhere, this is where you will specify the path to use. This is where Grip will store the WAV file that is used to create your encoded audio file. At this point, it's a good time to introduce the variables (preceded by a % sign) that Grip uses. Here is a full list of those variables: b — The bitrate that files are being encoded at. c — The CDrom device being used. C — The generic SCSI device being used (note that this will be substituted with the CDrom device if no generic SCSI device has been specified). w — The filename of the wave file being ripped. m — The filename of the file being encoded. t — The track number, beginning at 1, and zero-filled (i.e.: '03' for the third track). N — The number of tracks, zero-filled (i.e.: '07'). s — The start sector of the track. e — The end sector of the track. n — The name of the track. a — The artist name for the track. A — The artist name for the disc. I — The artist's initial letter. d — The name of the disc. i — The disc database id (in hex) for the disc. y — The year of the disc. g — The ID3 genre id of the disc. G — The ID3 genre string of the disc. r — The recommended replay gain for the track (in dB). Note that this is only applicable if you have enabled gain calculation. R — The recommended replay gain for the entire album (in dB). This value is only valid after an entire disc has been ripped (it is designed to be used with the disc filter command). x — The encoded file extension (i.e., “mp3”). These same variables will also be used when your files are encoded to your selected audio file format. On the “Options” tab (second image), I've left everything at its default values. 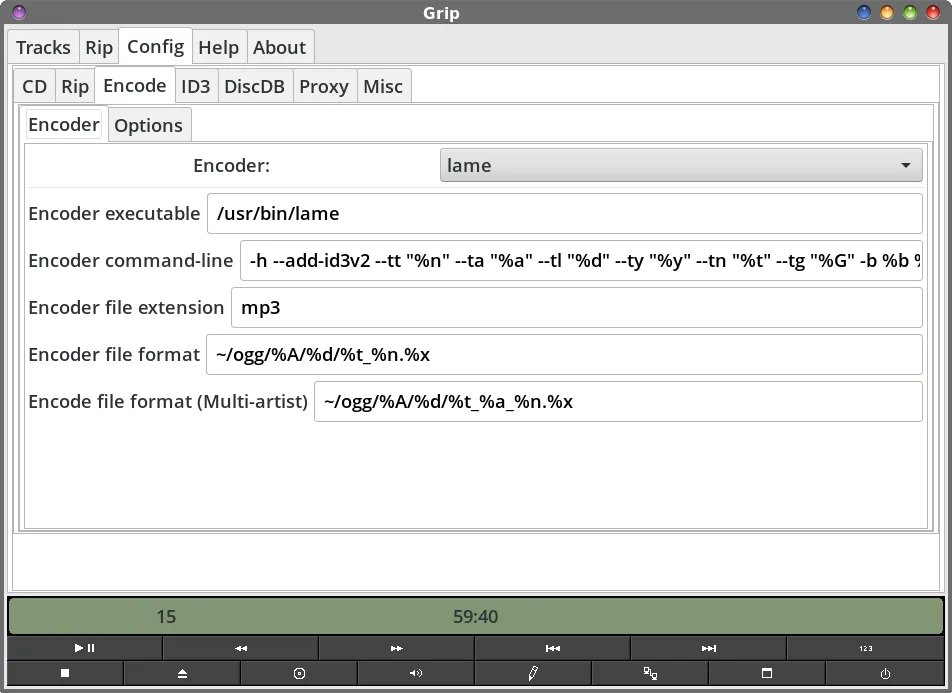 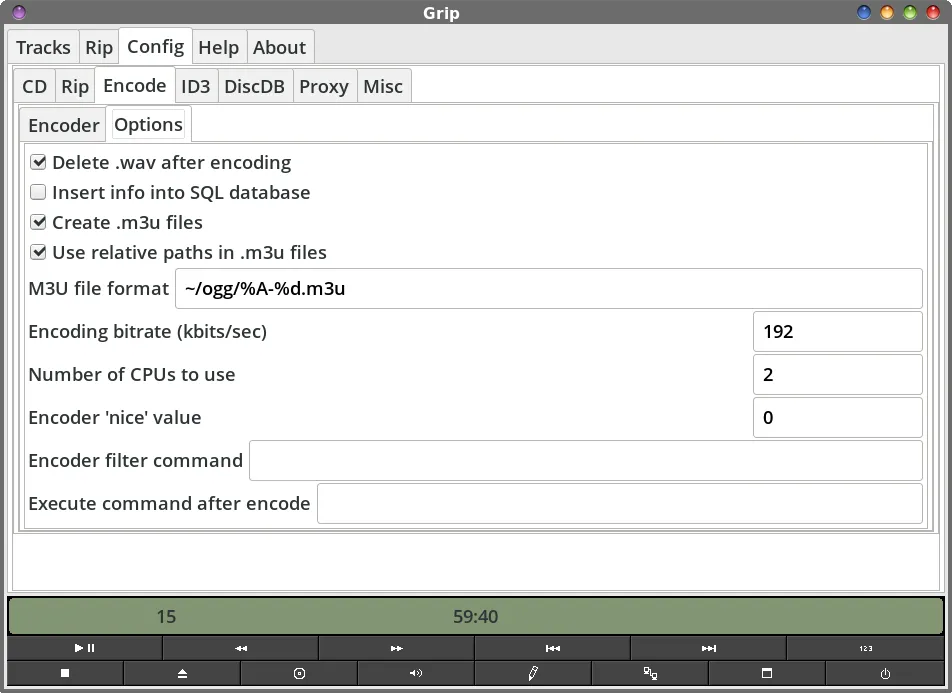 When you go to the Config > Encode tab, you will see two other sub-tabs. The first one is the “Encoder” tab. The very first option is to select your encoder. In my first image above, I've selected “lame” as my encoder. There are actually four different encoders you can choose from for MP3 files: lame, bladeenc, xingmp3enc, and mp3encode. I chose lame because I'm much more familiar with it. You can also choose to encode your audio files in other formats, using oggenc, l3enc, gogo, flac, faac, opusenc, and “other.” In the next text entry box, provide the path to the encoder library that you selected as your encoder. The next text entry box allows you to alter the command line switches for tailoring how you want to customize the filenames of the audio files you encode. Use the same variables as I showed earlier to customize your filenames. To be perfectly honest, I just accepted the defaults that Grip came preconfigured with, and I've been perfectly happy with those. Under the “Options” sub-tab (second image above), set the bitrate to use to encode your files (halfway down from the top). Since I'm using MP3, I chose 192kbps. Remember that the lower the number, the lower the fidelity … and vice versa. I find 192kbps to be a happy medium which gives you good sound quality, but still decent compression. For comparison, 128kbps equates (roughly) to the sound fidelity you get from an FM radio station. The rest of the settings under the “Options” sub-tab should be relatively evident. 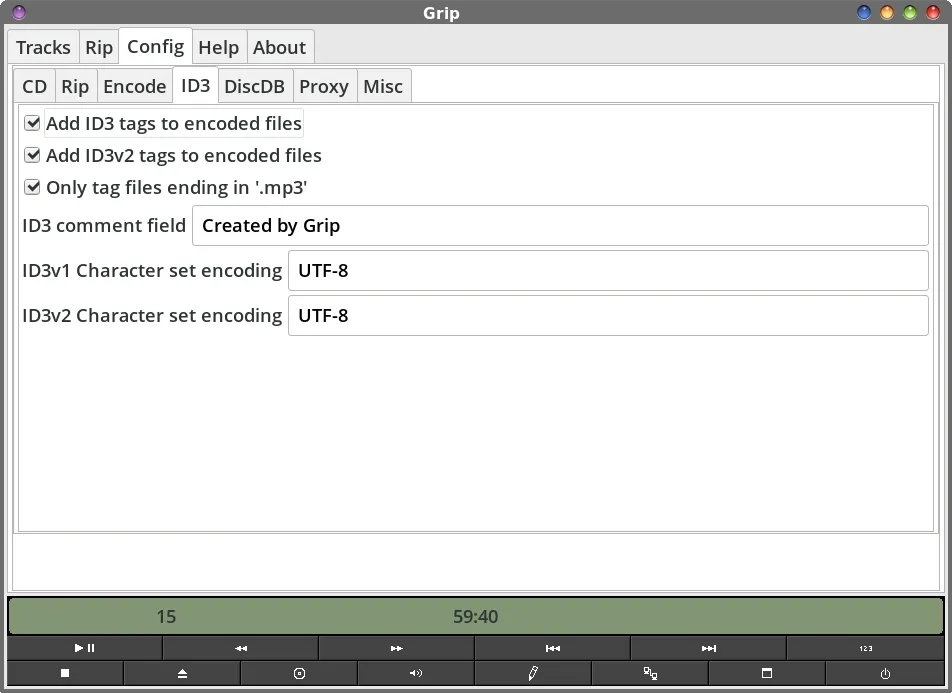 Under the Config > ID3 sub-tab, I enabled all of the options (which should be fairly self-explanatory). For your ID3 comment field, you can change this to whatever you want. So, if you wanted to put “From the music library of Joe Blow,” you're definitely more than welcome to do so. 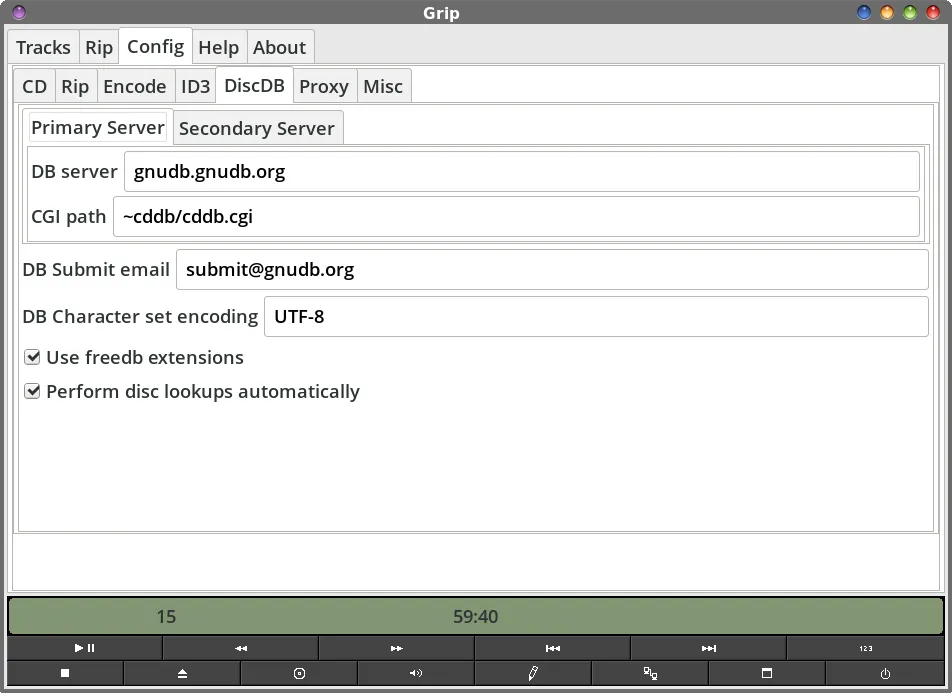 The Config > DiscDB tab has two sub-tabs: Primary Server and Secondary Server. They are identical in appearance. This is where you configure which CDDB server to use for retrieving the disc information. On my copy of Grip, the Secondary Server tab is not filled out with the DB server field, making the server indicated under the Primary Server tab the only one that Grip checks for disc information. Fill in the server under the Secondary Server tab if you feel you must, but not having a secondary server to retrieve disc data from has not hindered the ability of CDDB to provide the information I need. In other words, it works just fine without a server specified under the Secondary Server tab. 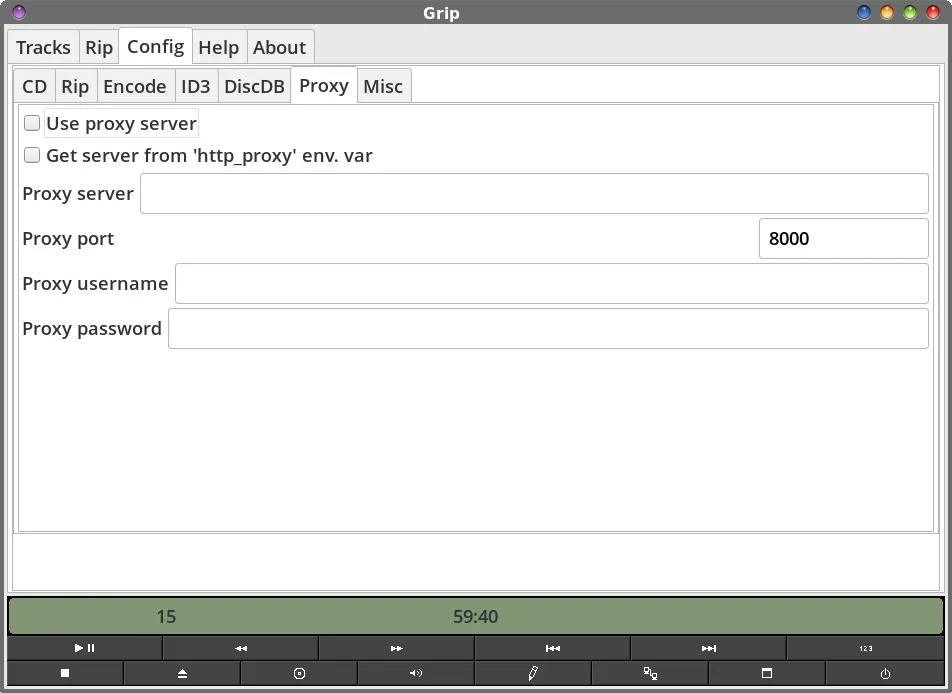 The image above is how Grip is set up by default, and since I don't use/need a proxy, I've made no changes to the defaults. 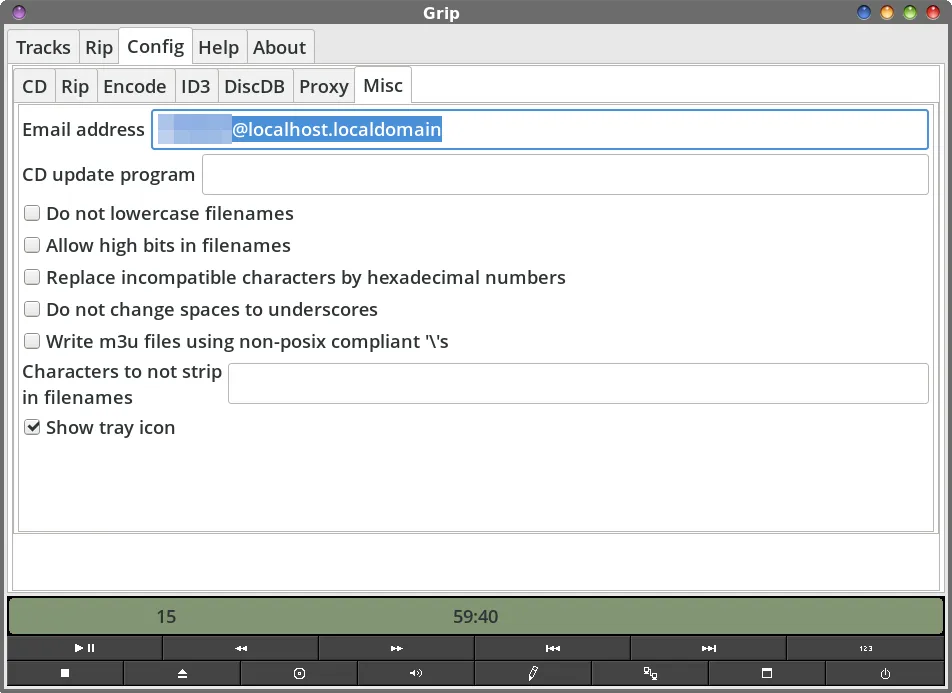 Under the Config > Misc tab, you can make several changes that don't really fit into any other category. The only thing I changed here was to enable the “Show tray icon” setting. That allows an icon for Grip to be placed in the notification tray of my panel. Right-clicking my mouse pointer over the tray icon gives me immediate access to several different functions of Grip, without having to physically open (or bring to the forefront) the Grip window. 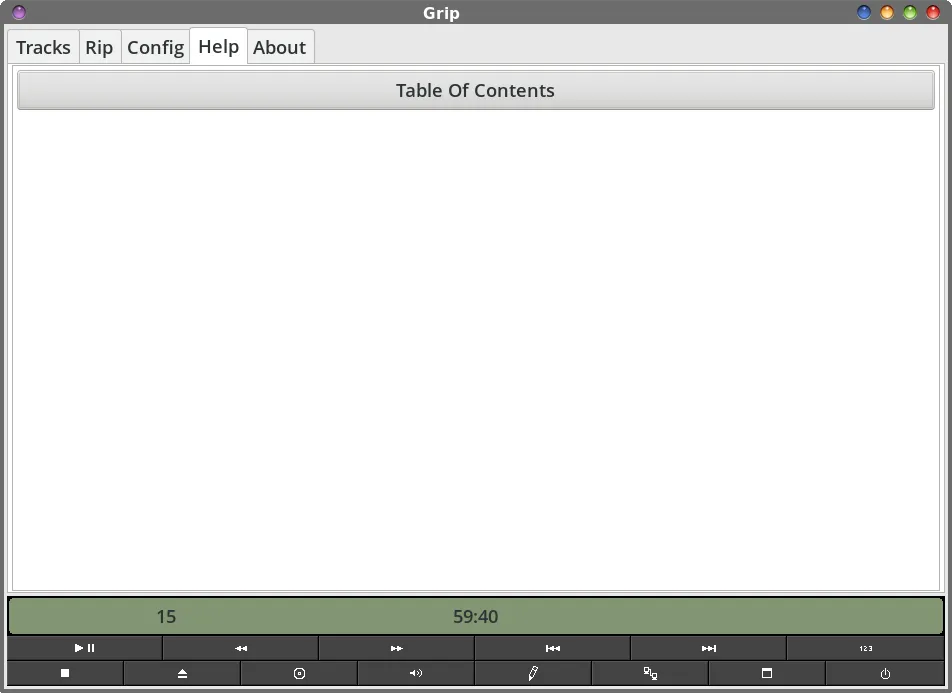
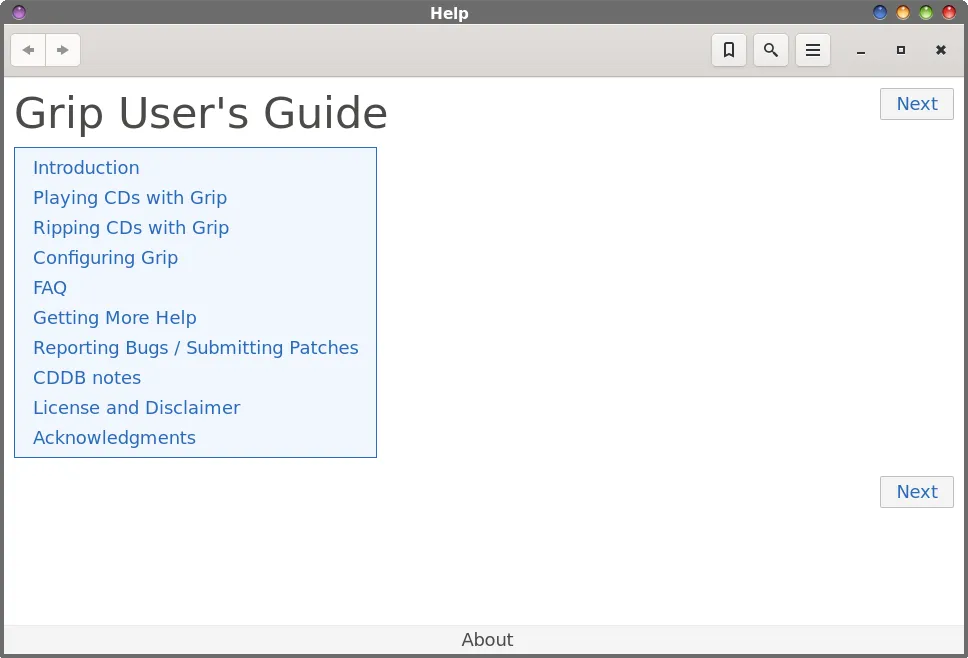 The Grip help file, opened in Yelp The “Help” tab gives you access to Grip's help file, which appears to be fairly well written. If you have Yelp (Gnome's help viewer) installed, Grip's help file will open in Yelp when you select the “Table Of Contents” button in the Help tab (second image). 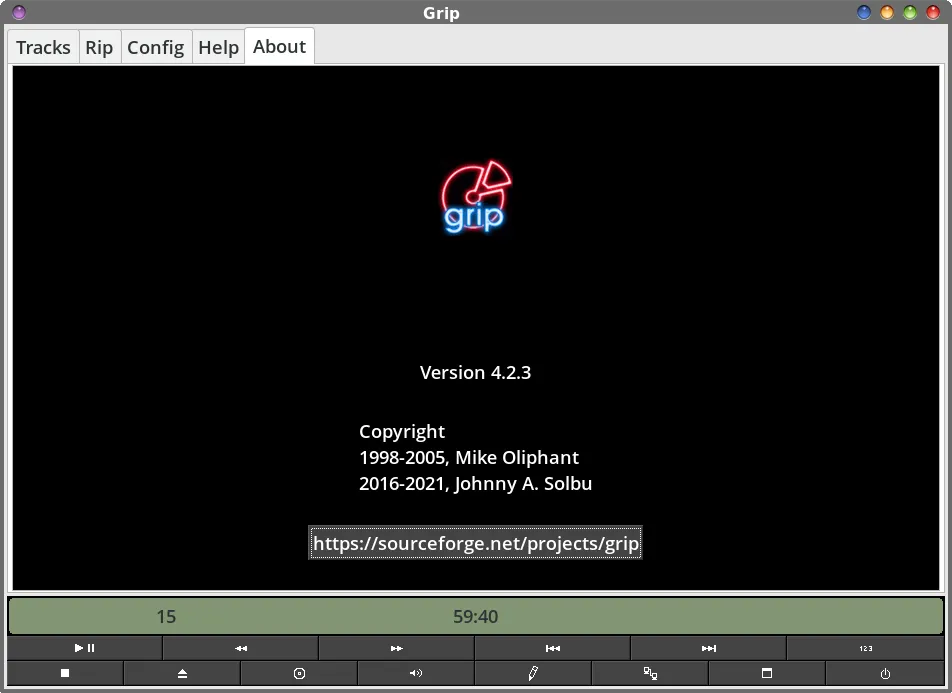 Of course, the “About” tab shows the obligatory “About” information, along with a live link to the Grip project page on sourceforge.net. Clicking on the link will open the project page in your default web browser. Overall, Grip does a very nice job of ripping your audio CDs to encoded audio files. And, it's reasonably fast. This particular Beatles disc (Please Please Me) has about an hour of music on it. So, pay attention to the CD read speed. If you see it saying 4.0x, that means it's reading the data 4x faster than “normal” playback. Take that 60 minutes of music and divide by the CD read speed. That result will be *about* how long it will take to rip and encode the entire audio CD to your chosen audio file format. Thus, this album took all of about 15 minutes to rip and encode to MP3 files.
 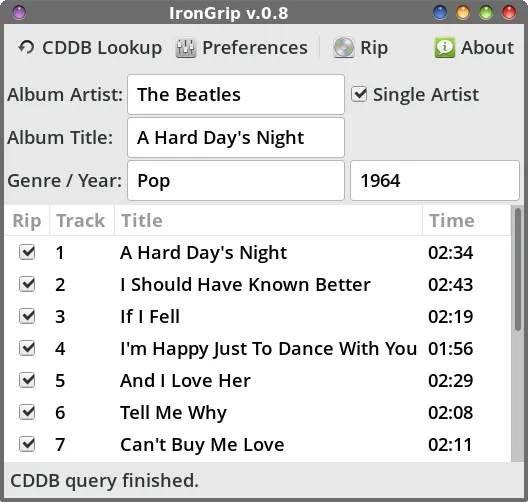 While Grip is primarily a CD ripper/encoder that also allows you to also play audio CDs, IronGrip is ONLY a CD ripper/encoder. If space is at a premium on your system, the program binary file for IronGrip is about 25 KB smaller than Grip. The controls and options for IronGrip are fewer, but don't underestimate its abilities. IronGrip does as good of a job at ripping and encoding your audio CDs into audio files as any other program around. And, even though there have been no updates listed on its GitHub site in over 10 years, IronGrip works very, very well. The first time you use IronGrip, you will need to select the “CDDB Lookup” button at the top left of the IronGrip main window. You can change this in the Preferences, if you like, so that it automatically queries the CDDB when you insert an audio CD (and I'll point that out, as we go through the configuration process). If you choose to use IronGrip, you will need to open up the “Preferences” dialog anyway, if you wish to be able to avail yourself of a proper connection to the CDDB. IronGrip does NOT come with a working CDDB server preconfigured, out of the box. Again, I'll point that out as we go through the configuration process. 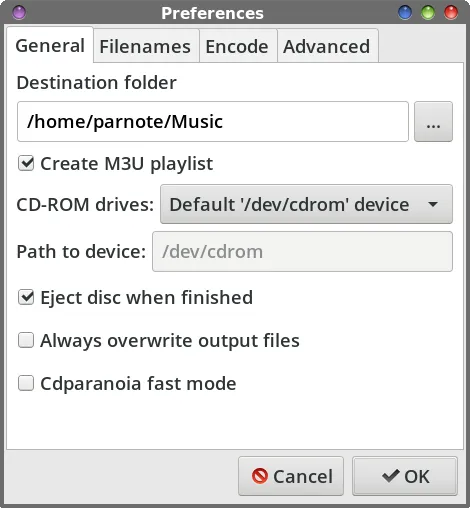 Under the “General” tab, you start off by specifying where you want IronGrip to save your encoded audio files, in the “Destination folder” field. Then, you tell IronGrip whether or not you want it to create a M3U playlist by checking or unchecking the checkbox next to “Create M3U playlist.” Your optical disc player should already be detected, but if you're on a computer with multiple optical disc players, you can choose which one you want to use by specifying it in the drop-down labeled “CD-ROM drives.” With my external USB optical drive, the “Eject disc when finished” does not work, whether there's a checkmark in the checkbox or not. For me, however, that is not a “dealbreaker.” The “Always overwrite output files” should be self-explanatory. I choose to not use the “Cdparanoia fast mode” setting, mostly out of fear of possibly getting ripped audio files besieged with jittery sound. 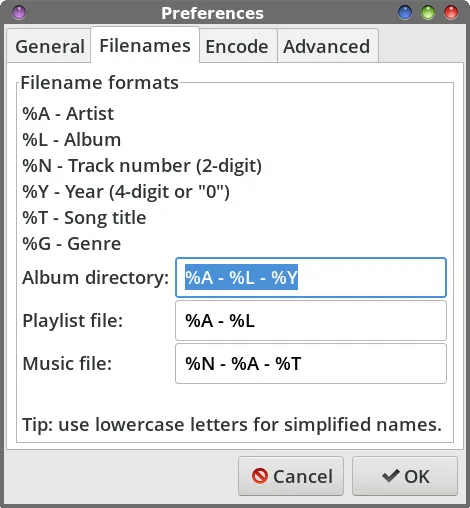 The “Filenames” tab allows you to specify the formatting of the CDDB data that is included in your filenames. I've accepted the defaults here, fully aware that there *will* be spaces in the generated filenames. Grip automatically replaces spaces with underscores, unless you specifically tell it to not do so. This is not so with IronGrip. Anyone who has read much of what I've written over the past 15 years will know that I really, really hate spaces in filenames. However, I can easily take care of that issue with a special custom action I have defined in Thunar file manager on my Xfce installation. It will allow me to select files in bulk, and replace spaces with another character all at once. There really is no other way to circumvent the “spaces in a filename” issue, since the song titles, artist names, and album names will (most likely) include spaces. The specifications for the formatting should be relatively self-explanatory, so feel free to tailor the filenames to meet your expectations or needs. If you really mess things up, you can always reference the image above to reset the parameters to their default values. For what it's worth, I just use the default settings for the filename naming convention. 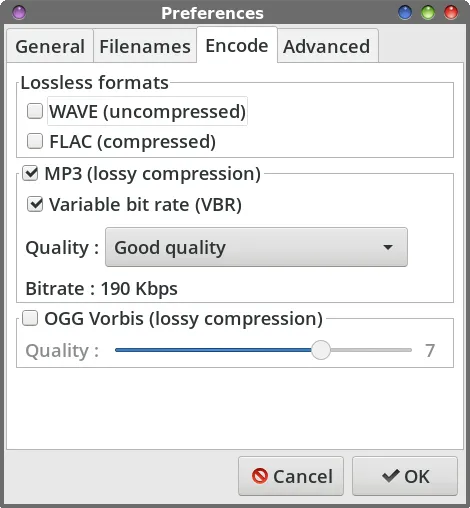 The “Encode” tab is where you will set your preferences for the audio files that are ripped and encoded from your audio CDs. You can choose WAV or FLAC, but be forewarned that those files will be quite large. WAV files aren't compressed at all, and FLAC files, while known for their incredible sound quality, don't offer up the compress-ability that MP3 or OGG files offer (albeit at a cost of sound fidelity). Since I mostly rip audio files to MP3 files, this is the section where I made my selections. I chose MP3 as my file format, and also chose the “Variable bit rate (VBR)” checkbox. Without it checked, IronGrip will use CBR (constant bit rate). VBR can help make your MP3 files smaller without quality loss by varying the bitrate depending on the dynamics of the sound file. Quieter, less “deep” sound recordings may not require as high of a bitrate as louder, “deeper” portions of a sound recording, and it is adjusted accordingly, within certain boundaries. Next, you choose the quality level you want your sound files saved in. As you change the setting between low, good, high and maximum quality, you will see the “Bitrate” setting change accordingly. I chose “Good” quality, since I'm quite happy with the sound quality from files encoded at 192kbps, and the 190kbps with a variable bit rate comes mighty close to that. If you choose to encode your files in the OGG format, you can check the box next to “OGG Vorbis.” Just be sure to uncheck the box next to the other formats. Slide the slider control to achieve the quality level you desire. Remember, higher compression leads to smaller files, but also lower sound fidelity, while lower compression leads to larger files, but with greater sound fidelity. 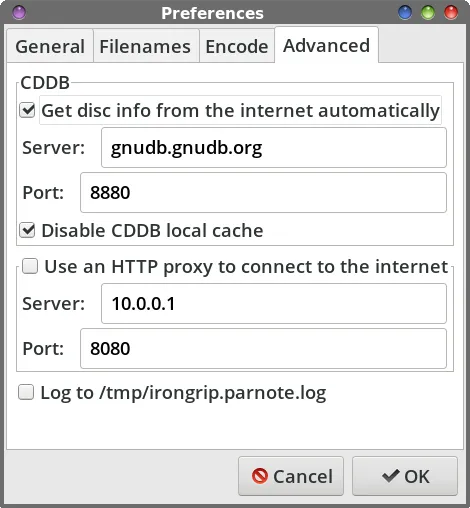 If you wish to avail yourself of using the CDDB to retrieve the artist, album name, and track names, you must first correct the CDDB server information that IronGrip comes pre-configured with. The main CDDB server I use is the one listed in the image above. But, you can also use the alternate CDDB server I provided to you at the beginning of the article. Unfortunately, the number of *working* CDDB servers around are decreasing, as optical discs popularity is giving way to streaming services. I've put a checkmark in the checkbox next to “Disable CDDB local cache.” I don't see/feel a need to keep a cache of CDDB on my computer. Since I don't use an HTTP proxy, I've left this section alone. I also don't need IronGrip keeping a log of my “transactions” on hand, so I've left the “Log to /tmp/irongrip.parnote.log” checkbox unchecked.  Clicking on the “Rip” button in IronGrip's main window will cause the progress bars detailing the program's progress in ripping my audio CDs to digital audio sound files on my computer. This should be obvious, but clicking on the “Cancel” button will stop the ripping and encoding of the audio CD tracks. 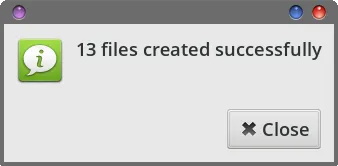 Once finished, IronGrip will display a simple information dialog box, like that shown above. 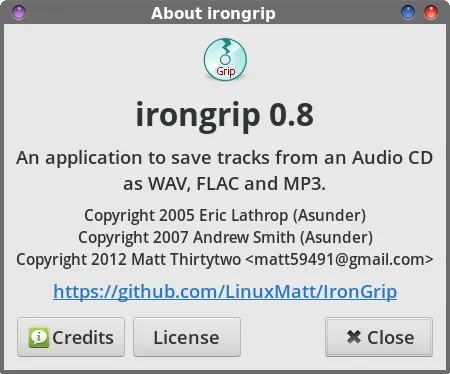 Clicking on the “About” button in IronGrip's main window will display the “About” dialog box shown above. It also contains a link to IronGrip's GitHub page.
 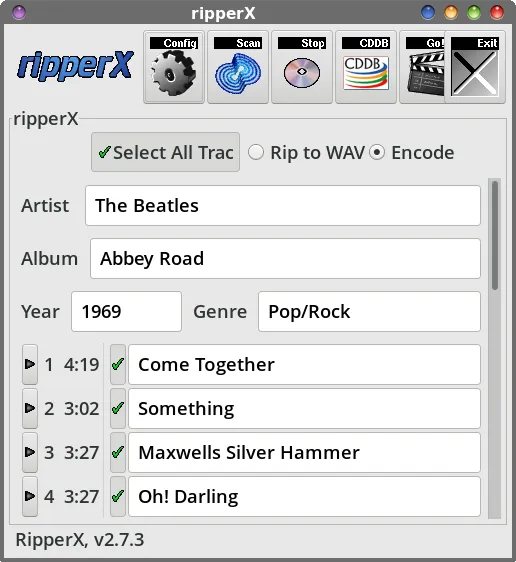 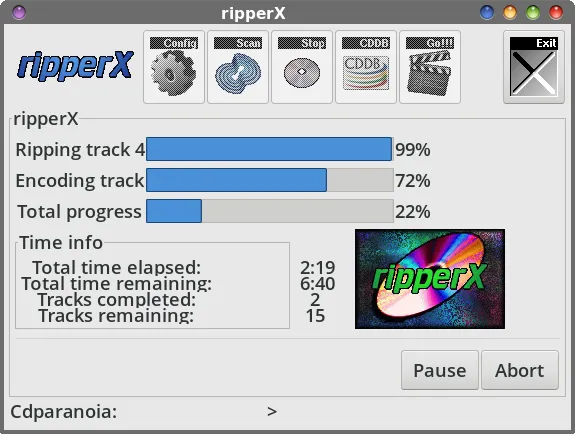 The third audio CD ripping program we're going to cover is RipperX. The current version in the PCLinuxOS repository is 2.7.3. On the sourceforge.net site for RipperX, the latest version is 2.8.0, last updated in March, 2014. The 2.7.3 version was last updated in November, 2010. Twenty years or so ago, Jos Dehaes of Belgium was its maintainer, before handing over the reins to other maintainers. Joske (as he goes by) was a bit surprised to find the source code still available on sourceforge.net. He then attempted to update the source code to take advantage of later Gtk+ releases (he originally wrote it for Gtk+ 1.x). After a while, he realized that it would be easier to rewrite the entire program in Rust, rather than its original C programming language. He now hosts his new Rust version on GitHub, as RipperX 4. But, don't let the age of RipperX in the PCLinuxOS repository deter you from giving this program a try. Even 14 years later, it still works very well for ripping your audio CDs. Just as with the other rippers we've covered in this article, the configuration of CDDB no longer works “out of the box” because it relies on the now-defunct freedb CDDB server. You will need to change the CDDB server information to one of the two CDDB servers listed at the beginning of this article. Once you do, it retrieves album, artist, and track information as it should. Notice how each track in the main program window has a green checkmark next to it? That means it has been queued up for ripping and encoding. If you don't see a green checkmark, you can select the “Select All Tracks” button in the upper left corner of the RipperX window, or select the tracks you want to rip and encode, one by one. You'll also notice that there is a “play” button at the far left side of each track listing. Currently, I can only find one command line program in the PCLinuxOS repository that allows the play button to function … which is OK, because we're not as interested in using RipperX as a player (there are better programs available for that, anyways) as we are interested in RipperX to rip our audio CDs to our chosen digital sound file and format. We'll cover that when we get to the configuration dialog, where we define the player to use to play the individual CD tracks. 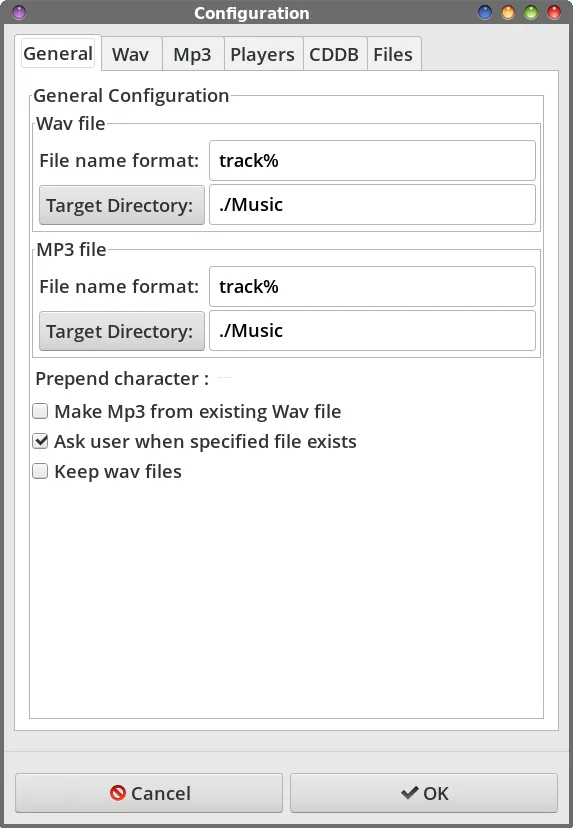 Like other CD ripping programs, RipperX extracts the audio from your CD as a WAV file, and then encodes the WAV file with your encoder of choice. To avoid problems, point both the WAV and MP3 target directory to where you want RipperX to store your digital audio files, which is typically the same directory. Don't worry, because unless you have a checkmark in the checkbox “Keep wav files,” the WAV files will be automatically deleted after encoding them to your desired file format. 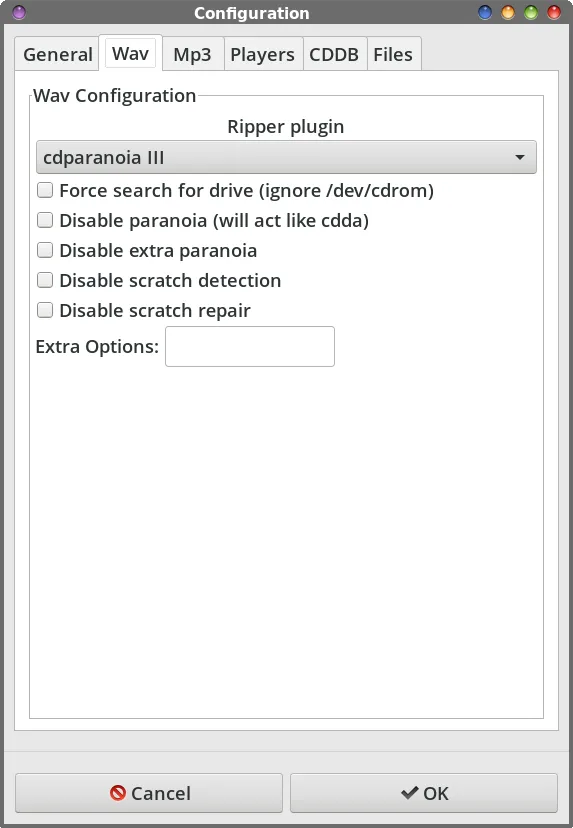 Under the “Wav” tab, I've kept all of the defaults for RipperX … which is nothing selected. I suspect it'll be a similar case for most users.  Under the “Mp3” tab is where you set RipperX up for whichever encoder you want to use for your final audio files. On my system, I have two MP3 encoders (lame and bladeenc) listed as available, as well as Ogg Vorbis (for OGG files) and a FLAC encoder. Again, I chose lame, because that's the one I'm most comfortable and familiar with. You select the bitrate of your encoded files in the sea of radio buttons. Like I mentioned earlier, I chose 192kbps as my bitrate, since it gives me fairly decent sound quality, while keeping file sizes relatively small. I also check the VBR checkbox, to further help in the creation of smaller MP3 files. 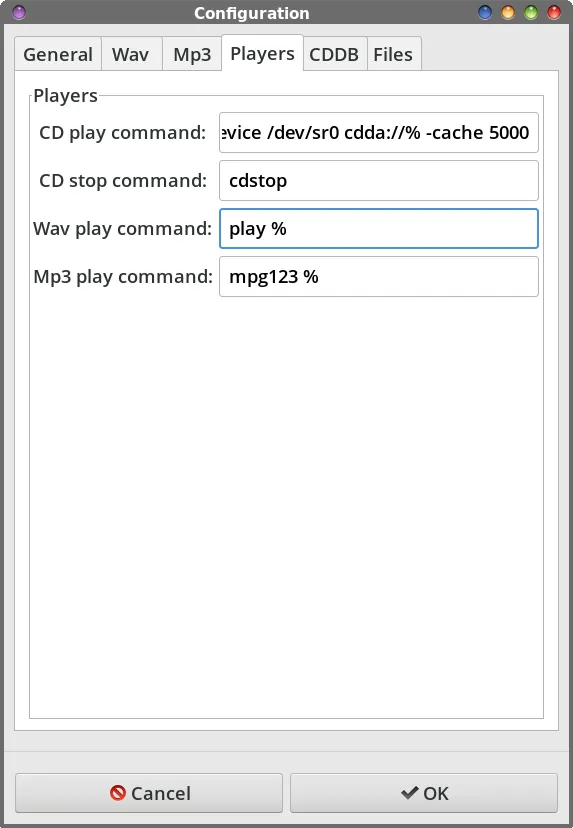 Under the “Players” tab, the “default” values for the first two fields are cdplay % and cdstop %. However, those programs are not available in the PCLinuxOS repository. I was not able to find a replacement for cdstop, but I did find a command line replacement for cdplay. Replace the “cdplay %” line with mplayer -cdrom-device /dev/sr0 cdda://% -cache 5000. You won't be able to stop playback once it starts, so you'll have to listen to the entire track before playback stops. Or, you can kill mplayer from a command line. I use “pkill mplayer” to stop playback, with no perceivable problem. If you choose to go this route, you will have to install pkill from the PCLinuxOS repository. The “-cache 5000” is very important in this command line, since leaving it out will result in interrupted playback as the buffer fills with the next part(s) of the track. The extra command sets up a five-second buffer, which tends to be sufficient to stop those buffering interruptions. I left all of the other fields at their default values. 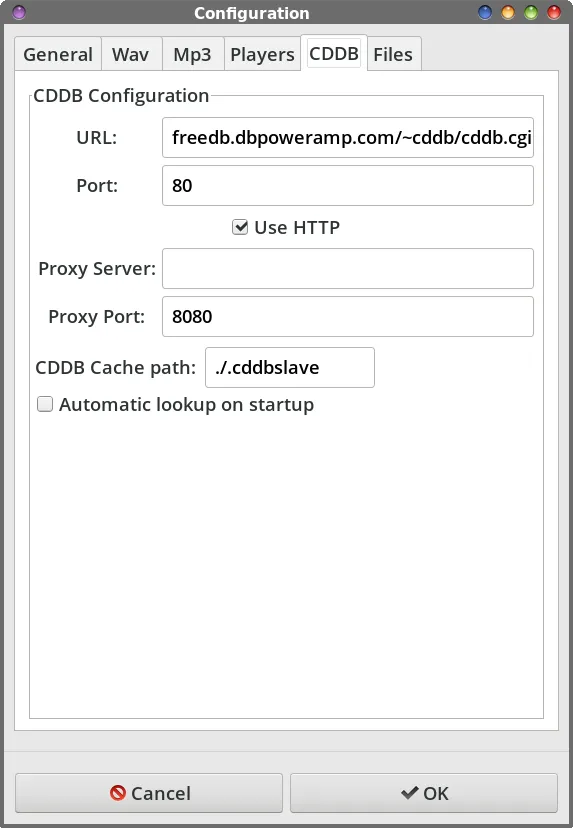 The “CDDB” tab is where you make the necessary changes so you can have a working CDDB server. In the image above, I've set up the second CDDB server that I told you about at the beginning of the article. Put freedb.dbpoweramp.com/~cddb/cddb.cgi as the CDDB server, and 80 as the port. If you want RipperX to automatically query the CDDB when you start up the program, put a checkmark in the checkbox next to “Automatic lookup on startup.” Unfortunately, I've not had good luck with RipperX being able to read the CDDB data for a newly inserted disc, without exiting and reopening the program. Instead, it just keeps the data for the previous disc, and nothing I do (short of closing and reopening RipperX) will get it to read the CDDB data for the new disc.  The “Files” tab is where you format what information makes up the filename format for your encoded files. The dialog box (above) makes it very easy to understand what the variables are and mean. I would recommend making sure there's a checkmark in the “Convert spaces to underscores” checkbox to ensure there aren't spaces in your filenames. 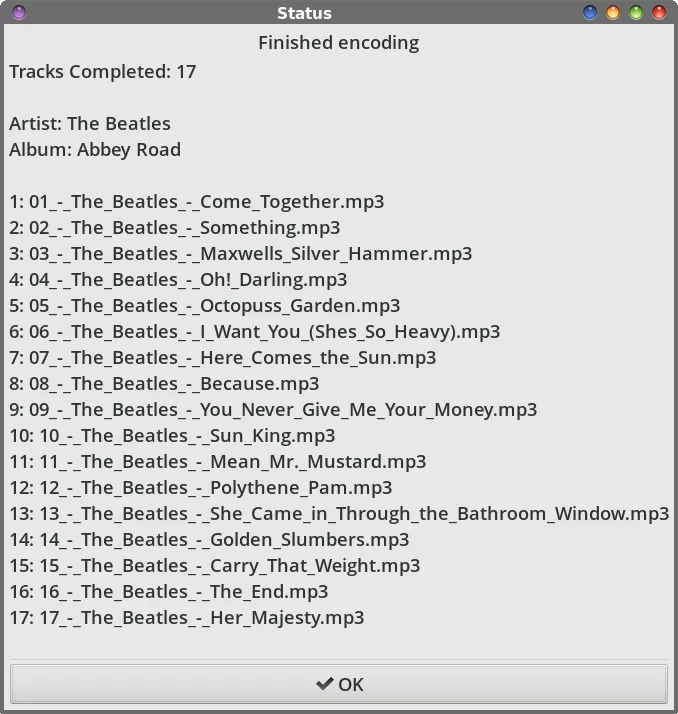 When RipperX has completed ripping and encoding your files from an audio CD, it displays a “Finished encoding” dialog box that shows the number of tracks ripped/encoded, the artist, the album, and the filename of every file that RipperX produced.
There you have it. There are other programs in the PCLinuxOS repository that are capable of ripping and encoding your audio CDs, but as we said from the outset, those programs (like K3b) also perform other tasks. Remember, we restricted the list of programs to those whose primary function is to rip and encode audio files from your audio CDs. There are even some programs in the PCLinuxOS repository that are command line programs (e.g., abcde … I swear … that's its name) that are just as capable. But, given how reluctant a lot of users are to use the command line, I've not included them here. I know that some users think optical discs should go the way of the dodo bird, but then the same thing was said of phonograph records when CDs came onto the scene. Today, phonograph records are seeing a niche comeback among audiophiles. I suspect that the same thing is likely to happen to CDs and other optical media. They may wane in popularity to the latest/greatest delivery method d'jour, but I'm pretty confident that they will be with us for the foreseeable future. With new vehicles coming out that don't even have a CD player, this method of ripping and encoding them as audio files, and then (from last month's article) putting them onto a USB thumb drive may be the only way to keep listening to your music collection as you travel down the road. |