| Previous
Page |
PCLinuxOS
Magazine |
PCLinuxOS |
Article List |
Disclaimer |
Next Page |
A Delayed Screenshot Script |
|
by Paul Arnote (parnote)
As I’ve spoken about before, I retired at the end of 2022 after working 35 years as a Registered Respiratory Therapist. I have ZERO plans to return to the workforce. My wife is also a Registered Respiratory Therapist. Hearing her “war stories” from the bedside trenches just reinforces my decision to have retired when I did. However, I do still maintain my respiratory license … just in case. It’s much easier to maintain it than it is to try to get it back after it elapses. Part of the “process” for maintaining my license to practice respiratory therapy (respiratory therapists are licensed in a manner similar to nurses, physicians, and other healthcare professionals) is to complete 24 CEUs (continuing education units … each “unit” is approximately one hour of education) every two years. Half of them must be what the licensing board considers “live contact.” That means either doing at least 12 of those CEUs in a setting where you can ask questions and have “live contact” with the presenter. There are two ways to obtain those “live contact” CEUs. You can either attend a seminar, or you can “attend” live webinars online. The former usually comes with a cost that you have to pay (and that cost can climb quickly), while the latter is offered for free via webinars sponsored by equipment vendors and others with an interest in dispensing respiratory educational information. Of course, all 24 CEUs can be of the “live contact” variety, and that is the route I’ve subscribed to for many years. Most of the webinars are offered via Zoom. Others are offered via a custom HTML5 format. With either method, at the end of the webinars, there is a special code that’s presented, or a QR code to scan. You can attend the webinar, but if you’re away from the computer when that code is displayed, you can’t receive credit for attending. Maybe you got up to go to the restroom, or you went to get something to drink or eat. On the way back, maybe you had to deal with something the kids are doing (or not doing). That code enables you to fill out the requisite survey and feedback form, which then grants you credit for your attendance. Invariably, that code is always presented at the end of the hour (each webinar actually only lasts 50 to 55 minutes long, but they count it for an hour). There have been several times when I’ve attended a webinar, but couldn’t receive credit for my attendance, simply because I missed the code at the end of the presentation. But, I figured if I could “schedule” a screenshot at or near the end of that hour, I wouldn’t miss out on receiving that code. Up until now, all of my previous attempts have been utter failures. 
Since I use the Xfce desktop, I initially tried using the xfce4-screenshooter program. However, I was not very successful with it to be able to capture a screenshot of that code. First of all, xfce4-screenshooter will only take one screenshot, as it pauses to ask you what you want to do with the screenshot it captured (save, copy to the clipboard, upload it to a cloud service, etc.). Basically, it requires user interaction to save the screenshot. That makes timing the screenshot at the end of the presentation very “iffy,” since you only have ONE chance to capture the code. Yep. One chance. Otherwise, the whole hour you spent attending the webinar is all for nothing. So, I needed a way to take a series of screenshots at the end of the presentation, over a specified amount of time at regularly spaced intervals, to help make sure I was able to capture the code. What I needed was something that would automatically (controlled by a script) take a series of screenshots at the end of the presentation, and save them to my computer’s hard drive. So, considering my unique “use case,” that meant that I had to write my own script. Nothing I found in my search for a solution even came close to being able to do what I needed. Fortunately, I had previously written a simple countdown timer script, which appeared in the March 2024 issue of The PCLinuxOS Magazine. That script gave me the framework I needed to create a custom bash script to make my delayed screenshot script a reality. I just had to replace the section of that script that sounded an alarm when the countdown timer elapsed with code that took a series of screenshots. So, let’s take a look at the script I came up with. And then, we’ll walk through the script so you can see what’s happening. The only requirements to run the script are to ensure that you have zenity and scrot installed from the PCLinuxOS repository.
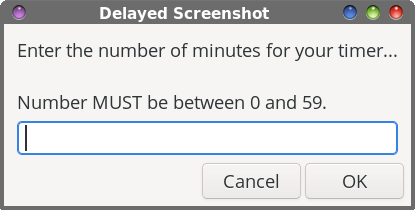
1. #!/bin/bash The first half of the script is lifted, line for line, from my countdown-timer script. It uses zenity dialogs to have the user input the time delay. The user inputs the number of hours ($hrs), which is converted to minutes ($hours). Then, the user inputs the number of minutes. If the input is a number NOT in the range of 0-59, the script displays an error message and exits. But, if the number of minutes is within that range, those minutes are added to $hours (line 34) to get the total time delay, in minutes ($TIME, in line 34). As such, if you need or want a 90-minute delay before taking the screenshot, you cannot just enter 90 minutes. You will have to enter “1” as the number of hours to delay, which gets converted to 60 minutes, and then you enter 30 minutes, which gets added to the total time, to make 90 minutes. 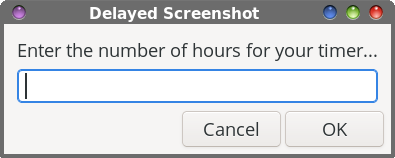
 Meanwhile, we need a place to store our screenshots. In line 23, the script checks to see if the directory ~/Pictures/ScreenCaps/ exists. If it doesn’t already exist, it is created in line 24. Then, in line 26, we issue the “cd” command to set our “working directory” to ~/Pictures/ScreenCaps. We also have to turn off or deactivate the screensaver. I only ever use the “blank screen” feature of xscreensaver. If you don’t turn the screensaver off or deactivate it, the script will dutifully take its screenshots, which will be nothing more than a blank, black screen. Starting with line 30, we set up a while … do loop that runs as long as $TIME is greater than zero. We then sleep for 60 seconds, issue the command to deactivate the screensaver, and then decrease the number of total minutes by one. Once the time has elapsed, we set up a for … do loop to take our screenshots. I have the for loop set up to take 10 screenshots. First, we wait another 30 seconds, and then we issue the command to take the screenshot. I use scrot to take the screenshot, since it was the only utility I found that automatically saved the screenshot without user interaction. The “-z” parameter tells scrot to take those screenshots silently. Without it, it makes a VERY annoying sound to signify that it’s taking a screenshot. I also use the “--quality 10” parameter to set the quality of the images very low. I’m not going to be publishing these images. Instead, I only need to be able to read them. Without the “--quality 10” parameter, all 10 images take up over 6 MiB of disk space. With the use of the “--quality 10” parameter (coupled with forcing scrot to save its images as JPG files), all 10 images take up only slightly over 600 KiB of disk space. The '%Y-%m-%d-%H-%M-%S.jpg' parameter sets the file name for the images saved by scrot. The %Y represents the year, %m represents the month, %d represents the day of the month. %H represents the hour, %M the minutes, and %S the seconds. Finally, we tell scrot to save the screenshots as JPG files. Otherwise, scrot would default to PNG files, which are considerably larger than JPG files. The for … do loop executes once every 30 seconds, until 10 screenshots have been captured. So, I have a five-minute window in which to capture my screenshots, evenly spaced out at 30 second intervals. So far, that has worked out perfectly for my needs (which I explained earlier). 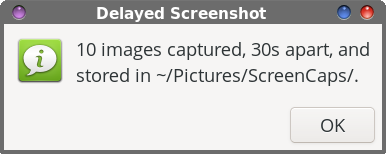 To finish up the script, another Zenity dialog box is displayed after all 10 screenshots have been captured, notifying the user that the script has completed. And then, the script exits.
Like I stated previously, this script has worked out perfectly for my needs. But, being a bash script, you can make alterations to fit your particular scenario. As for command line parameters, this script doesn’t take any. Store the script where you normally save all of your user-level scripts. I have a directory in my /home directory, named /bin, which is also defined in my system’s $PATH statement. So, you can launch the script from a terminal session, or you can make a launcher on your panel that launches the script with one click of your mouse. Most of my webinars start at the top of the hour. Attendees aren’t allowed to log into the webinar until a maximum of 15 minutes prior to the scheduled start time. So, by entering “1” into the hour dialog box, and 10 minutes into the minutes dialog box, I’m able to capture the code at the end of the webinar. That allows my script to capture screenshots at 30 second intervals at the end of the webinar, for the last five minutes of the webinar. That vastly improves my chances of capturing the “almighty code,” versus just a one-chance “stab in the dark” with any other screenshot utility. The script is easy enough to alter, if you so choose. So, if I wanted to, I could change the sleep 30s command in the script (responsible for triggering a screenshot every 30 seconds) to sleep 60s. That simple change will cause the script to take one screenshot every minute, for 10 minutes. If I were to do that, I would change the minutes entered into the minutes dialog to five minutes, which would cause the script to take one screenshot every minute for the last 10 minutes of the webinar. Another change that is super easy to make is to change the quality of the screenshots that scrot takes. Actually, there are two settings you could make. The first is to change “--quality 10” to “--quality 90” if you want a higher resolution image (of course, you can use any number you want/need … I just used “90” as an example). It’s best to think of the number after “quality” as a percentage. Higher numbers result in lower compression and larger file sizes, while lower numbers result in higher compression and smaller file sizes. The second item you can change scrot from saving JPG image files to PNG image files, simply by changing the file extension in the parameter that appears at the end of the definition of the filename. PNG files are inherently sharper (have a higher resolution) than JPG files, simply because PNG files use lossless compression, while JPG files use lossy compression.  The image above is a sample snippet taken from one of my test screenshots, taken with a quality level of 10. As you can see, it’s quite legible, but not anything close to what I would call sharp or high resolution. For shiitake mushrooms and giggles, and to test the script, I set the timer for 8 hours and 0 minutes before I went to bed. I then closed the lid on my laptop, and I proceeded to bed. When I awoke the next morning, I found the script in the process of dutifully taking the screenshots, just as it was instructed. During my testing, I also tried delays of 1 minute, 2 minutes, 5 minutes, 20 minutes, and one hour. All worked exactly as I had hoped, and as I had designed. You can download the script (as presented above … it’s a rather small, 1.2 KiB file) from the magazine website. The script is named “delayed-screenshot.sh.txt.” Save the script where you normally save your scripts, remove the “.txt” file extension, and make the file executable.
I initially created this handy script to fulfill a special need that I had. However, I’m pretty sure that this will also work for many other needs that you might have where you want or need to capture screenshots sometime in the future. Now, finally, I can check the desire for a delayed screenshot utility off of my “wish list.” |