
| Previous
Page |
PCLinuxOS
Magazine |
PCLinuxOS |
Article List |
Disclaimer |
Next Page |
Normalize The Volume Of Your MP3 Files With MP3Gain
|
|
by agmg (Antonis Komis) Introduction I'm pretty sure that most of you have faced the following situation: you have a large collection of MP3 files from different sources (cd's, online purchases etc) but when listening to them, you find out that they play in different volumes, making listening to them pretty annoying. Don't worry, this can be easily fixed with a nice little program called MP3Gain. MP3Gain and how it works MP3Gain is a program that analyzes MP3 files to determine how loud they sound to the human ear. It can then adjust the MP3 files so that they all have the same loudness without any quality loss. This way, you don't have to keep reaching for the volume dial on your MP3 player every time it switches to a new song. MP3Gain is an implementation of ReplayGain, supporting Track mode and Album mode. However, with most other formats, the necessary loudness adjustment of ReplayGain is stored as metadata, thus leaving the encoded results alone. With MP3Gain, the loudness adjustment is done on the data itself, albeit in a lossless/reversible way. Another difference with MP3Gain is the fact that it can only adjust physical volume in 1.5 dB steps. Here's the technical reason on why it's lossless (despite operating on the data itself), and also why the smallest change possible is 1.5 dB: The MP3 format stores the sound information in small chunks called "frames". Each frame represents a fraction of a second of sound. In each frame there is a "global gain" field. This field holds an 8-bit integer which can represent values from 0 to 255. When an MP3 player decodes the sound in the frame, it uses the global gain field to multiply the decoded sound samples by 2^(gain/4).
The way MP3Gain works actually has a very strong benefit. Since it is the data itself that is modified, MP3Gain does not require special support from players. ReplayGain is a proposed standard published by David Robinson in 2001 to measure the perceived loudness of audio in computer audio formats, such as MP3 and Ogg Vorbis. It allows players to normalize loudness for individual tracks or albums. This avoids the common problem of having to manually adjust volume levels between tracks when playing audio files from albums that have been mastered at different loudnesses. ReplayGain is now supported in a large number of media players and portable media players and digital audio players. Although the standard is now formally known as ReplayGain, it was originally known as Replay Gain and is sometimes abbreviated RG. You can find more information about ReplayGain and how it actually works, from the official website: http://www.replaygain.org/ Most popular audio players available in Linux, such as Amarok, Banshee, Clementine, Audacious, VLC, XBMC and many more, support ReplayGain, either natively or with the use of plug-ins. So, you can enable ReplayGain while listening to your music with such a player and have all your files play in the same volume. But if you want to listen your files using players that do not support ReplayGain, or if you just want to permanently adjust the audio level of all your MP3 files, then MP3Gain is the tool for the job. MP3Gain can be used either from the terminal, or by using a nice GUI called EasyMP3Gain, which is available in the PCLinuxOS repositories. I will explain both methods so you can choose the one that suits you better. Install MP3Gain and prepare your mp3 files First of all, you need to install MP3Gain and, optionally, its GUI, EasyMP3Gain. Open up Synaptic Package Manager, hit "Reload" and then search for "mp3gain". 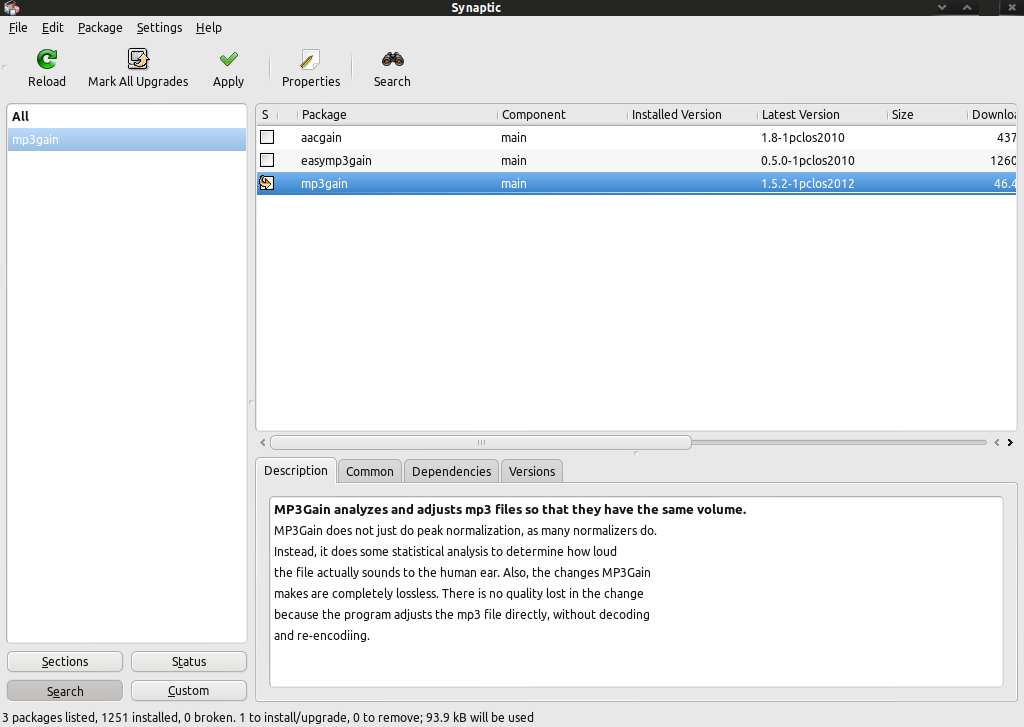 Select the package "mp3gain" for installation. If you select "easymp3gain" for installation, then "mp3gain", "aacgain" and "vorbisgain" will be marked for installation, too. Next, we need a folder containing MP3 files to work with. Although the changes MP3Gain makes to the files are reversible, I suggest you work on a test folder, at least at first. When you have become familiar with the use of mp3gain and have tested it on a couple of your MP3 files, you can then use it on a larger scale. I will use the folder "Music," which is located in my personal folder (/home/agmg/Music). In this folder, I have four MP3 files with names test01.mp3, test02.mp3, test03.mp3 and test04.mp3. I will use those files to demonstrate the operation of MP3Gain. Using MP3Gain from the terminal.
Open your favourite terminal emulator and navigate to the folder where your MP3 files are located. In my example, it's /home/agmg/Music. [agmg@localhost ~]$ cd /home/agmg/Music [agmg@localhost Music]$ Or: [agmg@localhost ~]$ cd ~/Music [agmg@localhost Music]$ Let's see what's inside that folder: [agmg@localhost Music]$ ls -l total 26944 -rwxrwx--- 1 agmg agmg 9204417 Jul 13 2012 test01.mp3* -rwxrwx--- 1 agmg agmg 4366398 Jul 13 2012 test02.mp3* -rwxrwx--- 1 agmg agmg 4842479 Jul 22 2012 test03.mp3* -rwxrwx--- 1 agmg agmg 9164943 Jul 14 2012 test04.mp3* [agmg@localhost Music]$
The syntax for MP3Gain is: mp3gain [options] You can issue the command mp3gain -? to view a list of all available options. We will discuss all options right away, but first, let me explain the difference between Track Gain and Album Gain. Track gain: applies gain to separate tracks (MP3 files) so they all sound equally during playback. The default volume in mp3gain is 89dB but can be manually set to higher or lower values, using 1.5dB steps (as explained earlier). Use this option if you want all your MP3 files to have the same volume when played. Best option when creating custom playlists containing MP3 files from different sources. Album gain: applies a single gain change to all files, so their loudness relative to each other remains unchanged but the average album loudness is normalized. In album gain analysis, an additional peak-value and gain-value, which will be shared by the whole album, is calculated. Use this option if you want your albums to sound equally loud with different tracks having different loudness. Best when listening to a whole album where all files come from the same source. Running MP3Gain with no options on certain MP3 files will perform an analysis of the files selected. Let's see it in action: [agmg@localhost Music]$ mp3gain *.mp3 test01.mp3 Recommended "Track" dB change: -3.175000 Recommended "Track" mp3 gain change: -2 Max PCM sample at current gain: 20603.994112 Max mp3 global gain field: 184 Min mp3 global gain field: 120 test02.mp3 Recommended "Track" dB change: -7.410000 Recommended "Track" mp3 gain change: -5 Max PCM sample at current gain: 40663.547904 Max mp3 global gain field: 255 Min mp3 global gain field: 146 test03.mp3 Recommended "Track" dB change: -2.845000 Recommended "Track" mp3 gain change: -2 Max PCM sample at current gain: 19178.061824 Max mp3 global gain field: 206 Min mp3 global gain field: 108 test04.mp3 Recommended "Track" dB change: -11.685000 Recommended "Track" mp3 gain change: -8 Max PCM sample at current gain: 54804.119552 Max mp3 global gain field: 213 Min mp3 global gain field: 28 Recommended "Album" dB change for all files: -10.450000 Recommended "Album" mp3 gain change for all files: -7 I have selected MP3Gain to analyze all MP3 files inside the "Music" folder by using the * wildcard. I got back the results of this analysis and the proposed gain for each track and for the whole album. Recommended "Track" dB change represents the difference between the track's volume and the default volume of MP3Gain in dB (MP3Gain's default volume is set at 89dB). Recommended "Track" mp3 gain change represents the gain that should be applied to the track so it reaches the default volume. MP3Gain applies volume gains in steps of 1.5dB, so a track gain of -2 would lower the track volume by 3dB. Recommended "Album" dB change for all files represents the difference between album's average volume and the default album volume set in MP3Gain (89dB). Recommended "Album" mp3 gain change for all files represents the single gain that should be applied to every track of the same album (same folder) so that the whole album's volume is normalized (according to mp3gain's default album volume) while maintaining the volume difference between tracks. Let's see an analysis of the first file:
[agmg@localhost Music]$ mp3gain test01.mp3

test01.mp3

Recommended "Track" dB change: -3.175000

Recommended "Track" mp3 gain change: -2

Max PCM sample at current gain: 20603.994112

Max mp3 global gain field: 184

Min mp3 global gain field: 120


Recommended "Album" dB change for all files: -10.450000

Recommended "Album" mp3 gain change for all files: -7
Issuing the command mp3gain test01.mp3 will not analyze the file again since it's already been analyzed the first time we issued the command (for all files) and the program has written a tag containing the results of the analysis. The command then reads that tag and gives back those results. The tag is modified every time MP3Gain makes changes to reflect the previous and the current status of the file and enables us to reverse those changes. If you want to re-analyze the file, you must use the -s r option. You will see that the program recalculates the volume of the file. The -s option has many more parameters that are related to tag handling:
-s c only check stored tag info (no other processing) Now, let's have a closer look at the results: Recommended "Track" dB change is -3.175000. This means that the actual volume of the track is 89 + 3.175 = 92.175 dB. So, we must apply a track gain of 2 (2 x 1.5 dB) if we want the track to go close to 89 dB. The fact that MP3Gain only increases or decreases the volume in steps of 1.5 dB, suggests that we can't have the exact set volume but a very close value. Let's apply the recommended track gain to the file: [agmg@localhost Music]$ mp3gain -r test01.mp3 test01.mp3 Applying mp3 gain change of -2 to test01.mp3... and see the results: [agmg@localhost Music]$ mp3gain test01.mp3 test01.mp3 Recommended "Track" dB change: -0.170000 Recommended "Track" mp3 gain change: 0 Max PCM sample at current gain: 14569.242624 Max mp3 global gain field: 182 Min mp3 global gain field: 118 Recommended "Album" dB change for all files: -0.170000 Recommended "Album" mp3 gain change for all files: 0 In the next example, I will increase the volume of my file to a value higher than the default 89 dB, lets say to 95 dB. The difference is 6 dB: [agmg@localhost Music]$ mp3gain -d 6 -r test01.mp3 test01.mp3 Applying mp3 gain change of 4 to test01.mp3... MP3Gain applied a gain of 4 to increase the volume of the file by 6 dB. The -d switch modifies suggested dB gain by floating-point set afterwards.
There is one more switch which modifies the suggested mp3 gain. The switch is -m followed by an integer number. [agmg@localhost Music]$ mp3gain test02.mp3 test02.mp3 Recommended "Track" dB change: -7.410000 Recommended "Track" mp3 gain change: -5 Max PCM sample at current gain: 40663.547904 Max mp3 global gain field: 255 Min mp3 global gain field: 146 Recommended "Album" dB change for all files: -10.450000 Recommended "Album" mp3 gain change for all files: -7
The suggested mp3 gain for this file is -5. [agmg@localhost Music]$ mp3gain -m 2 -r test02.mp3 test02.mp3 Applying mp3 gain change of -3 to test02.mp3... Now I want to show you something else. Let's use another file: [agmg@localhost Music]$ mp3gain test03.mp3 test03.mp3 Recommended "Track" dB change: -2.845000 Recommended "Track" mp3 gain change: -2 Max PCM sample at current gain: 19178.061824 Max mp3 global gain field: 206 Min mp3 global gain field: 108 Recommended "Album" dB change for all files: -10.450000 Recommended "Album" mp3 gain change for all files: -7 So, the volume of this file is 89 + 2.845 = 91.845dB I will try to increase the volume of the file by a large amount, lets say 12 dB. The file's volume is already around 3dB higher than the default. So the gain that the program will apply is: 12 ÷ 1.5 -2 = 6. Let's see:
[agmg@localhost Music]$ mp3gain -d 12 -r test03.mp3

test03.mp3


WARNING: test03.mp3 may clip with mp3 gain change 6

Make change? [y/n]:
What's this warning? What is clipping? In a real world situation, if you push a speaker beyond its capabilities, then the audio from it will be clipped -- this is sometimes referred to as overloading. This happens because there is a limit to the amount of power supplying the amplifier inside the speaker -- if the requirements go beyond this then the amplifier will clip the input signal. In this circumstance, instead of a smooth sine wave being produced for normal audio, a square waveform (clipped) will be outputted by the amplifier resulting in sound distortion. 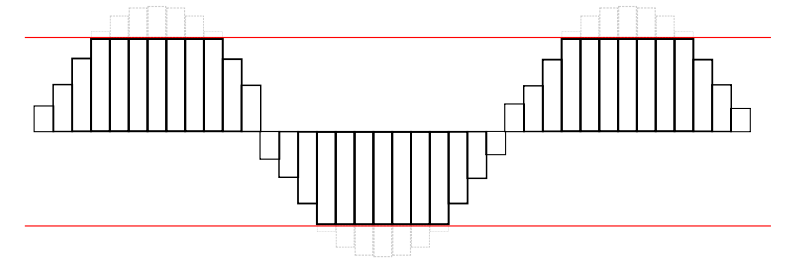 Similarly in digital audio, there is also a limit on how far an input sound can be represented. If the amplitude of a signal goes beyond a digital system's limits then the rest of it will be discarded. This is particularly bad in digital audio as a large amount of definition can be lost through audio clipping.
So how can we handle clipping? We have two options: [agmg@localhost Music]$ mp3gain -d 12 -r -k test03.mp3 test03.mp3 Applying auto-clipped mp3 gain change of 3 to test03.mp3 (Original suggested gain was 6) Applying mp3 gain change of 3 to test03.mp3... The program lowered the track gain by 3 so that the audio will not be clipped.
Same options discussed so far, apply also when using the program in Album gain mode. [agmg@localhost Music]$ mp3gain test02.mp3 test03.mp3 test02.mp3 Recommended "Track" dB change: -2.890000 Recommended "Track" mp3 gain change: -2 Max PCM sample at current gain: 24178.698469 Max mp3 global gain field: 252 Min mp3 global gain field: 143 test03.mp3 Recommended "Track" dB change: -7.360000 Recommended "Track" mp3 gain change: -5 Max PCM sample at current gain: 32253.529587 Max mp3 global gain field: 209 Min mp3 global gain field: 111 Recommended "Album" dB change for all files: -6.100000 Recommended "Album" mp3 gain change for all files: -4 Let's apply the recommended Album gain using the -a switch: [agmg@localhost Music]$ mp3gain -a test02.mp3 test03.mp3 test02.mp3 test03.mp3 Applying mp3 gain change of -4 to test02.mp3... Applying mp3 gain change of -4 to test03.mp3... Off course, we can modify the mp3 or dB gain, like we did in Track gain mode: [agmg@localhost Music]$ mp3gain -d -2 -a test02.mp3 test03.mp3 test02.mp3 test03.mp3 Applying mp3 gain change of -1 to test02.mp3... Applying mp3 gain change of -1 to test03.mp3... [agmg@localhost Music]$ mp3gain -m 4 -a test02.mp3 test03.mp3 test02.mp3 test03.mp3 Applying mp3 gain change of 5 to test02.mp3... Applying mp3 gain change of 5 to test03.mp3... There are a few more switches that can be used with the command line version of MP3gain, although we have covered the most important ones. You can view a full list of all MP3Gain options by issuing the command mp3gain -?
I will also list here those not covered extensively for your convenience: Using MP3Gain from the GUI (EasyMP3Gain). Let's begin with a presentation of the GUI and a short explanation of the program's options. This is the main EasyMP3Gain window: 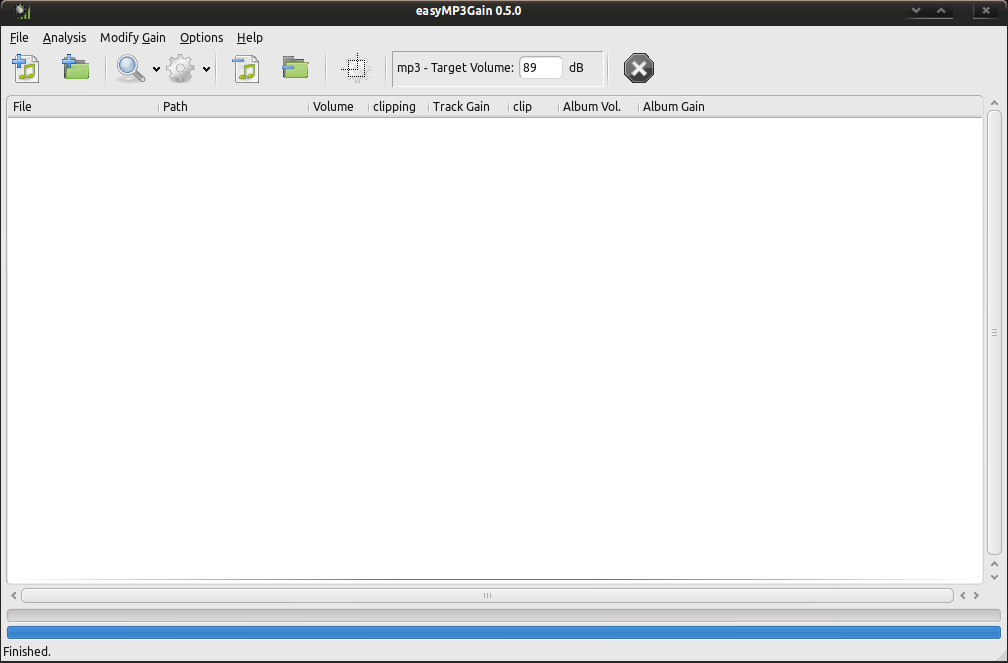 Let's add some files in our list:  Add file(s) or File -> Add Files to add single file(s). Add file(s) or File -> Add Files to add single file(s). Add folder(s) or File -> Add Folder to add a whole folder. Add folder(s) or File -> Add Folder to add a whole folder.I have added my /home/agmg/Music folder, containing a new set of mp3 files:  These files have no gain information on them so, first thing we should do is scan them.  This button has two options: Track Analysis and Album Analysis (default). This button has two options: Track Analysis and Album Analysis (default).
Track Analysis: If you have queued up a selection of unrelated MP3 songs that are not part of a complete album then you can simply click on the Track Analysis button. Doing this will examine each MP3 file in the list and calculate the replay gain value based on the target volume setting (default is 89 dB).   Let's have a look at the next button:  Similar to the previous button, this one also has two options: Apply Track Gain and Apply Album Gain. Similar to the previous button, this one also has two options: Apply Track Gain and Apply Album Gain.Once again, let's see the differences. First screenshot shows the same MP3 files after applying Track Gain and the second, after applying Album Gain. 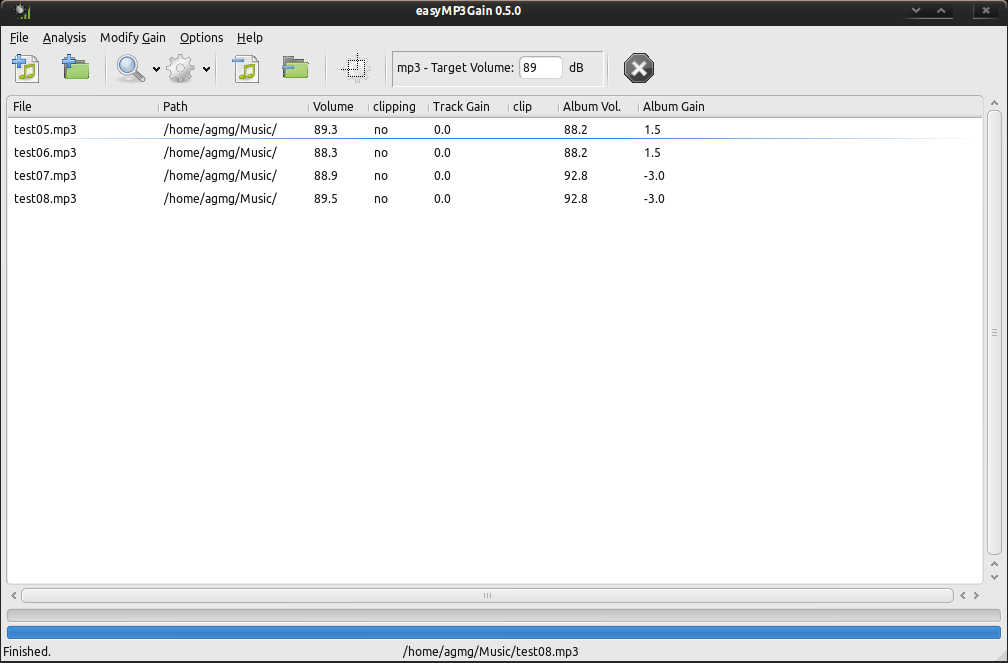  In the first case, I applied Track Gain after performing a Track Analysis on my MP3 files. The result is that all files now have the same volume (89dB). In the second case, I applied Album Gain after performing an Album Analysis. The result is that all tracks of the Album have the same average volume, while maintaining the relative difference between them. Let's move on to the next buttons:  This button removes the selected file(s) from the list. This button removes the selected file(s) from the list. This button removes all files from the list. This button removes all files from the list. This button instructs the program to process only the selected file(s). This button instructs the program to process only the selected file(s). Here you can change the default volume. Here you can change the default volume. This buttons stops current operations (will turn red when program is busy). This buttons stops current operations (will turn red when program is busy).Now, let's go through EasyMP3Gain's menus and have a look at the additional options: 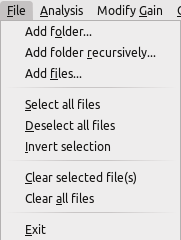 Add folder recursively will add a folder and the file it contains, including all subfolders. 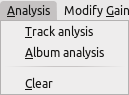 Selecting Clear will remove all analysis results from the list. 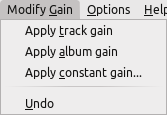
Apply constant gain will apply a fixed gain to all files, regardless their volumes. 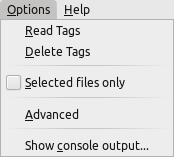
Read Tags tells the program to read the tags written during a previous analysis. Selected files only will apply changes only to the files you have selected. Show console output will open up a new window showing console messages generated by the mp3gain backend. Let's have a look under the Advanced options: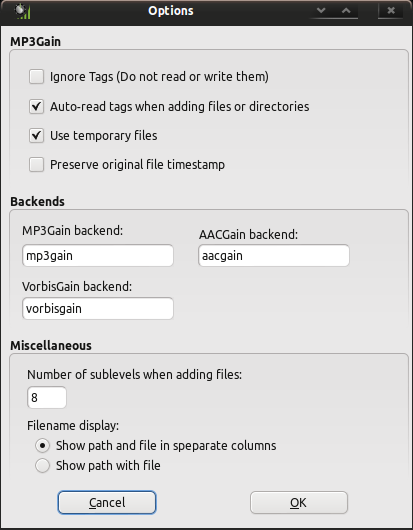 Ignore Tags tells MP3gain to not read or write any tags on the file. Note: If you choose the "Ignore Tags" option, then you will not be able to automatically undo changes made by MP3Gain. You will still be able to undo any changes, but you will have to manually keep track of what changes you make to your files. Auto-read tags when adding files or directories: if this options is unchecked, you have to hit the Analyze button to display gain information stored in tags during a previous analysis. Use temporary files will instruct MP3Gain to write modified data to temp file, then delete original instead of modifying bytes in original file. Preserve original timestamp: check this option if you want the original file timestamp to be untouched. The option Number of sublevels when adding files alters the behaviour of the Add folders recursively command. It specifies the number of folders underneath the initial one that MP3Gain will look into when adding files. As you can see from the above window, EasyMP3Gain also supports aac and ogg-vorbis files through the command-line backends aacgain and vorbisgain (which are also installed automatically when installing EasyMP3Gain). If you want to view the options of those two backends, you can issue the following commands in terminal:
aacgain --help (for aacgain options) Conclusion While using MP3Gain with a GUI is a lot more easier, there may be times when the command-line version is more useful. You could create a bash script that will automatically search and apply the options you specify to several of your MP3 files or albums without needing your attention. An example using the find command: find /home/agmg/Music -iname "*.mp3" -exec mp3gain -d 4 -r {} +; This command will search for every MP3 file inside the /home/agmg/Music directory and will apply a track gain (-r switch) by modifying the default volume by 4dB. You can find more information about MP3Gain on the official website, at: http://mp3gain.sourceforge.net/. |