| Previous
Page |
PCLinuxOS
Magazine |
PCLinuxOS |
Article List |
Disclaimer |
Next Page |
Repo Review: A Detailed Look At Grsync |
|
by kalwisti (David Pardue)
This article was inspired by a simple Grsync tutorial which was originally written by Iain Jackson for the August 2007 issue of our community magazine, and updated by Paul Arnote in November 2009. To commemorate the holiday, I decided to “refresh” these articles by covering Grsync in more detail and discussing a few aspects of the program that confused me at first. Texstar has frequently recommended that users should follow a two-pronged backup strategy: Timeshift to take care of the operating system files (i.e., everything except for your /home directory) and another backup utility — such as Grsync, Back In Time or luckyBackup — for your personal data (i.e., documents, pictures, music, videos). I personally use Grsync on my PCLinuxOS Xfce system and Back In Time on my LXQt machine. I have never tried the Qt-based luckyBackup, but I have read favorable comments about it. (luckyBackup's last stable release [ver. 0.5.0] dates from 2018; while development is “almost frozen”, the program is still supported by its developer). You might be wondering … “Why do I need two different backup applications? Why can't I just use Timeshift for everything?” If you use a single solution such as Timeshift, when you need to restore your system (after a borked upgrade, for instance), Timeshift will also overwrite your documents to a previous / earlier state — something you definitely want to avoid. However, if you have separate backups for your OS and your personal files, you can just have Timeshift revert to a previous working state without affecting your current documents.  Grsync (short for “Gnome-Rsync”) is a GUI for the command-line rsync utility. Although rsync is very powerful, it uses a complex set of arguments that can be overwhelming for the average user. Grsync makes use of the GTK toolkit and can run under Xfce, MATE and GNOME as well as Qt desktop environments (KDE, LXQt). Its primary developer, Piero Orsoni, believed that a graphical user interface would provide more opportunity for interaction with rsync by creating visual markers — including checkboxes, transfer processing visuals, and text entries. Grsync is a mature, robust program. It was initially released in December 2005 and is FOSS (licensed under the GPL). We have the most recent version, 1.3.1, available in the PCLinuxOS repositories. Orsoni's work has been recognized for its quality. Linux Journal awarded Grsync the Editors' Choice Award in January 2013.
Before using Grsync to back up your /home directory, you will need to decide which file system to use on your destination/target drive. For backing up an entire directory, it is better to format your backup medium with a native Linux file system, such as ext4. ext4 is suitable for both internal and removable drives. This helps ensure that things such as permissions, groups, time stamps and such are preserved. The ext4 file system also has journaling, which means that if your device is unplugged prematurely, there is more of a chance that the damaged filesystem can be recovered. When using an ext4 file system across multiple computers, however, one issue to keep in mind is permissions. If the different computers do not have the same set of users with the same UIDs (User IDs), the ownership will be wrong. Linux does not care about your user name when deciding who owns files. Instead, it pays attention to the file's numeric User ID instead. As a hypothetical example, let's say your User ID is 1000 on one computer, and 1001 on another PC. If you create files on your external drive on the first machine, those files will be owned by user 1000 — which is you. When you plug the drive into the other computer, those files are not owned by you any longer since you are User 1001 on that second machine. Instead, the files belong to User 1000 (who is someone else).
The solution: Check your User ID and coordinate User IDs between your computers. You can easily determine your UID by typing this command in a Terminal: If you are the sole user on your PCLinuxOS computer, this command should return a value of “1000”. Typically, the User ID created for users on Linux systems now starts from 1000. So, a user with UID 1000 is the first normal user (non-root user) created on the system. (I checked my Linux boxes and this was true with Mint 22.1, Debian 12 Bookworm and Slackware 15.0). If necessary, you should be able to change User IDs using the usermod command. If you choose ext4 as your file system, you can format your backup drive with GParted or with PCLinuxOS's own utility, ddCopy. (Look under the program's Format USB Device tab.) 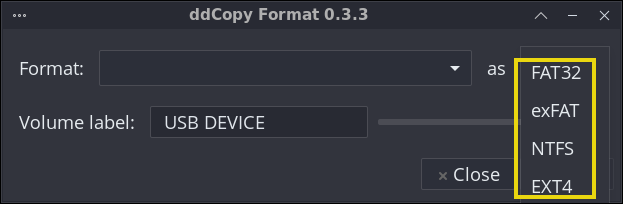 If you wish, you can instruct GParted to set a name for the USB backup partition (“Backups” for example). FAT32 However, if you need a backup device with broader compatibility — meaning that it can plug into any computer at any time, then FAT32 is an option. Most USB flash drives come with FAT (File Allocation Table) as the default file system. FAT32 is the “lowest common denominator” which also allows you to share files with Windows PCs or macOS. Be aware, though, that FAT32 can only store files smaller than 4 GB; it lacks journaling and does not support file attributes such as permissions.
Once you have prepared / formatted your backup drive and have installed Grsync via the Synaptic Package Manager, you are ready to begin using Grsync. Grsync has a compact UI that displays multiple elements: a Profile bar (outlined in red); an “Action” area (outlined in blue); the Source and Destination area (outlined in green); and three Tabs with different options (outlined in purple): 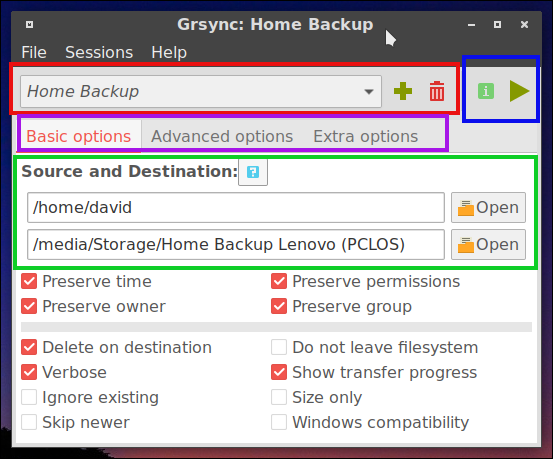 The “Basic options” tab (shown above) displays when Grsync is started. Clicking on the “Advanced options” tab will bring it forward. (I will discuss the various options in more detail, as I walk through the backup process.)  Below is a screenshot of the “Extra options” tab: 
By default, the Profile Bar shows a Backup Session called “default” (since it does not know how you plan to structure your backup). Clicking on the plus sign/icon (+) will create a new backup session that you can customize to suit your needs, and save it as a Profile. (This allows you to quickly run the same backup routine in the future.) Each Profile has its own settings, and you may create as many profiles as you wish. For example, you can create one profile to back up your entire /home directory, another profile to back up just your photographs and yet another profile for backing up your digital music. For simplicity's sake, I will assume that you intend to back up your entire /home directory. Click on the plus sign (+) to add a new session and type in a session name like “Home Backup”.
Next, you must add your Source and Destination directories. There are two boxes in the middle of the Grsync UI. The top box is the Source — this is where your files currently are. The bottom box is the Destination — where you want your files backed up to.  If you wish to back up to a removable medium such as a USB flash drive or external USB drive, insert it now. Wait a moment until PCLinuxOS detects the drive and mounts it. It is a good idea to create a new directory on your removable disk to store the backup files. You may name it whatever you like. I use the directory name “PCLOS 2024.04 Xfce” (since I use this same flash drive to back up the /home files from my Debian Bookworm system and my Mint 22.1 system). Click on the Open button beside the Source box. This should take you straight to your /home directory. Just click on Open to select it. Click on the Open button next to the Destination box. Your removable drive should appear as an entry in the left-hand margin of the file manager dialog, for easy access. Click on the removable drive entry to select it, then click on your desired backup folder before choosing the Open button. 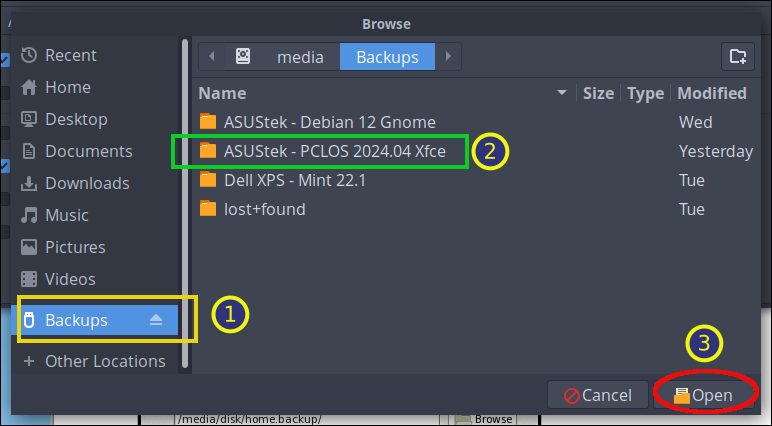
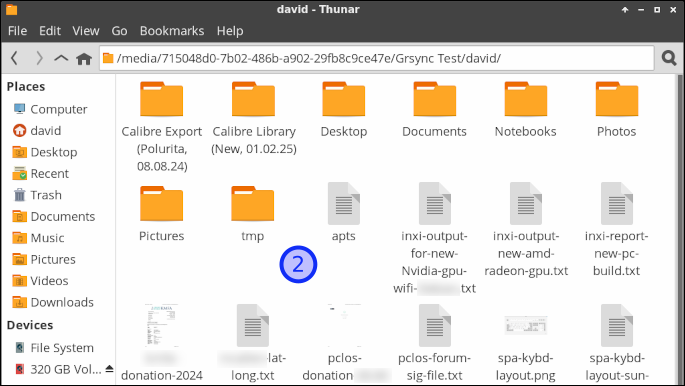
I must digress for a moment to discuss a confusing aspect of Grsync: the presence — or absence — of a trailing slash on the Source directory. I struggled to understand this correctly (and it still trips me up on occasion). The reason that Grysnc cares about this is because rsync is running under the hood, and rsync is persnickety about the trailing slash in the Source (directory) argument. Two concrete examples will hopefully demonstrate the use of the trailing slash when copying your /home directory. In the scenario below, the trailing slash is omitted from the Source directory (/home/david) which will be copied: 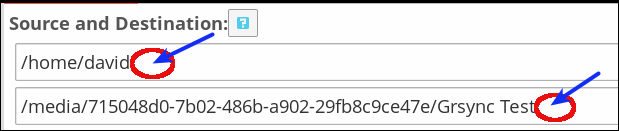 The result of this setting will be that Grsync copies the Source directory (/david) to the Destination. Another way of phrasing this, is that Grsync will copy the Source directory itself [Screenshot 1] and all its contents (subdirectories) [Screenshot 2]: 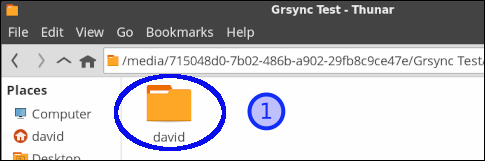
 In our second scenario below, the trailing slash is added to the Source directory (/home/david) which will be copied:  The presence of the trailing slash instructs rsync to avoid creating an additional directory level at the Destination drive. The result is that (G)rsync will not add “david” as a parent directory, but it will copy all of david's subdirectories with their contents: 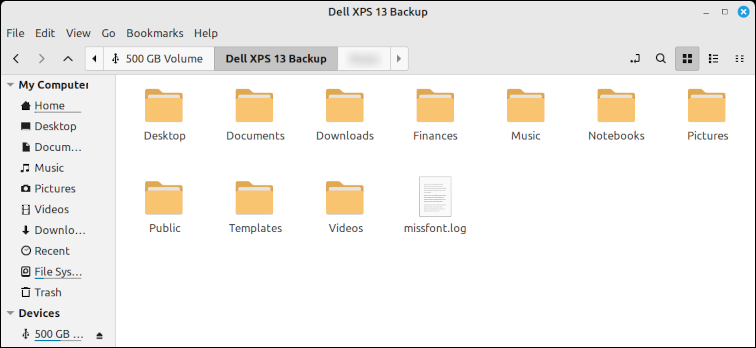 My takeaway is:
The trailing slash's behavior is not a life-or-death situation. Grsync will back up your files regardless of how you handle the trailing slash. However, you can better achieve your intended backup result if you understand how the trailing slash functions. I recommend that you make some practice backups, using different options, to gain confidence using Grsync.
Now it's time to examine some of Grsync's Basic options — and change them, if you wish. 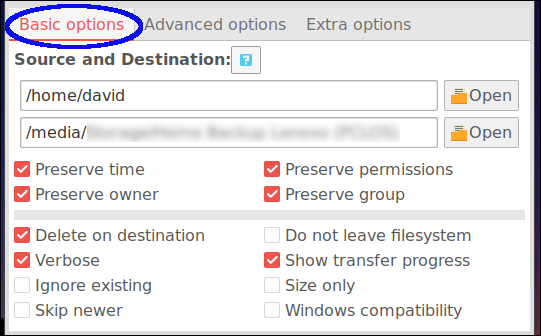 Preserve owner/permissions/group: This is optional if you are just backing up your /home directory (or a specific folder with some of your data files). Selecting just the “Preserve time” option is sufficient. However, it will not be harmful to select these options during a backup, so I check/tick them. If you are backing up multiple user accounts' files, it is important to select these options — since the other users have different permissions than you. Delete on destination (Optional): Selecting this option ensures that you will not end up with any old files in your backup that do not exist in your /home directory. If you delete a file from your /home folder and then perform a backup, Grsync will also delete that file on the Destination. Verbose: This is selected by default. It instructs Grsync to show more information when you perform a dry-run prior to your actual backup. Show transfer progress: This is selected by default. It tells Grsync to display a progress bar during the transfer/backup process. Skip newer (Optional): If you have newer files in the Destination compared to the Source, those files will not be updated. Windows compatibility (Optional): If selected, this provides a workaround for a Windows FAT file system limitation. The copy will be made such that Linux files will be compatible with the NTFS file system.
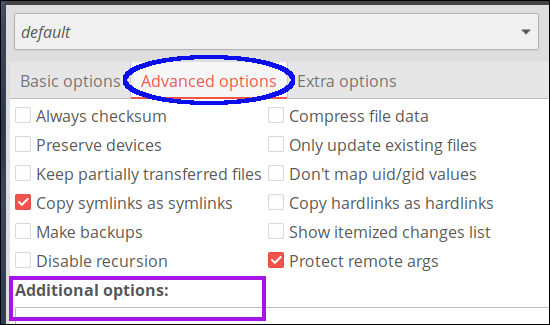 Although there are numerous options listed, I believe that you will likely deal with just three of them in ordinary use. Copy symlinks as symlinks: This means that if there are any links to files, only the link, rather than the file itself, is copied over. I recommend that you select this option. Protect remote args: This is selected by default, so I leave it as is. If you hover your mouse cursor over the option, a tooltip with a geeky explanation (which is beyond my understanding) will display. Additional options: In this box, you may type additional commands to pass to rsync. This is useful if you wish to exclude specific folders from your backup. I will provide examples of the “--exclude” command shortly.
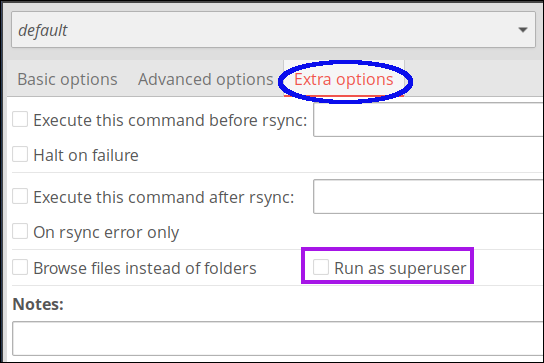 Run as superuser (Optional): You do not need to select this option if you are only backing up your personal files/folders. However, if you are backing up multiple user accounts' files, you should check/tick it. If you select this option, Grsync will prompt you to authenticate with root credentials before you can create the backup.
After creating a Backup Session, specifying your Source and Destination, and choosing your desired options, it is finally time to perform the backup. One of Grsync's most useful features is its Simulation mode (also known as a “dry run” mode). The dry run is a safety feature that shows what will be copied over to your Destination — without actually doing it. This is a great way to test your session and tweak the backup parameters without the risk of destroying your data. The Simulation icon is located in the “Action” area of the toolbar (upper-right corner):  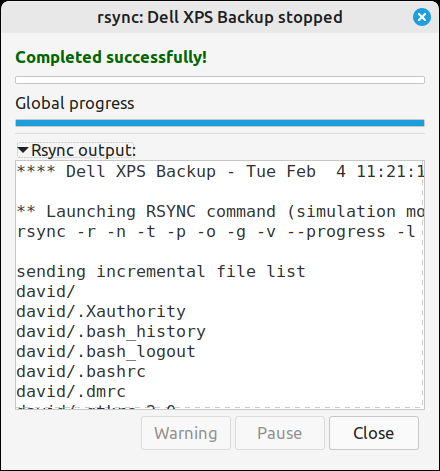 When you are satisfied that all the correct files are being either deleted or copied, click on the Make a Full Run/Go icon in the toolbar:  The first time you run the sync it may take a while, as it has to transfer all your data. The exact time will depend upon the amount of data you are copying and the speed of your computer. It might take 5–10 minutes to transfer your /home the first time out — longer if you have many large files such as music or video files. Subsequent syncs will be much quicker (perhaps 30 seconds) as Grsync only sends new or updated files for backup. Grsync's incremental backup process gives it a significant advantage over a manual backup. There is no substitute for seeing this feature in action, to fully appreciate it. The Linux for Seniors video tutorial on Grsync demonstrates incremental backup from minute 11:57 until 13:45 and from minute 14:01 until 17:58. Grsync offers yet another advantage: it makes an exact copy of your Source files in your selected Destination. Your files are directly accessible. There is no need to access them via Grsync itself. In other words, you can open/copy/move your files without having to use Grsync. If you need to restore from a backup created with Grsync, you can either use its Restore function (under the File menu > choose Switch source with destination), or you can open the storage device with your DE's file manager, and manually copy the files that you want.
You may exclude directories/folders from your backup, if you wish. Under the Advanced options tab, there is a box labeled “Additional options.” It is a free-text field that allows you to specify extra options not listed in Grsync's GUI. The “--exclude” option of rsync will exclude directories that you decide to omit from your backup, such as the Downloads folder (where I often store bulky Linux ISO files which can be re-downloaded if necessary), the Eqonomize folder (an AppImage) and the large virtual machines directory: 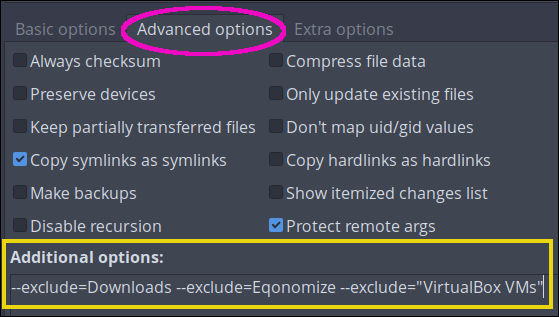 If your directory name has spaces, remember to enclose it within quotation marks. (Single quotation marks [ ' ' ] also work fine, based on my testing.) Another handy option is the ability to specify a maximum file size that Grsync will copy, such as the example below, which limits the file size to 500 MB. In other words, anything larger than 500 MB will not be backed up: 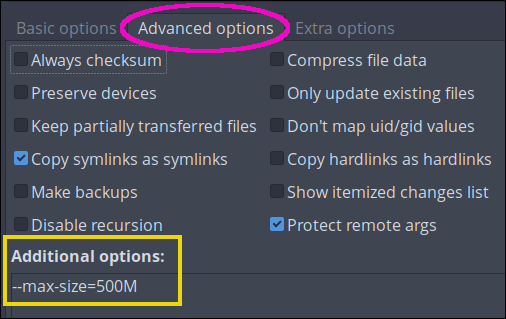 Additional Resources Average Linux User [Vladimir Mikulić]. “Linux Backup with Graphical Programs.” YouTube, 4 Oct. 2017. A clear and concise tutorial. He covers Grsync from minute 1:33 until 12:14. EzeeLinux [Joe Collins]. “Linux Tip: Making Backups with Grsync.” YouTube, 18 Apr. 2015. (16 min., 1 sec.) Linux for Seniors [Thor Hartmannsson]. “Kubuntu — KDE Plasma: Tips Using Grsync for Backups.” YouTube, 2 May 2023. (18 min., 22 sec.) Helpful for its real-time demonstration of incremental backup, from minute 11:57 until 13:45 and 14:01 until 17:58.
Grsync is a wonderful tool for helping you establish a backup routine. According to World Backup Day's website and other online sources, losing your files is a common occurrence. Considering that millions of computers will fail this year or be infected with malware, and that some people have never made an effort to back up, it's not a question of “if” you're going to lose your data, but “when.” Give yourself some peace of mind by creating a backup with Grsync on March 31st and making a resolution to back up regularly. Ideally, you should follow the “3-2-1” Backup Rule to ensure that your data is protected. |