| Previous
Page |
PCLinuxOS
Magazine |
PCLinuxOS |
Article List |
Disclaimer |
Next Page |
How To Draw Arrows In GIMP 3.0 |
|
by kalwisti (David Pardue)
Shutter has multiple dependencies relying on perl and perl-gtk2; a recent issue with outdated perl and/or perl-gtk packages in PCLinuxOS caused Shutter to be removed/uninstalled. (Texstar wrote in the forum that perl and perl-gtk are broken at the moment and “may be for a while.” Updating the perl-related packages is a daunting task, as more than 3,000 packages would need to be rebuilt.) I realized that it was time for me to learn how to draw arrows in GIMP. The result: This task can be accomplished easily, thanks to the “arrow.scm” script created by programmer_ceds. My tutorial covers how to install this script and use it in GIMP 3.0.4. GIMP 3.0 was released in March 2025, after seven years of effort by developers, artists, and members of the GIMP community. Meemaw provided an overview of this release's new features in the July 2025 issue of our magazine. The Davies Media Design channel on YouTube has an in-depth review of the changes. Version 3.0 runs natively on Wayland, while still continuing to run under X11. 

Davies points out that the API in GIMP 3.0 changed in many places; these changes break most of GIMP's legacy plugins — especially those with inactive development. Although this means inconvenience in the short term, it will improve the development of scripts and plugins for GIMP and will lay the foundation for a new generation of even better plugins. Fortunately for us, the “arrow.scm” script has been updated to be compatible with GIMP 3.0. The script works by using functions that interact with GIMP's internal functions. “arrow.scm” is a modified version of an earlier script by B-Ranger [Berengar Lehr]. (The .scm file extension is for a “Script-Fu” script based on an interpreted programming language called Scheme [which, in turn, is a variation of Lisp].) The screenshot below displays a snippet of the script:  The advantage of this script method is that you can render an arrow to a desired size and position, rather than having to rely on using a pre-configured brush and manipulating its size, angle and other variables before adding it to your image.
First, you need to download the zipped script file [121 KB] from:
In case that URL does not work properly, you may also download the file from my personal Box.com account:
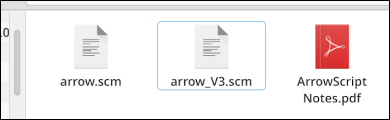
Use your favorite archive manager (Ark, Xarchiver, Engrampa, etc.) to extract the files. You should see three files:
Place the “arrow_V3.scm” file in the appropriate GIMP folder in your /home directory: ~/.config/GIMP/3.0/scripts Important: To avoid potential conflicts, do not copy the “arrow.scm” file into that folder. That script is for legacy versions of GIMP (2.10 and earlier). Make sure to use only “arrow_V3.scm” with GIMP version 3.0.x. Restart GIMP after installing the script.
Make a path for your arrow to follow:
Click on the Paths Tool You will first specify the starting point. Click on the spot where you want the arrow head/pointer to be. Notice that the map pin icon adds directionality to the first node that is created. It indicates the direction that your path is traveling. In the example below, the arrow head will point to the northeast. Next, click to create the ending point/anchor. 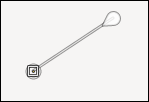 Go to the Tools menu > select Arrow > then choose Arrow. A dialog window will open with various settings. 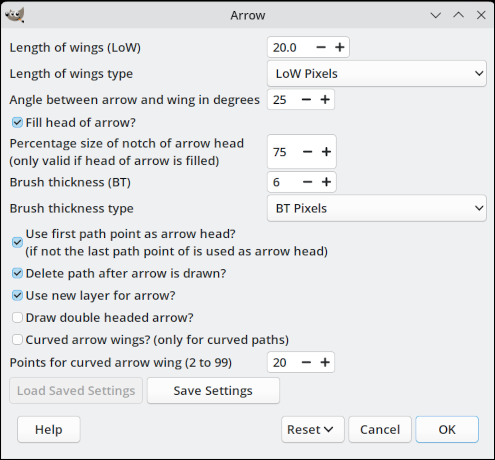 Adjust the variables as you wish. The arrow's color is determined by the setting of the active foreground color in the GIMP toolbox. (The default values are reasonable — in my opinion — and produce attractive arrows.) Note: You can revert your adjustments later, if desired, by choosing “Reset to Initial Values” or “Reset to Factory Defaults”: 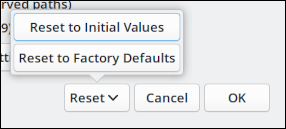 Click the “OK” button in the bottom right corner of the dialog. Voilà! Your arrow will appear. 
Follow the same steps outlined above to create a path. Afterwards, bend the path by clicking and dragging the path. While bending the path, you will see something like the screenshot below: 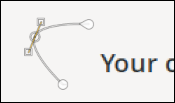 The result after calling the “arrow.scm” script:  The two screenshots below illustrate some of my experiments (with multiple adjustments to the Arrow variables). They will give you an idea of the results that you can achieve: (The blue background textures and the Wilber stamp are standard brushes available to the Paintbrush tool.) 
 Additional Sources The ArrowScriptNotes.pdf (bundled inside the “arrow.zip” file that you downloaded) is worth reading; it has a brief user guide as well as instructions for how to edit the default script values. Since GIMP 3.0 has been released so recently, there are not yet many tutorials on it. So one of the best reference sources is the official User Manual: https://docs.gimp.org/3.0/en The User Manual is available in other languages besides English. At the moment, the most complete translations appear to be in the Romance languages (except for Romanian), the Scandinavian languages, German, Dutch, and Russian. The sections on plugins and scripts contain relevant information.
Despite my initial reluctance to draw arrows with GIMP, I was surprised how easy the task is — thanks to the “arrow.scm” script. Based on my testing, the script works reliably and allows you to control the placement of your arrows, their line thickness as well as the size of the arrow head. If your needs are fairly simple, this script fits the bill; it saves you the trouble of hunting down compatible arrow brush sets or creating your own brush(es). |
 (or just type “B”) to begin creating a path.